Developing an Enterprise Security Model Using JAAS and JBoss
by Brian M. Coyner, Software Engineer
July 2002
Introduction
Securing access to enterprise resources is critical to any Java 2 Platform Enterprise Edition (J2EE) application. Any project that has security requirements (and what project doesn't) should immediately begin to design the security infrastructure and prepare to refactor as the project matures. This article will help shine some light on some of the most important aspects of developing and implementing an enterprise security framework.
The first section focuses on laying the foundation for our secure, enterprise Java application. We will start by looking at how to design an environment of users and roles that is well suited for any size enterprise application.
The second section focuses on the Java Authentication and Authorization Service (JAAS). JAAS provides a framework that allows for pluggable authentication and authorization technologies.
The third section focuses on configuring and deploying our application to JBoss, which is an open-source J2EE server. We will configure JBoss to use an implementation of the Secure Remote Password (SRP) authentication technology to authenticate users with the server.
The Product
This article's application will make use of a fictional online e-commerce store. This store will have a catalog full of fabulous merchandise that customers will be able to view and purchase. Along with the online storefront is an entire back office of managers and administration staff. These people are responsible for ensuring that the site is successful. Of course we are not going to actually develop a full-blown online store, but rather just use some of the concepts to help motivate the article. Please refer to Resources for information on how to download and run the sample application.
Here are a few high level requirements:
- Allow only company managers to view reports on:
- Current inventory
- Customer demographics and purchase habits
- Allow customers to search and purchase items from the company's online catalog.
- Allow administrators to manage users and roles.
These requirements are simple, but will help motivate the concepts needed to successfully master the art of enterprise security.
The Security Model
One of the first steps taken when designing a security framework is to think of the business functionality or business functions that your system will need in order to work. A business function may be a task to add new items to an online catalog or update customer account information. A business function may also be a logical grouping of tasks executed within a single atomic transaction.
We know that enterprise systems need the concept of a user. When you log into your personal computer (PC) at work you are logging in as a user. When you access your email account you do so as a user. So, a user is defined as a single entity that is trying to access a resource. We will see in the next section how a user is fits into the JAAS framework.
Users typically have certain privileges. At work you probably do not have access to accounting information, but the accounting staff and president will. And, the accounting staff probably does not have access to the source-code repository where your projects are stored. We can think of this as users that have roles.
A role can be described as a way to logically control access to a single business function. So, what does that mean? Let's think back to the requirements. We know that we need to allow managers the ability to view information on users' buying habits. To satisfy this requirement we would say that a user would need the role of 'ViewUserStatistics'. This role name is arbitrary. We could have called it 'TheSunIsBright', but that would not be very descriptive. The same steps should be repeated for all business functions in your application. But, how far should you go? Should each method in your application define its own role? Should each class define its own role? The goal should be to provide enough granularity without sacrificing functionality and ease of use. A role should be at a slightly higher level of abstraction than a single method. You may find at times it simply makes sense to have one role per method. This is okay at first, but as the system grows you will need to take a step back and refactor to ensure that the correct level of granularity is being achieved. Table 1-1 cross-references our requirements with our users and their roles.
Table 1-1 (a): Requirement to Role Mappings
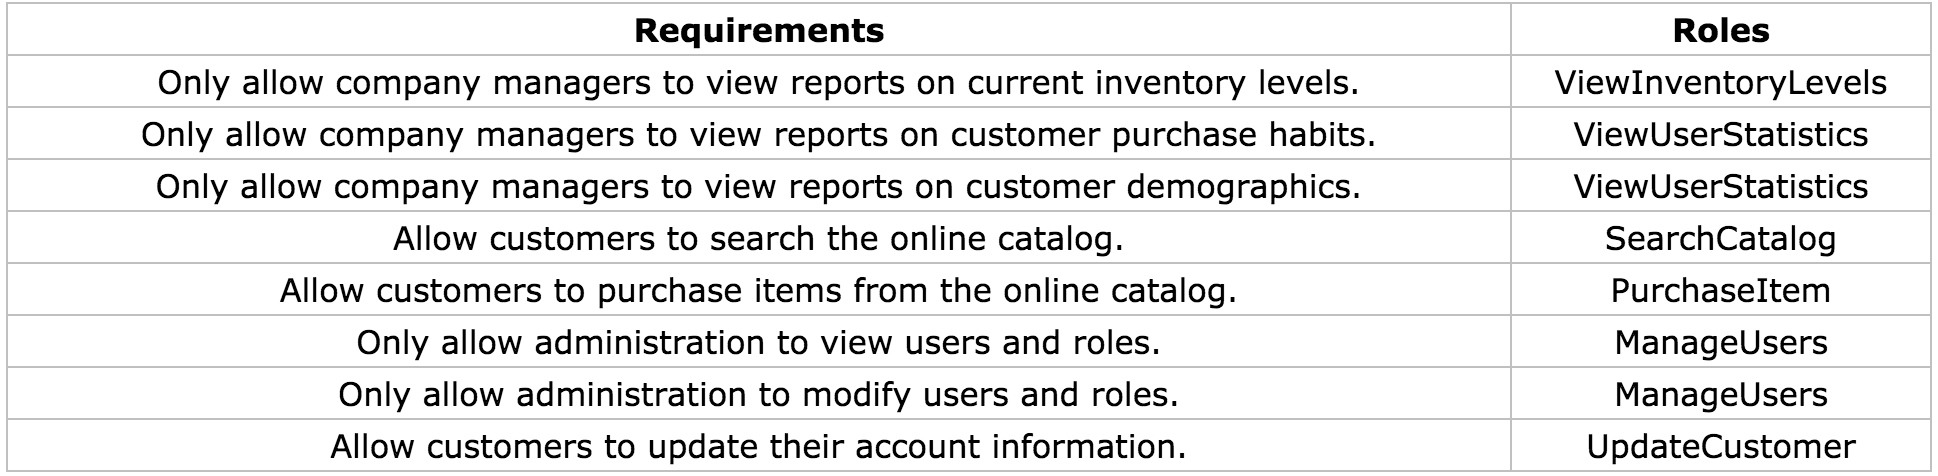
Table 1-1 (b): User to Role Mappings

The data shown above barely scratches the surface on the users and roles that would be in an enterprise application. Even the smallest enterprise application may contain dozens of roles. Large enterprise applications may contain hundreds. The challenge that you will most likely face is anticipating the roles that will be needed for your application and managing the changes that occur.
If your application grows to have hundreds of roles you may wish to consider adding another level of abstraction, called groups, to the security model. By grouping roles together we can assign users to one or more groups, where each group contains numerous roles. The best way to help motivate this is to use another example. Let's assume that our company just hired another administrator named Suzy. Suzy will need to have all the roles of an administrator. Which, if we remember, are 'ManageUsers' and 'UpdateCustomer'. This may not seem like a big deal since we only have two roles that our administrators use. But, what if there were hundreds of roles? We would have to assign each role to Suzy, possibly missing one or two in the process. By adding in the concept of a group we only have to assign Suzy to be in the 'Administrator' group. Tables 1-2(a) and 1-2(b) show how the new groups affect our original design. And just for fun, I tossed in another manager named John.
Table 1-2 (a): Group to Role Mappings

Table 1-2 (b): User to Group Mappings

The concept of grouping roles together is only used for managing users and their roles, and does not have any bearing on deploying J2EE applications. We will see in section three how this information is pulled together to provide secure access to J2EE resources.
We now have the high level concepts of what users, groups and roles our application will be using. Next, we will turn our attention to some of the guts of the application by looking at our data store design.
Creating the Foundation
The next step is to create the foundation for our application. Our application will consist of a persistent data store to hold our user, group and role data, a couple of Stateless Session Beans (deployed to JBoss) and numerous unit tests. We will make use of Ant to compile, deploy and run our application.
Designing the Data Store
Persistent data is critical for any enterprise application. Our small application will use MySQL as the persistent data store. MySQL is an open-source relational database. See Resources for download information. This article does not focus on the details of MySQL. Ant targets have been written to create and populate the database.
Another alternative to using a database for user, group and role information is to use a directory service such as Lightweight Directory Access Protocol (LDAP). Directory services are accessed using Java Naming and Directory Interface (JNDI). This is beyond the scope of the article, but the concepts are the same. The only difference is the underlying technology.
User information needs to be retrieved from a data store if we are to authenticate users trying to access our application. Users will need a unique id, username and password. The username could be used as the unique id, but it is more efficient and flexible to use an integer-based key. One reason to choose this approach is to allow users to change their username without changing the primary key. Keep in mind that application logic will need to be implemented to ensure that usernames are not duplicated. This may be implemented simply by adding a unique constraint to that column in the database or by programmatically ensuring that no duplicates are entered.
Next, we need to determine how to manage the authentication and authorization data for our users.
- Authentication data are usernames and passwords.
- Authorization data are the roles that an authenticated user has available to them.
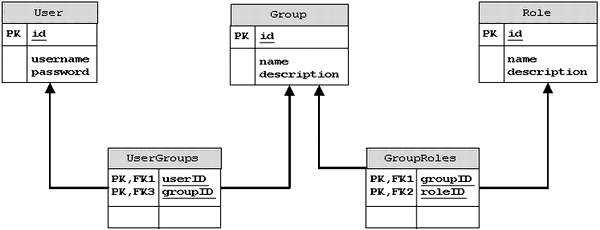
We have already determined that we will have multiple users that may belong to multiple groups and each group may have multiple roles. Diagram 1-1 shows the data store for our application. As you can see there is not much to it but does it provide a flexible and powerful tool for managing users and roles.
Diagram 1-1: Data Store Design
Creating the Enterprise Java Beans (EJB)
Creating the EJBs is the next step. Surprisingly, these beans will not access the data store just created. So, how exactly are the users going to be authenticated? We are going to make use of some very powerful Application Programming Interfaces (API) to lend us a helping hand. More specifically, we will use the JAAS framework. This framework is discussed in the next section. In reality, an application would use Entity Beans to create, modify and remove users, groups and roles. In order to keep things focused, scripts create our database automatically.
There are two Stateless Session Beans:
CatalogMgr- manages the online catalogUserMgr- to manage our users
The listings below show remote interfaces for the two beans.
- package com.ociweb.ejb;
-
- import javax.ejb.EJBObject;
- import java.rmi.RemoteException;
-
- public interface CatalogMgr extends EJBObject {
-
- int getCurrentQuantity(String itemID) throws RemoteException;
- Object findItem(String itemID) throws RemoteException;
- void purchaseItem(String itemID) throws RemoteException;
- }
-
-
- package com.ociweb.ejb;
-
- import javax.ejb.EJBObject;
- import javax.ejb.FinderException;
- import java.rmi.RemoteException;
- import java.util.Collection;
-
- public interface UserMgr extends EJBObject {
-
- Collection getDemographicInfo() throws RemoteException;
- Collection getPurchasingHistory(int userID) throws RemoteException;
- void updateUser(int userID, String newUsername, String newPassword)
- throws RemoteException;
- Object findUser(int userID) throws RemoteException, FinderException;
- }
If you look at the implementation classes for each of the beans (UserMgrBean and CatalogMgrBean) you will notice that we do not code any security logic. This is because zero lines of code need to be written to determine if the calling client has access to the bean's methods. This is the beauty of using J2EE technology! We are able to keep our business logic separated from security management, transaction management and all other low-level resource activities that would simply get in the way of coding the bean. Instead EJBs are configured using a deployment descriptor. An EJB deployment descriptor is an eXtensible Markup Language (XML) file. The structure of this file is governed by a Document Type Definition (DTD) produced by Sun Microsystems. A deployment descriptor allows J2EE applications to be configured without the need for hard coding configuration options. We will soon see how to use a deployment descriptor to provide declarative security. Please refer to Resources for more information on EJB and XML.
The EJB deployment descriptor is called ejb-jar.xml and contains the information needed to configure EJBs for deployment, including security attributes. There are two main sections to an EJB deployment descriptor. The first section defines each bean and the second section defines how the bean's methods behave in transactional and security realms.
Describing a bean means that we specify the name of the bean, the home and remote interfaces, the implementation class and the transactional and security information.
The listing below shows how we define the CatalogMgrBean (ejb-jar.xml).
- <ejb-jar>
- <enterprise-beans>
- <session>
- <ejb-name>CatalogMgrBean</ejb-name>
- <home>com.ociweb.ejb.CatalogMgrHome</home>
- <remote>com.ociweb.ejb.CatalogMgr</remote>
- <ejb-class>com.ociweb.ejb.CatalogMgrBean</ejb-class>
- <session-type>Stateless</session-type>
- <transaction-type>Container</transaction-type>
- <security-role-ref>
- <description>
- Users of this Role can view Inventory Levels
- </description>
- <role-name>ViewInventoryLevels</role-name>
- <role-link>ViewInventoryLevels</role-link>
- </security-role-ref>
- <security-role-ref>
- <description>
- Users of this Role can search
- </description>
- <role-name>BookSearch</role-name>
- <role-link>SearchCatalog</role-link>
- </security-role-ref>
- <security-role-ref>
- <role-name>PurchaseItem</role-name>
- <role-link>PurchaseItem</role-link>
- </security-role-ref>
- </session>
- </enterprise-beans>
- . . .
- </ejb-jar>
The <security-role-ref> element is used to define the security roles that are used by a bean implementation and to link that security role to a role defined in the assembly descriptor section of the deployment descriptor.
In the above listing the CatalogMgrBean refers to the following roles:
- ViewInventoryLevels
- BookSearch
- PurchaseItem
This means that we may write the following code in our bean implementation:
- EJBContext ejbContext = . . .
- if (ejbContext.isCallerInRole("BookSearch")) {
- //do something
- }
-
- if (ejbContext.isCallerInRole("ViewInventoryLevels")) }
- //do something else
- }
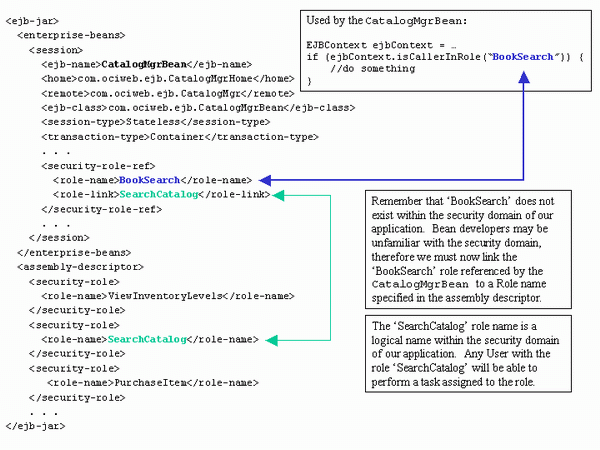
But wait a minute, the 'BookSearch' role is not defined in our data model (see Table 1-1). How does this work? Sometimes bean developers may not know the security domain, so they may simply make up a name that best describes what they are trying to secure. In the above example, the bean developer may have been trying to ensure that the caller was able to search for books. Before the application is deployed the 'BookSearch' role, used by the bean developer, has to be mapped to a role name described in the assembly descriptor section of the deployment descriptor. The <role-link> element is used to accomplish the task of linking or mapping role names. Finally, the <description> element should be used to provide comments about the role names and their intended purpose.
After the beans have been defined, they can be assembled together. Assembling a bean means to define the behavior of each of the bean's methods in the operating environment. We describe this behavior under the<assembly-descriptor> tag as shown in the listing below.
- <ejb-jar>
- . . .
- <assembly-descriptor>
- <security-role>
- <role-name>ViewInventoryLevels</role-name>
- </security-role>
- <security-role>
- <role-name>SearchCatalog</role-name>
- </security-role>
- <security-role>
- <role-name>PurchaseItem</role-name>
- </security-role>
- <method-permission>
- <unchecked></unchecked>
- <method>
- <ejb-name>CatalogMgrBean</ejb-name>
- <method-name>create</method-name>
- </method>
- </method-permission>
- <method-permission>
- <role-name>ViewInventoryLevels</role-name>
- <method>
- <ejb-name>CatalogMgrBean</ejb-name>
- <method-name>getCurrentQuantity</method-name>
- </method>
- </method-permission>
- <method-permission>
- <role-name>SearchCatalog</role-name>
- <method>
- <ejb-name>CatalogMgrBean</ejb-name>
- <method-name>findItem</method-name>
- </method>
- </method-permission>
- <method-permission>
- <role-name>PurchaseItem</role-name>
- <method>
- <ejb-name>CatalogMgrBean</ejb-name>
- <method-name>purchaseItem</method-name>
- </method>
- </method-permission>
- </assembly-descriptor>
- </ejb-jar>
The <security-role> element defines a logical role name. This role name is not directly tied to a security domain. This means that the 'ViewInventoryLevels' does not have a particular level of security associated with it. It is up to the application deployer to map the 'ViewInventoryLevels' role to that of a company manager for our application. Luckily, we have already done this for our application because we are acting as the implementer, assembler and deployer.
The <method-permission> element is used to define what security roles each bean method will secure. For example, if we tried to access the purchaseItem() method on CatalogMgrBean the J2EE server would first check to ensure that we had the 'PurchaseItem' role name assigned to us. If we want to tell the J2EE server to allow any caller access to a bean's method we can use the<unchecked/> element in place of the <role-name> element. The above listing shows how this is written for the create() method of CatalogMgrBean.
Diagram 1-2 provides a very good look at each piece of the puzzle and how those pieces relate.
Diagram 1-2: Deployment Descriptor Role Linking
Security Model Summary
The concepts described in this section can be used in any J2EE application environment and are not specific to any vendor. An important point to remember is that a business function may span more than one bean. Therefore, care must be taken to ensure that the correct roles are assigned to allow the caller to successfully complete a business function that may span several beans and several methods. The Session Facade pattern is a great example to motivate this point. One of the most challenging aspects to designing a robust and flexible security model is understanding how all of the pieces need to interact, especially in a J2EE environment where a lot of the concepts and strategies are very abstract.
JAAS
The concept of Java security is nothing new. Java security technology has been around since the dawn of Java, and is used to provide a safe environment to run potentially untrusted code. Since the release of the Java 2 platform we are now capable of placing fine-grained controls on our resources. Each resource can be secured with regard to the identity of where the code came from and who digitally signed that code. For example, you may download a digitally signed application via Java WebStart and can be sure that the code is trustworthy and secure (as long as you trust the signer). This type of security has its limitations. One major limitation is that there is no control over who has access to the application. Or even more importantly how does the application limit access to different business functions?
What is JAAS?
The JAAS framework is complimentary to the Java 2 platform security model and has been integrated into Java 1.4.
JAAS provides the following:
- Authentication
- Reliably and securely determine who is executing Java code. The term authentication represents the process by which one
Subject(user) verifies they are who they say they are. The only catch is that the authentication process should, or more appropriately, must be accomplished in a secure fashion, usually with Secure Sockets Layer (SSL). - Authorization
- Ensure users have the correct permissions to access a resource. Do you have access to view customer-buying habits?
JAAS authentication (logging into an application) is performed in a pluggable manner. This simply means that the application is not directly tied to a particular authentication technology. As stronger authentication technologies emerge your application can simply 'plug' it in. Authentication technologies range in varying strength and complexity. Authentication technologies might include encrypting a username and password (probably accepted from a user interface) that is sent across the wire to a remote server where the information is decrypted and verified. More complex authentication technologies might include biometric devices (retinal scanners or thumbprint readers).
So what does this mean? How do I use JAAS? To answer these questions and many others we must first take a look at some of the core classes and interfaces provided in the JAAS framework.
Core Classes and Interfaces
Subject
The term subject refers to any entity requesting access to a service. A subject may represent a person or another service. Typically we think of people and services as having names. For instance, a person may have the name 'Bob' and a server may have the name 'Integra'. We can use these names to establish connections with a resource (via a look up table, naming service, etc). Of course we know that people often have numerous identities. In some situations using the name 'Bob' might successfully identify that person. In other situations it may be necessary to identify that person using a unique id.
Another way to think of it is like this:
You are the Subject. You have a name; you have an employee id (hopefully!); you have a bank account number. Your name might uniquely identify you within your group of friends. Your employee id tells your boss who to send the check to once a month. Your bank account number identifies the account that holds your money that your boss just sent. Each identity is a Principal and is used to help identify you in distinct scenarios.
A Subject in the JAAS realm is represented by a javax.security.auth.Subject. A Subject represents a collection of related information for a single entity. The information stored may include the identities of the Subject, which as we saw above may be a name or id and security-related information (credentials) such as passwords, keys (public and private), etc.
Subject identities (name, id, etc) are stored as java.security.Principal objects and credential information are stored as java.lang.Objects. Thus any object may be a credential. A Subject may have one or more Principals and one or more credentials. Listed below are some of the key methods in the Subject class.
public Set getPrincipals();
public Set getPublicCredentials();
public Set getPrivateCredentials();
Client applications will almost never instantiate a Subject directly, but rather the Subject will be instantiated by a javax.security.auth.login.LoginContext. We will look at LoginContext in just a bit.
Principals
As mentioned above a Principal object represents a single identity for a Subject. A Principal is an interface that defines four methods that concrete implementations are required to implement.
String getName();
boolean equals(Object another);
public String toString();
public int hashCode();
Principal objects become associated with a Subject upon successful authentication. The Principal will remain with the Subject until the Subject is logged out.
Credentials
Credentials describe security-related information such as passwords, encrypted keys or public key certificates (X.509, PGP, etc). JAAS credentials are represented by any object (java.lang.Object) for ultimate flexbility.
JAAS credentials are divided into two categories. The first category contains public credentials (public key certificates, etc.) and the second category contains private credentials (passwords, encrypted keys, etc.). Credential is information is associated with a Subject upon successful authentication.
LoginContext
A LoginContext is used to authenticate a Subject and is represented by the class javax.security.auth.login.LoginContext. A LoginContext is configured with one or more authentication technologies or LoginModules. This technique is known as LoginModule stacking and simply means that all configured LoginModules must succeed or fail. Configuring the application with a set of LoginModules allows for an application to change authentication technologies without recompiling the application. A LoginContext uses a configuration to retrieve the configured LoginModules. The configuration is discussed later in this section. The LoginContext defines the following methods.
void login() throws LoginException;
void logout() throws LoginException;
void Subject getSubject();
A LoginContext performs authentication in two phases. The first phase is known as the login phase. During this phase each configured LoginModule is told to 'login' (perform authentication). If all configured LoginModules pass phase one, then the LoginContext enters phase two. In phase two each configured Login Module 'commits' the relevant Principals and credentials to the Subject. If at any time the first or second phase fails then each configured LoginModule is told to 'abort' the login process (clean up any saved state). If the authentication succeeds then the application may ask the LoginContext for the authenticated Subject. The entire login process is completely transparent to an application writer because the LoginContext manages the authentication process. An application knows if the authentication succeeded when no exceptions are thrown. If the authentication fails then a javax.security.auth.login.LoginException is thrown.
LoginModules
As mentioned above a LoginModule represents a single authentication technology. A LoginModule is represented by the interface javax.security.auth.spi.LoginModule and provides the following methods.
boolean login();  // phase one
boolean commit(); // phase two
boolean abort();
boolean logout();
Application writers typically do not implement LoginModules, but rather configure the LoginContext with a set of LoginModule implementations. Please refer to Resources for information on how to write a LoginModule. Later in this section we will look at a very simple LoginModule implementation called SimpleLoginModule.
Callbacks and CallbackHandlers
A LoginModule sometimes needs to communicate with the user to obtain authentication information. This is typically done via a user interface screen, command-line prompt or could even be a biometric device (thumb print reader or retinal scanner). CallbackHandlers give a LoginModule a way to communicate with the user that is independent of the underlying authentication technology. CallbackHandlers are represented by the interface javax.security.auth.callback.CallbackHandler. A CallbackHandler defines only one method.
void handle(Callback[] callbacks) throws IOException, UnsupportedCallbackException;An implementation of a CallbackHandler may prompt the user with a slick graphical user interface to retrieve a username and password or may simply use a command line interface.
The LoginModule will pass the CallbackHandler an array of javax.security.auth.callback.Callbacks. A Callback is a marker interface that simply tells the CallbackHandler that it is used to hold authentication information. Listed below are two Callback implementations that you will commonly use.
javax.security.auth.callback.NameCallback
javax.security.auth.callback.PasswordCallback
As you can tell by the names the NameCallback is used to hold a username and the PasswordCallback is used to hold a password.
Callback implementations should provide a way to communicate information from the application to the underlying security service and are normally written by the LoginModule writer.
LoginModule Configurations
A LoginModule configuration specifies which LoginModules should be used for authentication in an application. Also equally important is that the order the LoginModules are configured is the order they are invoked. Thus if one LoginModule depends on another, you must ensure they are configured in the correct order. Recall that the LoginContext will consult this configuration to determine which LoginModules to load. Listed below is the configuration template. This information is typically stored in a file called auth.conf.
Configuration Template
- Application_1 {
- ModuleClass_InvokedFirst Flag
- ModuleOption1=Value1
- ModuleOption2=Value2
- ModuleOptionN=ValueN
- ;
-
- ModuleClass_InvokedSecond Flag
- ModuleOption1=Value1
- ModuleOption2=Value2
- ModuleOptionN=ValueN
- ;
-
- // this is a comment
- // there can be many Modules defined here
-
- ModuleClass_InvokedLast Flag
- //options are optional
- ;
- };
-
- Application_2 {
- ModuleClass_InvokedFirst Flag
- ModuleOption1=Value1
- ModuleOption2=Value2
- ModuleOptionN=ValueN
- ;
-
- ModuleClass_InvokedSecond Flag
- // options are optional
- ;
-
- ModuleClass_InvokedLast Flag
- ModuleOption1=Value1
- ModuleOption2=Value2
- ModuleOptionN=ValueN
- ;
- };
-
- // this is the default application name
- other {
- ModuleClass_InvokedFirst Flag
- ModuleOption1=Value1
- ModuleOption2=Value2
- ModuleOptionN=ValueN
- ;
-
- ModuleClass_InvokedSecond Flag
- // options are optional
- ;
-
- ModuleClass_InvokedLast Flag
- ModuleOptions1=Value1
- ModuleOption2=Value2
- ModuleOptionN=ValueN
- ;
- };
Each entry in the configuration is referenced with an application name. The application name is used to look up or index the set of LoginModules that an application using JAAS will use for authentication. Under each application is a list of one or more fully qualified LoginModule name(s). Each LoginModule is invoked in the order in which it appears. This technique is called LoginModule stacking and provides a very powerful means to stack or chain together different LoginModules to authenticate a single Subject.
The Flag value controls the behavior of the authentication stack. The following values are valid for the Flag attribute:
Required- TheLoginModulemust succeed. If it succeeds or fails, authentication still continues down the stack, but will ultimately inform the user of failure. (This is the one that you will probably use the most).Requisite- TheLoginModulemust succeed. If it succeeds, authentication continues down the stack. If it fails then control is immediately given back to the calling client.Sufficient- TheLoginModuleis not required to succeed. If it does succeed, control immediately returns to the calling client. If it fails then authentication continues down the stack.Optional- TheLoginModuleis not required to succeed. If it succeeds or fails, authentication continues down the stack.
ModuleOptions are space-delimited properties (name/value pairs) that are unique to a given LoginModule. Each LoginModule controls the definition of its properties. Listed below is a code example to help illustrate.
- package com.ociweb.auth.login;
-
- public class DatabaseLoginModule implements LoginModule {
-
- private String dbDriver;
- private String dbURL;
- private String pwQuery;
-
- public void initialize(Subject subject, CallbackHandler callbackHandler,
- Map sharedState, Map options) {
- . . .
- this.dbDriver = (String) this.options.get("dbDriver");
- this.dbURL = (String) this.options.get("dbURL");
- this.pwQuery = (String) this.options.get("pwQuery");
- . . .
- }
- }
Here is what the configuration file auth.conf may look like:
- DBLogin {
- com.ociweb.auth.login.DatabaseLoginModule required
- dbDriver="org.gjt.mm.mysql.Driver"
- dbURL="jdbc:mysql://localhost/security_examples"
- pwQuery="SELECT password FROM Users WHERE username=?"
- ;
- };
The Authentication Process (Graphical User Interface Login)
Next, we will walk through an example of a JAAS login using a Swing Graphical User Interface. The example we are about to walk through is meant to give an overview of the authentication process and not on strong authentication technologies. Thus proper error handling and topics like encryption are omitted to keep the example focused. This example can be downloaded from Resources.
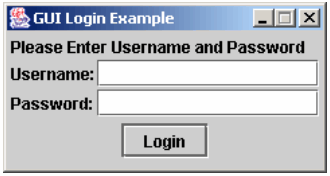
The first step in our authentication process is to show a LoginDialog.
// show the dialog
new LoginDialog().setVisible(true);
Diagram 2-1: Login Screen
Now the user will enter their username and password and click the 'Login' button. Listed below is the code that executes when 'Login' is pressed.
- public void actionPerformed(ActionEvent e) {
- String appName = System.getProperty("com.ociweb.jaas.appname");
- SimpleCallbackHandler handler =
- new SimpleCallbackHandler(username.getText(), password.getPassword());
- try {
- LoginContext context = new LoginContext(appName, handler);
- // if an exception is not thrown then the
- // login succeeded.
- context.login();
- JOptionPane.showMessageDialog(this.owner, "Success", "Login Successful",
- JOptionPane.INFORMATION_MESSAGE);
- } catch (LoginException ex) {
- showErrorMessage("Login Failed", ex.getMessage());
- username.requestFocus();
- } catch (Exception ex) {
- showErrorMessage("Login Failed", ex.getMessage());
- username.requestFocus();
- }
- }
First, the JAAS configuration application name is retrieved from the property com.ociweb.jaas.appname. Recall that this is the name in the auth.conf file that tells the LoginContext which LoginModules to invoke. The next step is to retrieve the username and password entered by the user. This information is given directly to the CallbackHandler. This is one approach to solving the problem. Another approach would be to have the SimpleCallbackHandler itself launch the GUI and set it's own data.
A LoginContext is instantiated with the JAAS configuration application name and the SimpleCallbackHandler. Next, the LoginContext.login() method is invoked to begin the authentication process. If the authentication process succeeds then the user sees a nice message. Otherwise, a failure message is shown.
The LoginContext uses the JAAS application name to locate the set of LoginModules that will be used to authenticate the new Subject. In this example the auth.conf file looks similar to this:
- SimpleLogin {
- com.ociweb.auth.login.SimpleLoginModule required
- ;
- };
The only LoginModule that will be invoked is the SimpleLoginModule. This LoginModule, as we will see in a bit, simply checks that the username is 'superman' and the password is 'secret'. Obviously this is not a very strong authentication technology, but does provide a nice introduction into the JAAS world.
We know that the LoginContext performs authentication in two phases. The first phase performs authentication and the second phase commits the authentication information to a Subject. Listed below is how the SimpleLoginModule performs its authentication (phase 1).
- public boolean login() throws LoginException {
- Callback[] callbacks = new Callback[2];
- callbacks[0] = new NameCallback("Username:");
- callbacks[1] = new PasswordCallback("Password:", false);
-
- try {
- this.callbackHandler.handle(callbacks);
- } catch (IOException ex) {
- throw new LoginException("Failure to retrieve user input: "
- + ex.getMessage());
- } catch (UnsupportedCallbackException ex) {
- throw new LoginException("Programmer Error! Callback not supported: "
- + ex.getMessage());
- }
-
- this.username = ((NameCallback) callbacks[0]).getName();
- this.password = ((PasswordCallback) callbacks[1]).getPassword();
-
- if (!"superman".equals(this.username)) {
- this.succeeded = false;
- throw new FailedLoginException("Invalid User Name: " + this.username);
- }
-
- if (!"secret".equals(new String(this.password))) {
- this.succeeded = false;
- throw new FailedLoginException("Invalid Password");
- }
-
- this.succeeded = true;
- return this.succeeded;
- }
There is not much to the authentication process in this example. We simply retrieve the information from the Callbacks and compare the username to 'superman' and the password to 'secret'.
The second phase commits the authentication information to a Subject. The listing below shows how the SimpleLoginModule handles the commit process (phase 2).
- public boolean commit() throws LoginException {
- if (this.succeeded) {
- this.principal = new OCIPrincipal(this.username);
- this.subject.getPrincipals().add(this.principal);
-
- cleanUp();
- return true;
- } else {
- cleanUp();
- return false;
- }
- }
During the commit phase we check to see if the login succeeded. If the login phase succeeded, then we instantiate a new Principal and add it to the Subject. Notice here that we did not store the password in the private credentials, though we probably should. The last part of the commit phase is to clean up any internal state. The instance variables principal and password are no longer needed and should be wiped from memory.
JAAS Summary
By now you should have a good understanding of the JAAS framework to tackle security-related challenges. Just remember that most application developers will probably never write their own LoginModules. This is best left to the security experts. Application writers will write the necessary CallbackHandlers and create a LoginContext configuration (auth.conf). In the next section we will look at how to configure JBoss to use an implementation of the Secure Remote Password (SRP) authentication technology. SRP is a strong public-key handshake protocol. Please refer to the Resources for links to SRP technology.
Configuring JBoss Security
Introduction
As we know by now securing access to J2EE resources is critical for any enterprise application. So far we have discussed how a security model may be implemented and the power of the JAAS framework. It is time now to put our ideas to work by configuring a J2EE application server, which in our case is the open-source JBoss server, to secure access to our EJBs. This section walks through how to configure JBoss to secure access to EJBs. JBoss uses the Java Management Extension (JMX) as it's architectural backbone. JMX defines the concept of a Managed Bean (MBean). An MBean is a Java class that implements an MBean interface (there are four types) and follows a set of well-defined patterns. MBeans are configurable, thus allowing changes to the behavior of the server without having to recompile. This means that functionality, or services, may be added and removed simply by changing a configuration file. JBoss 2.4.5 uses a file called jboss.jcml, which is an XML file, to configure all MBeans used by an instance of the server. This file is proprietary to JBoss. The important point to take from this is that we will be configuring numerous MBeans to tweak how the JBoss server runs. Please refer to References for links to JMX resources.
At the end of this section is a custom MBean service used to assist with database access using the SRP protocol. This MBean is not part of the JBoss distribution.
Now is a good time to install the necessary tools needed for our application. Please follow the instructions located in the resources bundle to accomplish this task.
. . . about 20 minutes later . . .
At this point you should have the following Open-Source tools installed.
- JBoss (2.4.5) - free, J2EE-compatible server
- JUnit (3.7) - Unit Testing framework
- MySQL (3.23.38) - Open source relational database
- Ant (1.4.1) - Open source build tool
- JDK (1.4)
All of the code for this article was written and tested with the versions of the tools listed above.
JBoss Directory Structure
Let's turn our attention to some of the key directories and configuration files within JBoss.
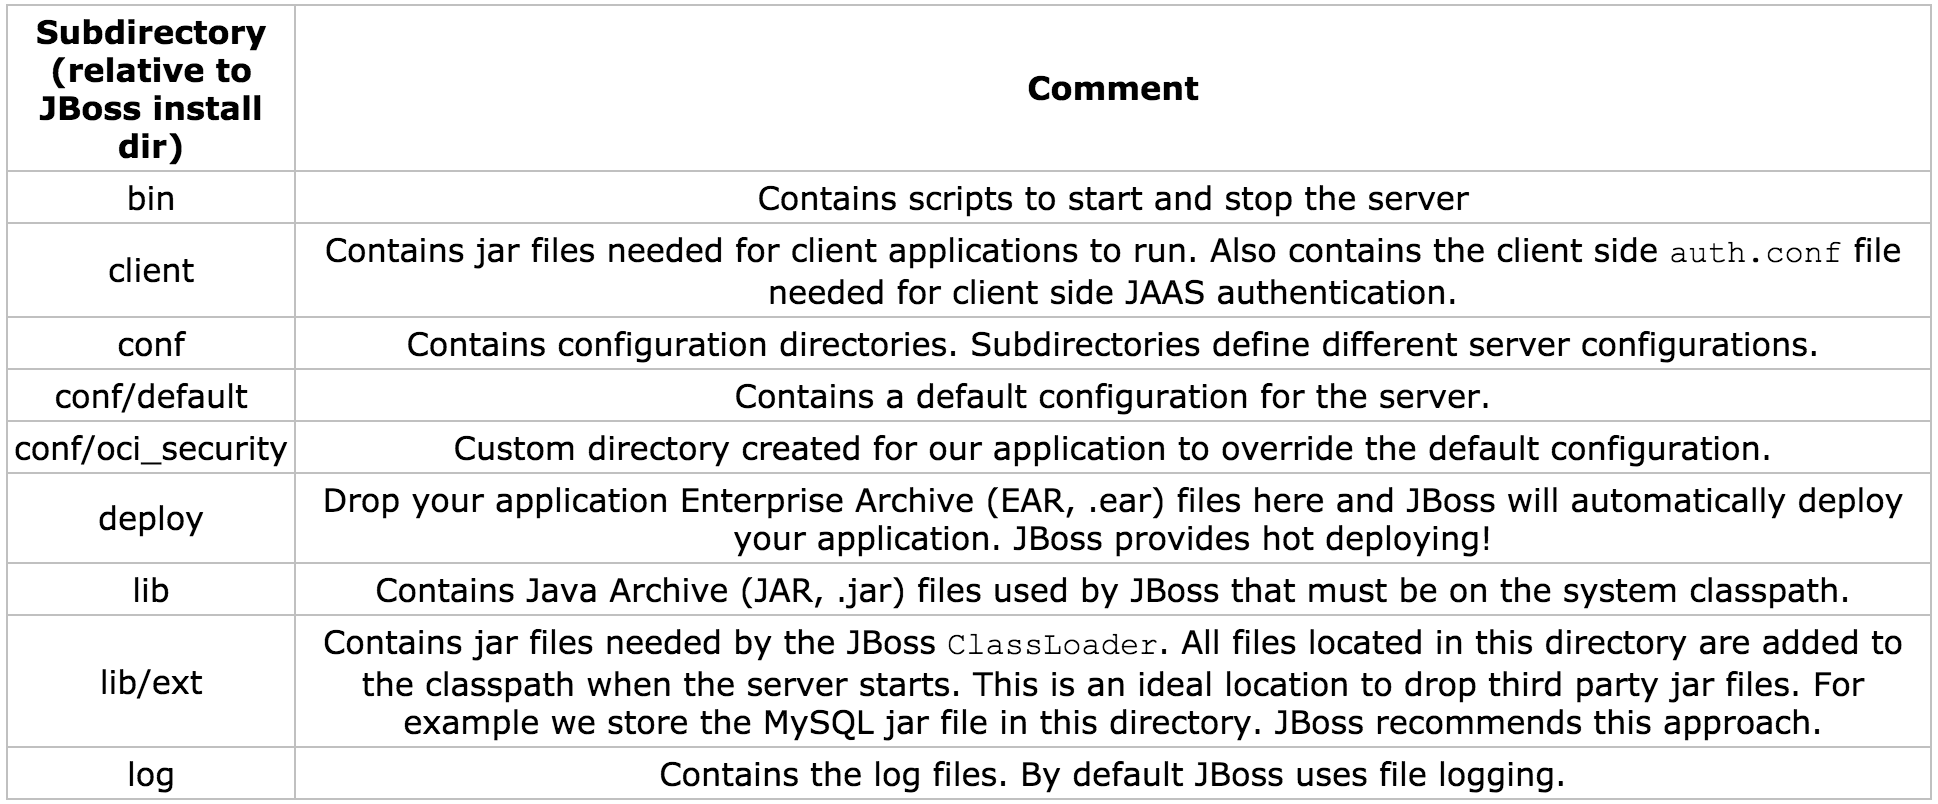
JBoss 2.4.5 has a well-defined directory structure that makes it easy to manage and navigate. Table 3-1 describes each directory.
Table 3-1: JBoss 2.4.5 Directory Structure
Changing the Configuration Directory
JBoss comes bundled with a complete set of default configuration files. These files are all located under the conf/default directory and are meant to give a quick start into the JBoss world. It is a good idea to create a custom configuration directory for an application or application suite (set of applications). This technique is useful when different application suites will run their own instance of a JBoss server. Each JBoss instance will use a single configuration set. The application for this article will use configuration files located in the conf/oci_security directory.
How does JBoss know which directory to read from?
The JBoss server's main entry point is through the class org.jboss.Main. JBoss provides the following scripts to start the server:
- bin/run.bat (Windows)
- bin/run.sh (Unix)
org.jboss.Main accepts as its first argument a directory name that is relative to the conf directory. By default JBoss uses the name default, thus the conf/default directory.
The line below shows the updated run script.
java -classpath "%JBOSS_CLASSPATH%" org.jboss.Main oci_securityTo verify that JBoss is using your configuration directory examine the server console output after the server has been started. You should see the following line near the top of the console.
Using configuration "oci_security"JNDI
In a distributed computing environment, such as with J2EE, we need a standard mechanism to locate resources from remote servers. This type of service is best known as a naming service. In the Java world we think of this as JNDI. JNDI is an abstraction that allows for resources to be stored and retrieved from a well-known location using a name (String). The JNDI name is sometimes referred to as a context name. The only important point to understand for this article is that we use a name to locate a resource or service. Please see References for links to JNDI resources.
JBoss Specific Deployment Descriptor (jboss.xml)
As with any J2EE server you will have to create vendor-specific deployment descriptors. JBoss uses a deployment descriptor called jboss.xml that maps EJB names to a JNDI name, along with numerous other configuration options, such as defining the Security Domain. The jboss.xml file is deployed with the application.
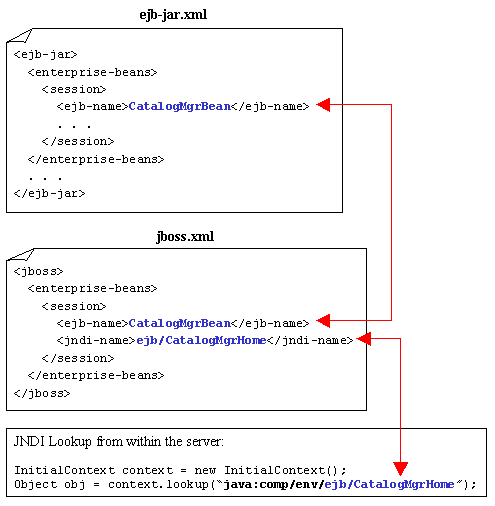
To specify the JNDI name for the CatalogMgrBean we simply take the EJB name from the ejb-jar.xml file and make a mapping in the jboss.xml file. Then we add a tag named that specifies how to locate the bean.
Diagram 3-1 shows how to map a bean into a JBoss JNDI context.
Diagram 3-1: Mapping EBJ's to JBoss
We will come back to the jboss.xml file when we discuss how to configure a security domain.
JBoss Server Configuration File (jboss.jcml)
The jboss.jcml file is an XML file containing the configurations of all JMX MBean (services) that JBoss will use to run an instance of the server. This file is proprietary to JBoss.
We are going to focus on configuring the following services:
- Database Services (MySQL)
- JBoss Security Manager Services
- SRP Security Services
Configuring JBoss to use the MySQL Database
Configuring a database in JBoss is fairly straightforward. The JdbcProvider MBean is used to tell JBoss which JDBC drivers to load.
- <mbean code="org.jboss.jdbc.JdbcProvider" name="DefaultDomain:service=JdbcProvider">
- <attribute name="Drivers">org.gjt.mm.mysql.Driver</attribute>
- </mbean>
Table 3-2: JdbcProvider Configurable Attributes
| Attribute Value | Description |
|---|---|
| Drivers | Comma-separated list of JDBC Driver classes. |
The only configurable attribute for the JdbcProvider MBean is Drivers. This is a comma-separated list of JDBC driver classes. The above configuration tells the JdbcProvider MBean to use the MySQL driver. The driver is loaded when the server starts. The MySQL driver class is located under the JBoss lib/ext directory in the mm.mysql-2.0.4-bin.jar file. This JAR file should have been copied to the lib/ext as part of this article's application installation process.
The XADataSource MBean manages database connections using a javax.sql.DataSource implementation. A DataSource is a factory for retrieving connections. There are more configurable attributes than shown below. This configuration is just enough to get JBoss talking with a MySQL database. Please see References for links to JBoss resources.
- <mbean code="org.jboss.jdbc.XADataSourceLoader"
- name="DefaultDomain:service=XADataSource,name=DefaultDS">
- <attribute name="PoolName">DefaultDS</attribute>
- <attribute name="DataSourceClass">
- org.jboss.pool.jdbc.xa.wrapper.XADataSourceImpl
- </attribute>
- <attribute name="URL">jdbc:mysql://localhost/security</attribute>
- <attribute name="JDBCUser"></attribute>
- <attribute name="Password"></attribute>
- </mbean>
Table 3-3: XADataSourceLoader Configurable Attributes (Partial List)
| Attribute Value | Description |
|---|---|
| PoolName | The JNDI name assigned to the pool. The name is bound under 'java:/name'. For example, 'java:/DefaultDS'. |
| DataSourceClass | A fully qualified class name of thejavax.sql.XADataSource implementation. JBoss provides a proxy implementation if a JDBC driver does not support an XADataSource. The implementation isorg.jboss.pool.jdbc.xa.wrapper.XADataSourceImpl. |
| URL | The JDBC URL to locate the database. |
| JDBCUser | The user to connect to the database as. When connecting to MySQL from the localhost this attribute is not required. |
| Password | The password to connect to the database as. When connecting to MySQL from the localhost this attribute is not required. |
The database is located on the localhost and has a name of security. Recall that the database was created with the name security. Refer to the downloaded resource bundle for details on how to create the database.
Configuring JBoss Security Manager Services
JBoss comes with a default Security Manager MBean called JaasSecurityManagerService. The default implementation is usually sufficient for most applications, including ours. The JaasSecurityManagerService MBean provides a mechanism to abstract the underlying JBoss Security Manager service. Thus simply by changing the configuration we can change how JBoss handles security. By default the JaasSecurityManager MBean is used to provide server side JAAS authentication and authorization. Listed below is the default configuration for the JaasSecurityManagerService MBean.
- <mbean code="org.jboss.security.plugins.JaasSecurityManagerService"
- name="Security:name=JaasSecurityManager">
- <attribute name="SecurityManagerClassName">
- org.jboss.security.plugins.JaasSecurityManager
- </attribute>
- <attribute name="LoginConfig">Security:name=DefaultLoginConfig</attribute>
- </mbean>
Table 3-4: JaasSecurityManagerService Configurable Attributes (Partial List)
| Attribute Value | Description |
|---|---|
| SecurityManagerClassName | Specifies the name Security Manager implementation class. By default JBoss uses org.jboss.security.plugins.JaasSecurityManager to provide JAAS security. |
| LoginConfig | Specifies the object name of the MBean service that is used to locate the server side security configuration file. |
The JaasSecurityManagerService MBean also provides a mechanism to handle the JNDI mapping of a Security Domain. A Security Domain specifies an application wide security manager whose responsibility is to ensure that users are both authenticated and authorized to access J2EE resources. This is exactly what the JaasSecurityManager MBean provides. The listing below shows how to configure JBoss with a Security Domain.
- <jboss>
- <security-domain>java:/jaas/OciSRP</security-domain>
- <enterprise-beans>
- <session>
- <ejb-name>UserMgrBean</ejb-name>
- <jndi-name>ejb/UserMgrHome</jndi-name>
- </session>
- <session>
- <ejb-name>CatalogMgrBean</ejb-name>
- <jndi-name>ejb/CatalogMgrHome</jndi-name>
- </session>
- </enterprise-beans>
- </jboss>
The above listing is the same jboss.xml file that we saw in section one and earlier in this section with the addition of the <security-domain> attribute. This attribute tells JBoss the JNDI name to use when looking up the security manager. The name 'OciSRP' also plays a role as the server side auth.conf JAAS application name. Recall that there are two JAAS auth.conf files. One file is for client side JAAS processing (logging in) and the other is for server side JAAS processing. The details of server side JAAS is coming in just a bit.
The DefaultLoginConfig MBean is used to locate the server side security configuration file, which in our case is the JAAS auth.conf file. This MBean is referenced by the JaasSecurityManagerService MBean. The JaasSecurityManagerService MBean configuration listed above used the attribute LoginConfig to specify the DefaultLoginConfig MBean object name, Security:name=DefaultLoginConfig. The server side auth.conf file is relative to the configuration directory, which is conf/oci_security.
- <mbean code="org.jboss.security.plugins.DefaultLoginConfig"
- name="Security:name=DefaultLoginConfig">
- <attribute name="AuthConfig">auth.conf</attribute>
- </mbean>
Table 3-5: DefaultLoginConfig Configurable Attributes
| Attribute Value | Description |
|---|---|
| AuthConfig | Specifies the auth.conf file name. This name is relative to the configuration directory (conf/oci_security). |
Configuring JBoss Secure Remote Password (SRP) Services
In a nutshell, SRP is an open-source implementation of a strong public key exchange handshake. Please refer to Resources for links to SRP.
Luckily we do not have to understand how SRP truly works because JBoss provides an implementation of the SRP protocol. Now there is one hitch to the out-of-the-box implementation, and that is, at the time of this writing, there is no way to tell the SRP implementation to look up authentication data (usernames and passwords) from a database. The SRP implementation provided by JBoss reads authentication data from a file. The desire to read from a database is the motivation for creating a new MBean to provide the functionality our application requires.
Using the SRP implementation provided by JBoss is as simple as configuring a couple of MBeans. The first MBean we will look at is the SRPService MBean followed by the custom SRPDatabaseVerifierStoreService MBean. These MBeans, along with other low level services, make up the SRP Authentication Server.
The SRPService MBean is responsible for maintaining the SRP Authentication Session Cache and exposing a Remote Method Invocation (RMI) client. This cache holds authentication information for consecutive calls to secure J2EE resources. The listing below shows the configuration for the SRPService MBean.
- <mbean code="org.jboss.security.srp.SRPService"
- name="Security:service=SRPService">
- <attribute name="VerifierSourceJndiName">srp/OCIVerifierStore</attribute>
- <attribute name="AuthenticationCacheJndiName">srp/AuthenticationCache</attribute>
- <attribute name="JndiName">srp/SRPServerInterface</attribute>
- </mbean>
Table 3-6: SRPService Configurable Attributes (partial list)
| Attribute Value | Description |
|---|---|
| JndiName | Specifies the JNDI name of theSRPService MBean. The default name is 'srp/SRPServerInterface'. |
| VerifierSourceJndiName | Specifies the JNDI name of the MBean responsible for looking up SRP password information. |
| AuthenticationCacheJndiName | Specifies the JNDI name of the authentication cache MBean. The default cache is located using the name 'srp/AuthenticationCache'. |
| AuthenticationCacheTimeout | Specifies the timeout in seconds for the authentication cache. The default is 30 minutes (1800 seconds). |
| AuthenticationCacheResolution | Specifies the interval between checks for timeouts. The default is one minute (60 seconds). |
It is very important to understand that when the Authentication Cache times out all authentication data is lost. Thus calls to secure J2EE components will fail. As of this writing, JBoss does not provide a way for renegotiating SRP authentication information. The easiest way to handle this is to set the timeout period to be 50 years, for example. If this is inappropriate then you will have to handle the renegotiation. One way could be to write your own SRP Authentication Cache MBean.
The com.ociweb.jmx.jaas.srp.SRPDatabaseVerifierStoreService is a custom MBean written specifically for this article's application. Recall that JBoss, as of this writing, does not have a SRP MBean that can retrieve authentication information from a database. The listing below shows the configuration for the SRPDatabaseVerifierStoreService MBean.
- <mbean code="com.ociweb.jmx.jaas.srp.SRPDatabaseVerifierStoreService"
- name="Security:name=OciSecurityService">
- <attribute name="JndiName">srp/OCIVerifierStore</attribute>
- <attribute name="DsJndiName">java:/DefaultDS</attribute>
- <attribute name="PasswordQuery">
- SELECT TRIM(password) FROM users WHERE username=?
- </attribute>
- </mbean>
Table 3-7: SRPDatabaseVerifierStoreService Configurable Attributes
| Attribute Value | Description |
|---|---|
| JndiName | The JNDI name used by the SRPService MBean to locate this service. |
| DsJndiName | Specifies the JNDI name for the Data Source of the database containing User information (username and password). |
| PasswordQuery | A SQL query that is used by this MBean to locate a password based on a 'username'. The SQL statement must accept one and only one parameter that uniquely identifies a user, if it exists. This means that the query should return zero rows if the username did not exist, or one row containing the username's password. |
To retrieve authentication information the SRPDatabaseVerifierStoreService MBean uses an implementation of the org.jboss.security.srp.SRPVerifierStore interface called com.ociweb.jmx.jaas.srp.DatabaseVerifierStore. The DatabaseVerifierStore is the object responsible for retrieving the password from the database. This is done by using the SRPDatabaseVerifierStoreService MBean's PasswordQuery attribute value. The DatabaseVerifierStore creates and returns a SRP verifier that will be used during the client-server SRP authentication process.
The only step left is to configure the server side auth.conf file to use JAAS implementations of SRP Login Modules. We will look at how this is done in the next section.
Authenticating a User
The best way to understand how server-side JAAS authentication works is to walk through a code example. Remember that the process of authenticating a Subject means that we verify they are who they say they are, and if successful associate a new Principal to the Subject. Refer back to section two for information on JAAS.
We will look at code snippets from the point of view of a unit test (JUnit) and assume that 'Brian' (that's me) is trying to login.
Table 3-8: User, Groups, and Roles ('Brian')
| User | Group | Roles |
|---|---|---|
| Brian | Manager | ManageUsers, UpdateCustomer |
The Client Side
The diagram below shows the first step in the authentication process.
Diagram 3-2: Client Side JAAS Login
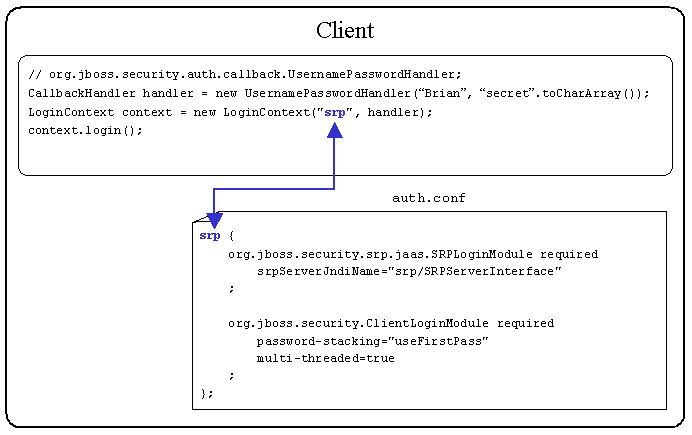
The UsernamePasswordHandler provided by JBoss provides a very convenient CallbackHandler for unit testing because the username and password can be hardcoded. In a real application you would create a CallbackHandler that would solicit for a username and password via a user interface or utilize a biometric device (retinal scanner, thumbprint reader, etc).
A LoginContext is instantiated by the client application. The LoginContext constructor accepts a JAAS Configuration Application name ('srp') and a CallbackHandler. The JAAS Configuration Application name ('srp') maps to a name in the client side auth.conf file. This tells the LoginContext which LoginModules should be invoked.
The LoginContext can use the -Djava.security.auth.login.config Java Virtual Machine (JVM) argument to locate the auth.conf file. The snippet below is from the build.xml file that comes with the sample application.
-Djava.security.auth.login.config=file://${jboss.home}/client/auth.confThere is nothing inherently special about having the file located in the $JBOSS_HOME/client directory. This is just a convenient location.
The LoginModules defined in the above auth.conf file are supplied by JBoss. The first LoginModule invoked is org.jboss.security.srp.jaas.SRPLoginModule. This LoginModule is responsible for initiating the client-server SRP authentication process for a given username and password. The details of the client-server SRP authentication process are discussed in just a bit.
If client-server SRP authentication succeeds then the second LoginModuleorg.jboss.security.ClientLoginModule is invoked. The ClientLoginModule does not perform any authentication, but rather binds the JAAS Subject and credential, populated by the SRPLoginModule, to the JBoss server. This is an example of LoginModule stacking that was discussed in section two.
Listed in Table 3-9 are two very important options for the ClientLoginModule.
Table 3-9: ClientLoginModule Options
| Option Name | Valid Values | Description |
|---|---|---|
| password-stacking | Any non-null value. | Recommended value is 'useFirstPass'. If enabled then Subject and Credential information should have been set by a LoginModule higher in the stack. |
| multi-threaded | 'true' or 'false' | If 'true' then each client thread is able to store authentication information on the server. This allows for multiple users to login. If 'false' then only one user may be logged in to the server. |
The configuration outlined above uses password-stacking. This allows for the SRPLoginModule to perform the authentication and the ClientLoginModule to bind the Subject and credential to JBoss. A multi-threaded server is used to allow concurrent users to login to the server at once, which is probably the normal mode of operation.
The credential that is stored is not the password but rather a verifier. A verifier is mathematically similar to a public key, where the verifier is easily computed from a password, but reverse engineering the password from the verifier is infeasible. The client passes the verifier to the server any time authentication needs to be verified with the server. We will see this when 'Brian' tries to access our secured EJBs.
The Server Side
When the client side LoginModule org.jboss.security.srp.jaas.SRPLoginModule is invoked, a lookup of the SRP Authentication Server is performed. The SRP Authentication Server is located by the srpServerJndiName attribute value. The srpServerJndiName tells the client SRPLoginModule where to locate the SRP Authentication Server.
Diagram 3-3 shows the SRPService MBean configuration and how the client auth.conf file maps the srpServerJndiName JNDI name.
Diagram 3-3: SRPService Configuration
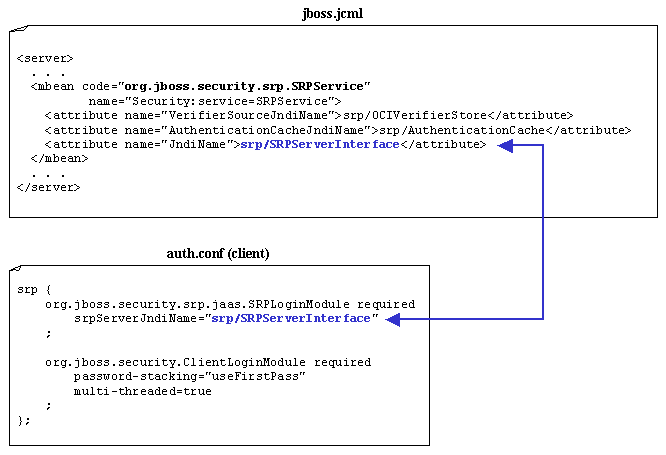
The client SRPLoginModule uses the JndiName attribute value to locate the SRPService MBean and then begins the authentication process.
The client SRPLoginModule first requests a set of SRP parameters based on the given username. Included in the SRP parameters is the verifier based on the actual password. Recall that the verifier is created by the SRPDatabaseVerifierStoreService. The client and server SRP LoginModules will negotiate several times to ensure that the authentication is indeed authentic. If the client and server SRP LoginModules agree the user is who they say they are, then the authentication succeeds. Upon success a server side JAAS Subject, Principal and verifier are created for managing secure J2EE calls. Once authentication succeeds the calling client is allowed to try accessing secure J2EE resources.
The truly impressive aspect of J2EE JAAS authorization is that just a few lines of client code and a few configuration files is all it takes to build a very powerful security framework. The next step is to access secured J2EE resources.
Authorizing Access to J2EE Resources
'Brian' is successfully logged into the application. Now it's time for 'Brian' to start accessing secured J2EE resources, namely the CatalogMgrBean and UserMgrBean. Recall that the authorization process ensures that the calling client has permissions to access a secure resource.
When a client obtains a reference to a secure remote EJB and invokes a method on that bean, the method invocation passes the following information to the server:
- method arguments
- user identity (username) - obtained from Client Login
- credentials (SRP verifier) - obtained from Client Login
When JBoss receives an incoming method invocation it will determine if the bean is configured with a Security Domain. Recall that a Security Domain specifies an application wide security manager whose responsibility is to ensure that users are both authenticated and authorized to access J2EE resources.
JBoss has a set of Interceptors that are executed each time a method invocation hits the server. One of those Interceptors is the Security Interceptor. If the bean is not configured with a Security Domain then the Security Interceptor passes the method invocation to the next Interceptor. If the bean is configured with a Security Domain then the Security Interceptor will perform the following two tasks.
- Perform a server side JAAS login to authenticate the user
- Authorize the user (map user roles to
ejb-jar.xmlfile)
Performing a JAAS login on the server side during a method invocation may seem redundant since the calling client has already been authenticated during the client login process. This is somewhat true for the SRP LoginModule implementation, but there are no rules stating that a user must be authenticated on the client side. There are some client side authentication technologies that simply bind the username and password to the server and upon accessing a secure resource perform authentication. These types of technologies do not provide a robust security model, but they do exist. In any case the server needs to perform a JAAS login again to obtain the necessary JAAS objects (Subject, Principals, etc).
Diagram 3-4: Server Side auth.conf
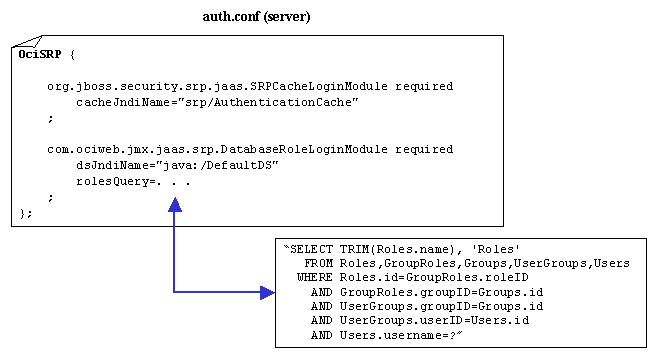
Recall that the SRPService MBean is configured with a SRP Authentication Cache. This cache is used during the server side JAAS login process to improve performance. The server side LoginModule org.jboss.security.srp.jaas.SRPCacheLoginModule provides a door into the SRP Authentication Cache.
Table 3-10: SRPCacheLoginModule Configurable Attributes
| Attribute Value | Description |
|---|---|
| cacheJndiName | Specifies the JNDI name of the Authentication Cache. This should be the same JNDI name used in the SRPService MBean configuration. |
The SRPCacheLoginModule will look up the authentication information from the cache and make that information available to all other LoginModules on the stack.
The next LoginModule to be executed, according to the server side auth.conf file, is com.ociweb.jmx.jaas.srp.DatabaseRoleLoginModule. This is a custom LoginModule written to work with the SRPCacheLoginModule. The DatabaseRoleLoginModule does not attempt any authentication, but rather returns the authentication information available on the authentication stack. The real power of this LoginModule lies in its Role Mapping behavior. Role Mapping is the process by which all roles are retrieved for a single user and mapped to roles in the deployment descriptor (assembly-descriptor section). Thus Role Mapping provides the functionality of ensuring that a user has the privileges to access a J2EE resource.
Table 3-11: DatabaseRolesLoginModule Configurable Attributes
| Attribute Value | Description |
|---|---|
| dsJndiName | Specifies the JNDI name for the data source of the database containing the logical roles (Principals). |
| rolesQuery | A SQL statement that returns zero or more rows of data representing the role name and the role group for a single user (username). When JBoss performs Role Mapping it uses a group called 'Roles'. Thus we want to put all returned roles into a group called 'Roles'. |
If the user is authenticated, a JAAS Subject is created that contains a Principal representing the user's identity ('Brian') and a java.security.acl.Group called 'Roles' that contains a collection of role names assigned to the user. These roles are retrieved by the DatabaseRoleLoginModule using the rolesQuery SQL statement. The Group object is used by JBoss to hold the roles used in the Role Mapping process. Diagram 3-6 shows the mapping between the deployment descriptor and the roles associated with 'Brian'. In this case we configured the UserMgrBean.findUser(int) to only allow access to those with the 'ManageUsers' role. Section one covers the details of creating the security model.
Diagram 3-5: Valid Roles (Deployment Descriptor Mapping)
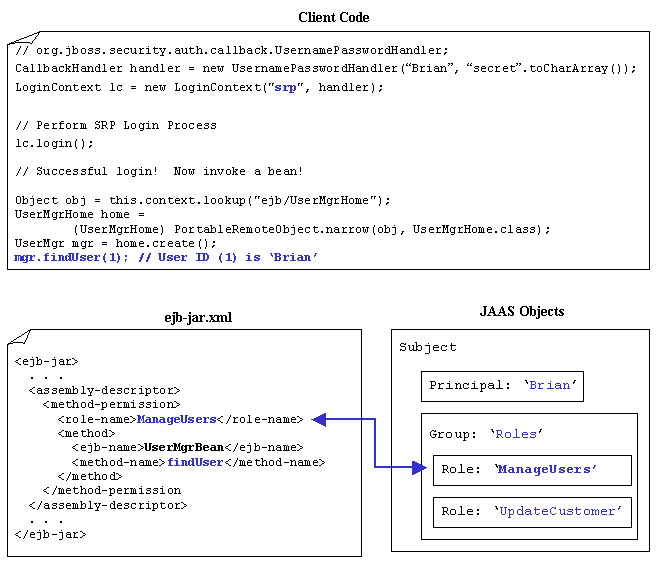
As you can see from the above diagram 'Brian' has the role 'ManageUsers'. Thus 'Brian' will be allowed to execute the method.
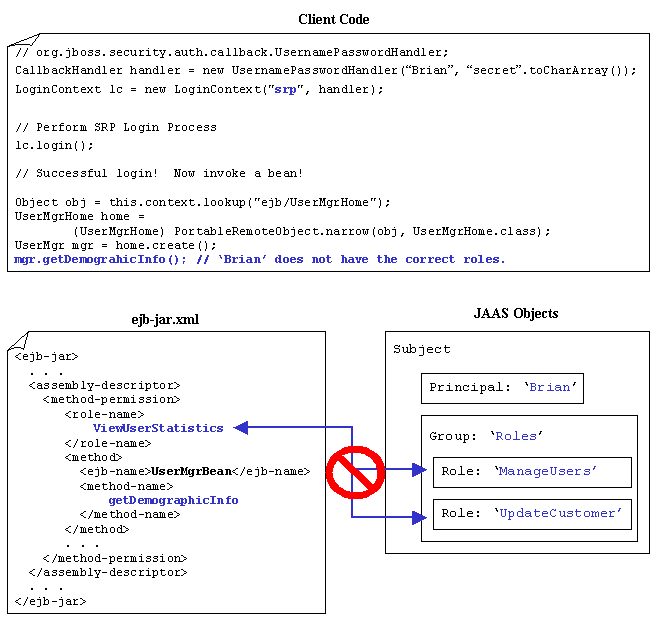
Now let us see at what happens when 'Brian' tries to access a resource that he does not have authorization for. Diagram 3-7 shows that this time 'Brian' is trying to access the UserMgrHome.getDemographicInfo() method. In this case 'Brian' does not have the correct roles and access is denied by throwing a java.lang.SecurityException. Note that this exception is wrapped in a java.remote.RemoteException. If your client code needs to handle a failed access attempt then simply perform a recursive call on Throwable.getCause() to retrieve the root cause of the exception. This holds true for any RemoteException thrown by a J2EE server.
Diagram 3-6: Invalid Roles (Deployment Descriptor Mapping)
Summary
This article covered a lot of ground. We have seen how to create a robust data model to hold user and role information, along with an overview of the JAAS framework, and finally wrapping things up by configuring JBoss to deploy and secure our application using SRP. J2EE JAAS security provides a very powerful framework to secure resources without writing a lot of custom functionality. As enterprise data becomes more and more secure we need the ability to change authentication technologies without jumping through a lot of hoops. By utilizing J2EE and JAAS we are able to keep up the pace of creating and securing robust, cutting-edge, enterprise applications.
Resources
Resource Bundle
The resource bundle contains example JAAS LoginModules and CallbackHandlers, along with a completely configured JBoss server using the SRP protocol discussed in section three. Scripts and Ant targets are also available in the resource bundle to install all third-party software (MySQL, JBoss, Ant, JUnit). Simply download and follow the instructions provided in the readme.txt file.
Open Source Tools
- JBoss
http://www.jboss.org - MySQL
http://www.mysql.org - JUnit
http://www.junit.org - Apache Ant
http://jakarta.apache.org/ant
References
Books
- [1] Ant: The Definitive Guide, Jesse E. Tilly, Eric M. Burke (O'Reilly, 2002; ISBN: 0-596-00184-3)
- [2] Enterprise Java Beans (3rd Edition), Richard Monson-Haefil (O'Reilly, 2001; ISBN: 0-596-00226-2)
- [3] XML in a Nutshell, Elliotte Rusty Harold, W. Scott Means (O'Reilly, 2001; ISBN: 0-596-00058-8)
Links
- [4] JAAS
http://java.sun.com/products/jaas/index-14.html - [5] JMX
http://java.sun.com/products/JavaManagement/index.html - [6] JNDI
http://java.sun.com/products/jndi - [7] JBoss forums
http://jboss.org/forums.jsp - [8] SRP
http://www-cs-students.stanford.edu/~tjw/srp/
Software Engineering Tech Trends (SETT) is a regular publication featuring emerging trends in software engineering.
