Introduction
There are many approaches to managing state (data) in web applications. Often state management libraries are specific to a single framework such as Angular, React, or Vue.
State can be stored in any of these locations:
- the DOM
- sessionStorage
- localStorage
- inside components that use the state
- a "store" that can be shared by all components
The last option has become the most popular.
One reason for this is the desire for state changes to be reflected by re-rendering all components that care about particular pieces of data. An example of a library that provides this functionality is Redux. Redux can be used with many frameworks and is especially popular in React applications.
Want to see this tutorial in action? Mark Volkmann provides a real-time demonstration in this video.
State-Management Goals
Goals for state management include the following:
- Enable writing components that can just render data passed to them (in React using "props").
- It should be easy to specify the state properties used by each component whose changes should cause a component to re-render.
- It should be easy to replace the current state with new state.
- It should be easy to retrieve the current state.
- It should be easy to register functions that derive a new state by applying changes to the current state, and such functions should be usable by multiple components.
- It should be easy to view the current and past states in browser developer tools.
- It should be easy to see a log of all requested state changes and the changes they caused.
- It should be easy to replay state changes backward and forward and see resulting UI changes ("time travel debugging").
- State should survive browser refreshes and the UI should re-render correctly.
Use of a store is a good step toward achieving these goals.
Many state management libraries support using a store, but most do not achieve all the listed goals.
Redux Fundamentals
The Redux approach to state management can be summarized by the following:
- Application state is held in a single "store."
- State is only updated by dispatching actions.
- Actions are objects that have a type and an optional payload.
- Actions can be dispatched by any code, but often this is done by components in response to user interaction.
- Reducers are functions that take the current state and an action and return a new state.
- State is never modified, only replaced.
- Components can register to be notified when state they care about changes so they can re-render.
Example Application
Let's walk through an example application that uses a common approach to utilizing Redux and assess how it meets the goals listed earlier.
The example application creates greeting card content. It allows:
- selection of an occasion
- entry of a person's name
- entry of a message
- ability to "shout" the message (all uppercase)
- display of the card content
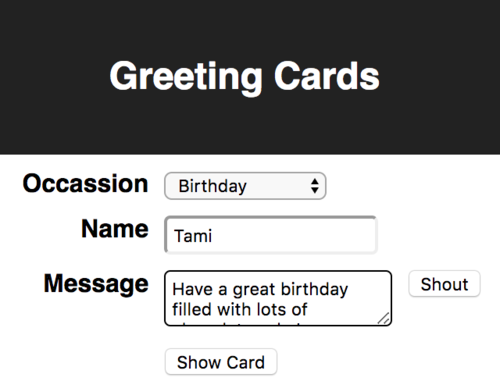
After entering the data, pressing the "Show Card" button displays the card content.

The code for this application can be found at https://github.com/mvolkmann/redux-greeting-card.
Steps to support a new "action"
A Redux "action" has a name and data that is used to update the state in a particular way.
The steps typically followed to support a new action in a React application that uses Redux are:
- Add a new action type constant.
- Write an "action creator function" that creates an action object of a specific type and has the appropriate payload. The payload is just the data needed to update the state.
- Modify the
switchstatement in a "reducer" function to handle the new action type by building a new state that incorporates the action payload. - Write an event handling function in each component that will "dispatch" the action.
- Register the event handling function so it will be invoked at the appropriate time. For example, this might happen when a user presses a button or changes an input.
- Possibly add new properties to the object that defines the initial state for the application.
Example App State
The state used by this application is specified in the variable initialState, which is set in https://github.com/mvolkmann/redux-greeting-card/blob/master/src/index.js.
Here is that code:
const initialState = {
  occasion: 'Birthday',
  name: '',
  message: '',
  show: 'form'
};
Supplying State to Components
Using a mapStateToProps function, a component can copy state property values to component properties, which causes the component to re-render when they change.
Components that are attached to application state in this manner are referred to as connected components.
The Form component at https://github.com/mvolkmann/redux-greeting-card/blob/master/src/form.js does this with the following code:
function mapStateToProps(state) {
  const {message, name, occasion} = state;
  return {message, name, occasion};
}

export default connect(mapStateToProps, mapDispatchToProps)(Form);
The object returned by mapStateToProps provides what will become the "props" of the component. It can access those via this.props.
Updating State in Response to User Input
A component updates state in Redux by calling a function that dispatches an action. These functions are typically defined in an object returned by a mapDispatchToProps function. It can call "action creator" functions to obtain the "action objects" that it passes to the Redux dispatch function.
In the example app, the action creator functions are defined in https://github.com/mvolkmann/redux-greeting-card/blob/master/src/reducer.js.
Here is the mapDispatchToProps function from the Form component.
const mapDispatchToProps = dispatch => ({
  handleMessage(event) {
    dispatch(setMessage(event));
  },
  handleName(event) {
    dispatch(setName(event));
  },
  handleOccasion(event) {
    dispatch(setOccasion(event));
  },
  showCard() {
    dispatch(setShow('card'))
  },
  shout() {
    dispatch(shout())
  }
});
The action creator functions are all pretty similar. Here is one from reducer.js.
export const setMessage = event => ({
  type: SET_MESSAGE,
  payload: event.target.value
});
A form element in a component gets its value from a prop passed to the component. When it receives user input, it uses an event handling method to call a function supplied as a prop from mapDispatchToProps.
The Form component render method renders form elements that have values obtained from props.
The form elements specify event handling methods that are invoked when the user interacts with the element.
Here is the entire render method from the Form component.
 render() {
    const {
      handleMessage,
      handleName,
      handleOccasion,
      message,
      name,
      occasion,
      showCard,
      shout
    } = this.props;

    return (
      <div className="form">
        <div className="row">
          <label>Occassion</label>
          <select onChange={handleOccasion} value={occasion}>
            <option>Birthday</option>
            <option>Christmas</option>
            <option>Valentine’s Day</option>
          </select>
        </div>
        <div className="row">
          <label>Name</label>
          <input type="text" onChange={handleName} value={name} />
        </div>
        <div className="row">
          <label>Message</label>
          <textarea onChange={handleMessage} value={message} />
          <button onClick={shout}>Shout</button>
        </div>
        <div className="row">
          <label></label>
          <button onClick={showCard}>Show Card</button>
        </div>
      </div>
    );
  }
Action creator functions and reducer functions use "action types" to identify specific kinds of actions. These are string constants.
The following action types are defined for this application in reducer.js.
const SET_MESSAGE = 'SET_MESSAGE';
const SET_NAME = 'SET_NAME';
const SET_OCCASION = 'SET_OCCASION';
const SET_SHOW = 'SET_SHOW';
const SHOUT = 'SHOUT';
The file reducer.js also defines a reducer function that is invoked when an action is dispatched.
ES2018 added the ability to use the spread operator in objects. This is a great way for reducer functions to create new objects from data in existing objects.
Here is that function:
export function reducer(state, action) {
  const {payload, type} = action;
  switch (type) {
    case SET_MESSAGE:
      return {...state, message: payload};
    case SET_NAME:
      return {...state, name: payload};
    case SET_OCCASION:
      return {...state, occasion: payload};
    case SET_SHOW:
      return {...state, show: payload};
    case SHOUT:
      return {...state, message: state.message.toUpperCase()};
    default:
      return state;
  }
}
Note how the reducer function always returns a new state object rather than modifying the one passed to it. This is a requirement in Redux.
This approach for utilizing Redux works well, but it requires a large number of steps.
Simplifying Use of Redux
Now that we've seen the typical way in which Redux is used, let's see what we can do to simplify things.
I have primarily used React over the last few years and have created a library that simplies the use of Redux. It is called redux-easy and can be found in npm at https://www.npmjs.com/package/redux-easy.
redux-easy uses the redux and react-redux npm packages under the covers, so existing apps that do the same can be gradually changed to use redux-easy.
A version of the sample app that uses a simpler approach to state management can be found at https://github.com/mvolkmann/redux-easy-greeting-card.
Applications that use redux-easy must call reduxSetup. This function takes three arguments:
- the top component to be rendered, often named
App - the initial state for Redux as a JavaScript object
- the element where the component should be rendered (defaults to the element with an id of
root)
For example, if the top component is named App, the intialState is in a variable named initialState, and there is an element with an id of root in the main HTML file, this will work:
reduxSetup({component: <App />, initialState});This one line replaces the following code in typical Redux usage:
import {Provider} from 'react-redux';
import {createStore} from 'redux';

// Setup for redux-devtools
const extension = window.__REDUX_DEVTOOLS_EXTENSION__;
const enhancer = extension && extension();

const store = createStore(reducer, initialState, enhancer);

ReactDOM.render(
  <Provider store={store}>
    <App />
  </Provider>,
  document.getElementById('root')
);
Goals Achieved by redux-easy
Let's assess how redux-easy meets the goals stated earlier.
Goal #1: Components just render data passed to them
This is a fundamental part of React, and we don't need to do anything extra to get that.
Goal #2: It's easy to specify state properties used by a component
In standard Redux, this is done in the mapStateToProps function. But that function is passed the entire state and typically uses destructuring to pull out the properties of interest.
It can be simplified by supporting a watch function that accepts a component and a mapping of desired property names to paths within the state.
Here's an example.
export default watch(Card, {message: '', name: '', occasion: ''});This says that the Card component wants to get properties named message, name, and occassion from the state.
The empty strings signify that the path to the state value happens to match the name of the prop.
Suppose we wanted a prop named zip, but it was located at user.address.zipCode in the state. In that case, the object passed to watch would contain:
zip: 'user.address.zipCode'With this approach, the mapStateToProps function is not needed. The watch function returns a "higher-order component" that is used in place of the component passed to it.
Goal #3: Current state is easily replaced
In standard Redux, state is replaced in a reducer function which is invoked when an action object is dispatched.
Action objects are created by calling an action creator function. The action object has a type property whose value matches an action type string constant.
The reducer function uses a switch statement to match on the type property in the action object.
This works great, but is NOT easy! Too many steps are involved.
An easier approach is to enable any component to import a dispatch function that accepts an action type and an optional payload.
For example:
dispatch('shout');This particular action doesn't require a payload. For actions that do, that is supplied as the second argument to the dispatch function.
In typical applications, most cases in a reducer function simply produce new state where the value of an existing state property is modified. In those cases another function can be used to specify the desired state change.
For example, to change the zipCode of the current user, we can do this:
dispatchSet('user.address.zipCode', newZipCode);This generates an action with the type "@@set user.address.zipCode" which is handled by the provided reducer function.
Now we're getting somewhere!
We can update state from anywhere without defining action type constants, writing action creator functions, or adding code to a reducer function. It addition, there is no need to write tests for reducer code that now does not exist.
Sometimes we want to change state in a more complicated way that can be handled by dispatchSet. While a custom reducer can be implemented for such cases, additional dispatch* methods provide an easier solution.
dispatchDelete dispatches an @@delete action that deletes the state at a given path.
For example:
dispatchDelete('user.lastName');dispatchTransform dispatches an @@transform action that transforms the value of the state at a path. It takes a path and a function.
The function is passed the current value at the path and returns the new value.
For example:
dispatchTransform('game.score', score => score + 1);dispatchPush dispatches an @@push action that appends elements to an array. It takes a path to an array and any number of values to be appended.
For example:
dispatchPush('paint.colors', 'red', 'green', 'blue');dispatchFilter dispatches an @@filter action that filters elements in an array. It is useful for deleting elements. It takes a path to an array and a function.
The function is passed each array element and should return true for elements to be retained and false for elements to be deleted.
For example the following removes the color green from an array of colors:
dispatchFilter('paint.colors', color => color !== 'green');dispatchMap dispatches an @@map action that modifies the elements in an array. It takes a path to an array and a function.
The function is passed each array element and should return the new array element value.
For example the follow doubles all the scores in an array:
dispatchMap('game.scores', score => score * 2);These function cannot handle every possible case. For example, none can modify the value at multiple paths.
For more complex state changes, define a new reducer function as explained in goal #5.
Goal #4: Current state is easily retrieved
We've already seen how the watch function can be used to specify the state data that a component wishes to receive from the state. This works great for components. But it would be nice to also allow non-component code, perhaps invoked by component code, to grab the current state.
Such code can retrieve the zipCode of the current user as follows:
const zip = getState().user.address.zipCode;Goal #5: It's easy to write/register functions that derive new state
In standard Redux, supporting a new action type requires many steps. It is simpler to allow any code to call an addReducer function as follows:
addReducer('shout', state => ({
  ...state,
  message: state.message.toUpperCase()
}));
This reducer can be invoked by calling dispatch('shout').
Here's another example that sets multiple state properties:
addReducer('setRadius', (state, radius) => {
  const area = Math.PI * radius ** 2;
  const circumference = 2 * Math.PI * radius;
  const {circle} = state;
  return {
    ...state,
    {...circle, area, circumference, radius}
  };
};
This reducer can be invoked by calling dispatch('setRadius', someRadius).
The addReducer function just adds to a map from action types (shout in this example) to functions that handle that type. When the supplied reducer function is invoked, it finds the appropriate function from the map and invokes it to obtain the new state.
With this approach it is not necessary to:
- define action type constants
- write action creator functions
- add a new case to the
switchstatement in a reducer function
Goal #6: It's easy to view current and past states
The approach presented here builds on the redux npm package. This means that redux-devtools, a browser developer tool for Redux available for Chrome and Firefox at https://github.com/gaearon/redux-devtools, can still be used. That provides an easy way to view all the state history.
Goal #7: It's Easy to see log of all state changes and diffs
This is also achieved by using redux-devtools.
Goal #8: It's Easy to replay state changes backward and forward
This is also achieved by using redux-devtools.
Goal #9: State should survive browser refreshes
One way to have state survive browser refreshes is to store it in the browser sessionStorage. That can only store strings, so the entire state object must be serialized to a JSON string.
While that is relatively fast, doing this on every change can introduce a performance issue. The throttle function in Lodash can be used to prevent this from happening more than once per second. In practice this works well.
When the browser is refreshed, the function that configures Redux called reduxSetup is invoked again. That function reloads the state from sessionStorage by passing it to JSON.parse and using the object that returns to recreate the Redux store.
All of this is handled automatically by the reduxSetup function.
Well-written React components just render what is passed to them through props. As we have seen, the watch function can be used to specify a mapping from state properties to component props. Since state is restored from sessionStorage after a refresh, the UI re-renders correctly.
Form Elements Tied to State Paths
It is common to have input, select, and textarea elements with onChange handlers that get their value from event.target.value and dispatch an action where the value is the payload.
An alternative is to use the provided Input, Select, and TextArea components as follows:
HTML input elements can be replaced by the Input component. For example:
<Input path="user.firstName" />The type property defaults to 'text' but can be set to any valid value, including 'checkbox'.
The value used by the input is the state value at the specified path. When the user changes the value, this component updates the value at that path in the state. If the state value at the specified path is modified by other code, the value displayed in the input is updated to match.
To perform additional processing of changes, such as validation, supply an onChange prop that refers to a function.
HTML textarea elements can be replaced by the TextArea component. For example:
<TextArea path="feedback.comment" />HTML select elements can be replaced by the Select component. For example:
<Select path="user.favoriteColor">
  <option>red</option>
  <option>green</option>
  <option>blue</option>
</Select>
If the option elements have a value attribute, those values are used instead of the text inside the option.
For a set of radio buttons, use the RadioButtons component. For example:
<RadioButtons
  className="flavor"
  list={radioButtonList}
  path="favoriteFlavor"
/>
where radioButtonList is set as follows:
const radioButtonList = [
  {text: 'Chocolate', value: 'choc'},
  {text: 'Strawberry', value: 'straw'},
  {text: 'Vanilla', value: 'van'}
];
When a radio button is clicked, the state property favoriteFlavor is set the value of that radio button.
For a set of checkboxes, use the Checkboxes component. For example:
<Checkboxes className="colors" list={checkboxList} />where checkboxList is set as follows:
const checkboxList = [
  {text: 'Red', path: 'color.red'},
  {text: 'Green', path: 'color.green'},
  {text: 'Blue', path: 'color.blue'}
];
When a checkbox is clicked, the boolean value at the corresponding path is toggled between false and true.
Asynchronous Actions
If a function passed to addReducer returns a Promise, when a matching action is dispatched it will wait for that Promise to resolve and then update the state to the resolved value of the Promise.
Here's an example of such a reducer function:
addReducer('myAsyncThing', (state, payload) => {
  return new Promise(async (resolve, reject) => {
    try {
      // Data in payload would typically be used
      // in the following call to an asynchronous function.
      const result = await fetch('some-url');

      // Build the new state using the current state
      // obtained by calling getState() rather than
      // the state passed to the reducer function
      // because it may have changed
      // since the asynchronous activity began.
      const newState = {...getState(), someKey: result};

      resolve(newState);
    } catch (e) {
      reject(e);
    }
  });
});
Conclusion
If you are using React, I encourage you to give redux-easy a try. I'm confident you will find that it greatly simplifies your applications.
If you are not using React, I encourage you to implement a library like redux-easy for your framework of choice. I have started work on a library like this for Angular called ngrx-store-easy. See https://www.npmjs.com/search?q=ngrx-store-easy.
Let's make state management easier for all the popular web app frameworks!
See the example in action
Software Engineering Tech Trends (SETT) is a regular publication featuring emerging trends in software engineering.
