tmux*
By Mark Volkmann, Partner at Object Computing, Inc.
January 2013
*Updated 1/27/13
Introduction
This article provides an overview of tmux. tmux is short for "terminal multiplexer." It dramatically expands what can be done with terminal windows. It is highly configurable and scriptable.
tmux is an alternative to an older, similar program named "screen". It was created by Nicholas Marriott. The first version was released in 2007.
One benefit of both tmux and screen is realized when working on remote machines where network communication can fail. Both maintain the state of sessions so the user can pick up where they left off by reconnecting and reattaching to the session.
I first learned about tmux from the excellent book "tmux: Productive Mouse-Free Development" by Brian Hogan at http://pragprog.com/book/bhtmux/tmux. If this article piques your interest in tmux, I highly recommend getting this book.
Another excellent source of information about tmux is its long man page. Studying the tmux man page will enable you to maximize the benefits derived from its use. If you decide to print it, generate a nicely formatted PostScript version with man -t tmux > tmux.ps.
This article contains many tables. It is intended to be printed and used as a cheat sheet. The tables have been carefully organized and styled so none of them split across a page break.
For You?
Like any software tool, tmux doesn't appeal to everyone. There are three key indicators that tmux is a fit for you.
- You work in a Unix-like environment like Linux or Mac OS X. tmux is not supported under Windows (not even in Cygwin).
- You frequently work in terminal windows performing command-line activities.
- You value using keyboard shortcuts as alternatives to using a mouse. An indicator of this is that you prefer editors like Vim or emacs, or that you have memorized many keyboard shortcuts in an IDE.
Terminology
| Term | Definition |
|---|---|
| server | A tmux server manages a set of sessions. The server is started when the user creates the first session. The server terminates when all sessions have been killed. |
| client | A tmux client manages the interactions with one session at a time. When the user enters a command from the command-line to create a new session or attach to an existing one, a client is created. The user can start any number of clients. |
| session | A tmux session is a collection of windows. The user can ask a client to create a new window in a session, kill an existing window in a session, or switch to a different session. |
| window | A tmux window has one or more associated panes. A client displays one window of a session at a time. The user can ask a client to split an existing pane in order to create a new pane in a window, kill an existing pane in a window, or display a different window from the current session. |
| pane | A tmux pane belongs to a window and is displayed when its window is displayed. Each pane runs the default shell in a command-line terminal. The user can ask a client to change the active pane, the layout of the panes, or the position of the panes. |
| status bar | A tmux client displays a status bar, typically on the bottom line, but it can be configured to display at the top. It has three sections named left, centre and right. The content of the left and right sections can be customized. The centre section displays a list of the names of the windows in the current session. |
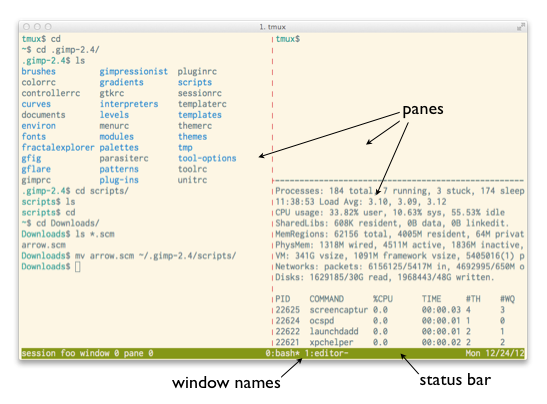
Typically it is desirable to view certain panes simultaneously. This is accomplished by putting those panes in the same window. The pane border color indicates which pane is active.
Consider creating a separate session for each group of related activities. For example, when working on multiple projects, create a session for each. Each project can have its own script that attaches to an existing session for that project if one already exists, or creates a new session. The script can create a set of windows, each with a set of panes, that are configured in a way that is convenient for that project. The script can also run commands (ex. ssh) in specific panes.
Sessions and windows can have names, but panes typically only have indexes. A pane can be given a title by running this command from the pane: printf '\e]2;title\e\\'. Pane titles are only displayed in customized status bars using #T. Only the title of the active pane is displayed.
Installing
To install tmux on a Mac:
- Open a Terminal window.
- Install Homebrew by running
ruby -e "$(curl -fsSkL raw.github.com/mxcl/homebrew/go)" brew install tmux
Additional Mac-specific advice appears near the end of this article.
The steps to install tmux in a Linux environment vary based on the package manager used.
Here are the steps when using apt-get:
- Open a terminal window.
sudo apt-get install libevent-devsudo apt-get install libncurses5-dev- Download the latest version of tmux from http://tmux.sourceforge.net.
tar -zxvf tmux-{version}.tar.gzcd tmux-{version}./configuremakesudo make install
To verify the version of tmux that is installed, enter tmux -V. Note that the flag is a capital V.
Commands
There are many tmux commands. The most useful subset and their options (in my opinion) are covered in this article.
Many commands can be executed in several ways that include:
- command-line / shell script
- command mode in a tmux client
- keyboard shortcut (default or custom) in a tmux client
- tmux configuration file
Every keyboard shortcut is bound to a tmux command. Some tmux commands can only be used from the command-line or a shell script. Some tmux commands can only be used from inside a tmux client. Some tmux commands can be used from anywhere.
Most keyboard shortcuts are case-sensitive and begin with what tmux refers to as a "prefix key". By default this is ctrl-b, also written as C-b. The tmux man page refers to control key sequences as C-{key} and this article follows that convention. The meta key is abbreviated as M. On a Mac, this is cmd-option by default. Many users bind the prefix key to C-a for convenience and to match the prefix key in the "screen" program. This is done in the sample tmux configuration file shown later.
| Action | Command |
|---|---|
| list | prefix ?, list-keys or lskThis lists all the current key bindings. Press the return key when finished viewing. |
| bind | bind-key [-r] {key} {command}bind ... This binds a key to a command. If the key is already bound to another command, this replaces the binding. The -r flag makes the key repeat so the command can beexecuted again by pressing the key without the prefix key. |
| unbind | unbind-key {key}unbind ...This removes a key binding. |
From a command-line or shell script, tmux commands can be executed by entering "tmux {command}". From inside a tmux client, tmux commands can be executed by pressing prefix : to enter command mode and then entering a command in the status bar. Commands can be specified by name (full or shortest unique prefix) or alias for commands that have one. Tab completion can be used to enter command names. The up and down arrows can be used to recall previously entered commands.
A common command flag is -t which specifies a target client, session, window or pane.
Sample Session
After installing tmux, following along with this sample session to get a feel for what tmux can do. Where "prefix" appears, press C-a.
- Create the file ~/.tmux.conf with the following content that will be explained later:
- set -g prefix C-a # changes prefix key sequence from C-b to C-a
- bind | split-window -h
- bind - split-window -v
2. Create a session named "foo": tmux new -s foo3. Split the window horizontally: prefix |4. Split the right pane vertically: prefix -5. Run the "top" command in the lower-right pane just created: top6. Switch to the left pane: prefix left-arrow
7. cd to the /tmp directory and list the files there: cd /tmp; ls8. Create a second window in this session: prefix c9. Name the window "editor": prefix , (press the comma key) and change the default name (ex. bash) to "editor"
10. Start a text editor in the only pane in this window: vim11. Notice that there are two window names in the status bar at the bottom.
12. Switch back to the first window: prefix l13. Detach from this session: prefix d14. Create a session named "bar": tmux new -s bar15. Split the window vertically: prefix -16. Start a text editor in the bottom pane: vim17. Split the bottom pane horizontally two times: prefix | prefix |18. Split the current pane vertically: prefix -19. Display a clock in the current pane: prefix : clock-mode or prefix t20. Change the layout of the panes in the current window several times: prefix space
21. Note how the pane borders indicate which pane is active.
22. Change the active pane several times: prefix {arrow-key}
23. Make the clock pane the active pane: prefix {arrow-key}
24. Swap the clock pane with the previous pane several times: prefix {25. Rotate all the panes in this window up: prefix C-o26. Make the vim pane the active one: prefix {arrow-key}
27. Move the vim pane to a new window within this session: prefix !28. Detach from this session: prefix d29. List the existing sessions: tmux ls30. Attach to the foo session: tmux attach -t foo31. Switch to the bar session: prefix s, use arrow keys to move to "bar" and press return
32. Detach from this session: prefix d33. Kill the bar session: tmux kill-session -t bar34. List the existing sessions: tmux ls35. Note that only the foo session remains.
36. Kill the foo session: tmux kill-session -t foo
| Action | Command |
|---|---|
| new | $ tmux new-session [-s {session-name}] [-w {first-window-name}] [{command}]$ tmux new ...This creates a new session with an optional name containing one window with an optional name and starts a new client for interacting with it. The window will contain a single pane that runs an optional command. If the session or window name is omitted, it will be an incrementing integer starting at zero. |
| detach | prefix d, detach-client or detachThis exits from the current client. The session continues running. |
| attach | $ tmux attach-session -t {sess-name}$ tmux attach ...This creates a new client and attaches it to an existing session. |
| list | list-sessions or lsWhen run from outside tmux, this outputs "failed to connect to server" if there are no sessions. |
| rename | prefix $ (prompts)rename-session [-t {old-name}] {new-name}rename ...This renames the current session (if -t is omitted) or a specified one. |
| switch | from list: prefix s or choose-session (lists existing and allows choosing one)previous: prefix (, switch-client -p or switchc -pnext: prefix ), switch-client -n or switchc -nThese change the session being viewed and operated on by the current client. |
| kill | kill-session [-a] [-t {sess-name}]-a kills all sessions but the one specified with -t.Using -a without -t kills all but the most recently created session.Run from command mode with no flags to kill the current session and client. |
| Action | Command |
|---|---|
| new | prefix c, new-window [-n {name}] [{command}] or neww ...This creates a new window in the current session. If no name is specified, it will be the command currently running (ex. bash). |
| rename | prefix , (prompts for new name)rename-window [-t {old-name}] {new-name} or renamew ...This renames the current window or a specified window if -t is used. |
| switch | last selected: prefix l, last-window or lastnext: prefix n, next-window or nextprevious: prefix p, previous-window or prevclick window name in status bar (if enabled) by index: prefix {0..9} from list: prefix w or choose-window |
| list | list-windows or lswA window cannot be selected from the list, so this isn't very useful. Pressing prefix w, described above, is more useful. |
| move | prefix . (prompts for other session name)move-window -t {dst-session}movew ...This moves the current window to a different session. |
| kill | prefix & (asks for confirmation), kill-window or killwThis kills the current window. |
| Action | Command |
|---|---|
| new | via horizontal split: prefix % (often re-bound to prefix |), split-window -h or splitw -hvia vertical split: prefix " (often re-bound to prefix -), split-window -v or splitw -v |
| switch | next: prefix o (doesn't repeat) or select-pane -t i:.+last active: prefix ; or last-paneby direction: prefix {arrow-key} (repeats) by index: prefix q or display-panesThis briefly displays pane indexes. Press a digit key to select a pane. |
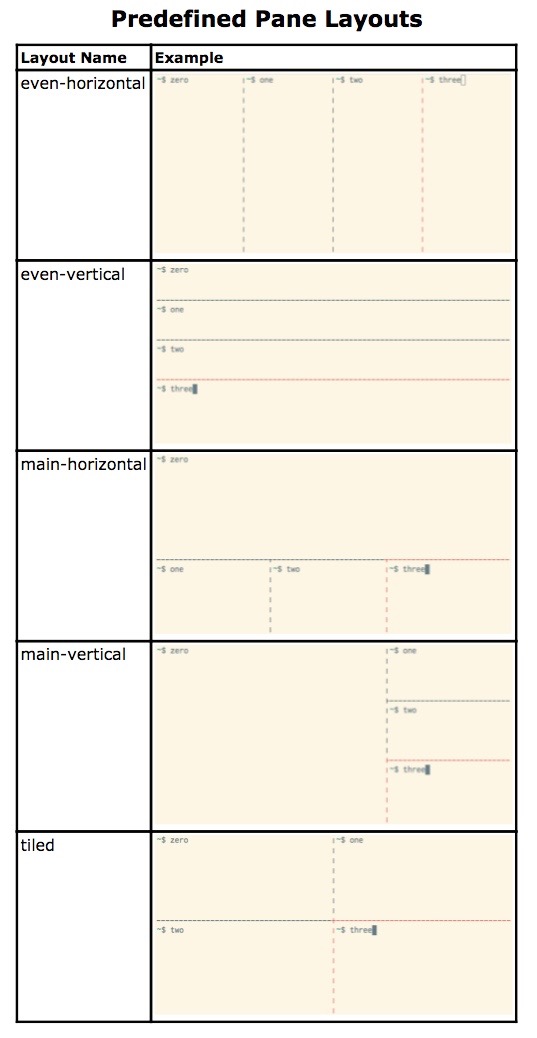
| change layout | See examples of the supported layouts in the next table. specific layout: prefix M {1-5}where the number matches one of the following layout names: 1) even-horizontal (left to right)2) even-vertical (top to bottom)3) main-horizontal (top fills width)4) main-vertical (left fills height)5) tiledcycle through layouts: prefix space (doesn't repeat) by layout name: select-layout {name} |
| resize | by one cell: prefix C-{arrow-key} (repeats) by five cells: prefix M-{arrow-key} (repeats) by any number of cells: resize-pane -UDLR {cells} or resizep ...These resize the current pane in the specified direction. If the mouse-resize-pane option is on, pane borders can be dragged. |
| rotate | down: prefix C-o (repeats) or rotate-window -DThis moves all panes to the next highest numbered position. up: prefix M-o or rotate-window -UThis moves all panes to the next lowest numbered position. |
| swap | with previous: prefix { (doesn't repeat)with next: prefix } (doesn't repeat)with a given pane: swap-pane -s {pane-index}These swap the position of the current pane with another. |
| move | current to new window: prefix ! or break-panecurrent to existing window: join-pane -t {session-name}:{window}.{pane} or joinp ...This adds the pane after the target pane. Omit {session-name}: for the current session (typical).If the -t value is only a number (no colon or period),it is treated as a pane index within current window. To move to last window, joinp -t!given pane to current window: join-pane -s {session-name}:{source-window}.{source-pane}omit {session-name}: for current session (typical) omit .{source-pane} if only one pane in source window This pane is added after the pane with focus. |
| execute command from a script |
$ tmux send-keys -t {sess}:{win}:{pane} '{commands}' C-m$ tmux send ...This executes commands (semicolon-separated) in a specified pane. C-m is the return key. See the examples in the "Scripting" section later. |
| kill (close) | enter "exit", prefix x (asks for confirmation), kill-pane or killp |
Buffers
Each pane has a history buffer that stores the shell commands entered and their output. The size of this buffer is specified by the history-limit session option and defaults to 2000 lines. To scroll through the content of a buffer and optionally copy some of its content, enter copy mode using the command shown below.
Each copy creates a new "paste buffer" on a stack. There is one paste buffer stack per session. The stack has a limited size that is specified by the buffer-limit server option and defaults to 20. When the limit is reached and a new paste buffer is created, the oldest one is discarded.
| Action | Command |
|---|---|
| enter copy mode | prefix [ or copy-mode |
| exit copy mode | Press return or q. |
| move cursor | Press arrow keys or use Vim keys likegg (go to top), G (go to bottom),C-f (page forward) and C-b (page backward).This can also be configured to use Emacs keys. |
| copy text | Move to start, press space, move to end and press return. This creates a new paste buffer on the stack. |
| copy all visible text | capture-paneThis creates a new paste buffer on the stack. |
| list paste buffers | prefix #, list-buffers or lsbThis lists each buffer index followed by the beginning of its content. Press return when finished viewing. |
| view paste buffer contents | show-buffer {index} or showb ...This shows the content of the specified buffer or the top one if index is omitted. Press return when finished viewing. |
| save paste buffer content to file | save-buffer [-b {buf-index}] {file-path} or saveb ...If -b is not specified, the most recent paste buffer is saved. |
| paste text from top paste buffer | press ], paste-buffer or pasteb |
| paste text from a specific buffer | press = or choose-bufferMove the cursor to one of the buffers and press return. Press q to exit without choosing a buffer. |
| change paste buffer stack size | buffer-limit {number} |
| delete one paste buffer | delete-buffer [{index}] or deleteb ...This deletes the specified buffer or the top one if index is omitted. |
| clear history buffer | clear-history or clearhistThis deletes all the history buffer content for the current pane. It does not delete paste buffers. |
Configuration
tmux is highly configurable. There are three kinds of options: server, session and window. Options can be global (the common case) or apply to a specific session or window.
| Action | Command |
|---|---|
| set option | set-option [-agqsuw] [-t {sess}|{win}] {name} {value}set ...-a appends value to the existing option value.-g specifies a global option (typically want this), not specific to one session or window.-q operates quietly without informational message output.-s specifies a server option.-u unsets an option specific to a session or window so the global option is used.-t specifies the name of a particular session or window whose option is being set or unset.-w specifies a window option.If neither -s nor -w is used, a session option is assumed. |
| show option | show-options [-gsw] [-t {sess}|{win}] [{name}]show ...The flags have the same meaning as in set-option.Omit name to see all options in the specified category. |
| set window option | set-window-option [-agqu] [-t {win}] {name} {value}setw ...This is identical to using set-option -w ...The flags have the same meaning as in set-option. |
| show window option | show-window-options [-g] [-t {win}] [{name}]showw ...This is identical to using show-options -w ...The flags have the same meaning as in set-option. |
There are WAY too many options to describe in detail in this article. The table below is provided simply to give a feel for the configurability of tmux. See the tmux man page for details.
| Kind | Options |
|---|---|
| server | buffer-limit, escape-time, exit-unattached, quiet and set-clipboard |
| session | base-index, bell-action, bell-on-alert, default-{command|path|shell|terminal}, destroy-unattached, detach-on-destroy, display-panes-{active-colour|colour|time}, display-time, history-limit, lock-after-time, lock-command, lock-server, message-{attr|bg|fg|limit}, message-command-{attr|bg|fg}, mouse-resize-pane, mouse-select-{pane|window}, mouse-utf8, pane-active-border-{bg|fg}, pane-border-{bg|fg}, prefix, prefix2, repeat-time, set-remain-on-exit, set-titles, set-titles-string, status, status-{attr|bg|fg|interval|justify|keys}, status-left, status-left-{attr|bg|fg|length}, status-right, status-right-{attr|bg|fg|length}, status-utf8, terminal-overrides, update-environment, visual-{activity|bell|content|silence} and word-separators |
| window | aggressive-resize, allow-rename, alternate-screen, automatic-rename, clock-mode-{colour|style}, force-{height|width}, main-pane-{height|width}, mode-{attr|bg|fg}, mode-{keys|mouse}, monitor-{activity|content|silence}, other-pane-{height|width}, pane-base-index, remain-on-exit, synchronize-panes, utf8, window-status-bell-{attr|bg|fg}, window-status-content-{attr|bg|fg}, window-status-activity-{attr|bg|fg}, window-status-{attr|bg|fg|format}, window-status-current-{attr|bg|fg|format} and xterm-keys |
tmux configuration comes from two files. If it exists, tmux reads /etc/tmux.conf which is shared by all users. Then it reads .tmux.conf in the user's home directory (~/.tmux.conf) to supplement and override settings in the first file. Here's an example configuration file that is well-commented to describe each piece. This barely scratches the surface of possible status bar customizations. All characters from a # to the end of a line are treated as a comment and ignored.
- # Session options
- # reduce time tmux waits to send commands after an escape is input
- set -sg escape-time 1
-
- # Window options
- # allow multiple clients to display windows from the same session in different sizes
- setw -g aggressive-resize-on
- setw -g mode-keys vi # enable vi keys for working with buffers
- setw -g mode-mouse on # allow mouse drags to enter copy mode and select text
- # watch for activity in windows so it can be indicated in the status bar
- # (see visual-activity option below)
- setw -g monitor-activity on
-
- # Prefix key
- set -g prefix C-a # instead of default C-b
- unbind C-b # don't want two keys prefix keys
- bind C-a send-prefix # press C-a twice to send to an app
-
- # Key bindings
- bind r source-file ~/.tmux.conf \; display "reloaded" # reload this file
- # The line above replaces the default binding to the "refresh-client" command.
- bind | split-window -h # in addition to %
- bind - split-window -v # in addition to "
-
- # Mouse options
- set -g mouse-select-pane on # activate pane by clicking in it
- set -g mouse-resize-pane on # resize pane by dragging border
- set -g mouse-select-window on # change window by clicking name in status bar
-
- # Color customizations
- set -g default-terminal "screen-256color" # use 256 colors instead of 16
- set -g pane-border-fg black # default is "default" which is gray
- set -g pane-active-border-fg red # default is green
-
- # Status bar
- set -g status-fg white # default is black
- set -g status-interval 60 # update status bar every 60 seconds
- set -g status-justify centre # display window list in center of status bar
- set -g status-left "session #S window #I pane #P -"
- set -g status-left-length 40
- set -g status-right "#h %a %m/%d/%y" # hostname, day abbrev., month, day, year
- set -g status-right-length 45
- set -g status-utf8 on # allow status bar to contain Unicode characters
- set -g visual-activity on # highlight window names in status bar on activity
Changes made to a configuration file are not automatically picked up by existing tmux clients. To load configuration changes into a running client, use the command source-file {path} (alias source). This is needed often when testing configuration changes, so it is convenient to bind this to a key as shown in the configuration file above. With that binding in place, changes can be loaded by pressing prefix r.
Scripting
Here's an example bash shell script for starting a tmux session named mytmux. A key feature of this type of script is only creating a new session if one with a given name doesn't already exist. If it does exist, the script just attaches to it.
- !/bin/bash
- # If this file is modified, kill the existing session
- # with "tmux kill-session -t mytmux" and run this again.
-
- # If the "mytmux" session does not exist ...
- if ! tmux has-session -t mytmux; then
- # Create a new session named "mytmux" and detach from it.
- # The name of the first window will be the command running in it (vim).
- tmux new-session -s mytmux -d
-
- # In first window, cd to Node labs directory and
- # start Vim with vertical split and in explore mode.
- tmux send-keys -t mytmux:0.0 'cd ~/Node.js/nodejs-labs; vim +vs +E' C-m
-
- # Create a second window named "console" for entering shell commands.
- tmux new-window -n console -t mytmux
-
- tmux split-window -h -t mytmux:1 # split into two horizontal panes
- tmux split-window -v -t mytmux:1.1 # split right pane into two vertical panes
-
- # In upper-right pane, cd to Node labs directory and start "less-watch".
- tmux send-keys -t mytmux:1.1 'cd ~/Node.js/labs; less-watch .' C-m
-
- # In lower-right pane, run "top".
- tmux send-keys -t mytmux:1.2 'top' C-m
-
- tmux select-window -t mytmux:0 # move focus to first window
- #tmux select-pane -t 0 # move focus to vim pane; only one, so not needed
- fi
-
- # Attach to the "mytmux" session.
- tmux attach -t mytmux
Multiple Clients, One Session
Sometimes it is useful to attach multiple tmux clients to the same session. This can be done on a single machine using multiple terminal windows. It enables simultaneous viewing of multiple tmux windows that belong to the same session. This is especially useful on computers that have more than one monitor or on a laptop that also has an external monitor. After creating a session or attaching to one in the normal way from the first terminal window, create new sessions from other terminal windows using tmux new -t {session-name}. The new session is "grouped" with the target session which enables the sessions to share the same set of tmux windows, but display different ones.
If multiple monitors are being used and they are different sizes (the typical case when one is a laptop screen), tmux will only display the same number of cells (rows and columns) in each terminal window. Excess cells in larger terminal windows are filled with period characters. To avoid this, set the window option aggressive-resize to "on", preferably in a tmux configuration file.
Having multiple clients attached to the same session can be used for collaborative work, including pair programming. To do this, login to a machine where ssh is enabled and start a tmux session. Then ask each participant to ssh to that machine and attach to the tmux session in the normal way, tmux attach -t {session-name}. Each user will see the results of what others do in the shared session.
Mac-specific Advice
The Mac OS X Terminal program in Snow Leopard and earlier only supports 16 colors. To get 256 colors, iTerm2 must be used. This is a free Terminal replacement that can be downloaded from http://www.iterm2.com/. After starting iTerm2, activate the iTerm menu and select Preferences ... Profiles ... Terminal. In the "Default" profile, set "Report Terminal Type" to "xterm-256color". Quit iTerm2, restart it, and verify that the TERM environment variable is set to "xterm-256color" instead of "xterm". In addition, add the following command to ~/.tmux.conf:set -g default-terminal "screen-256color"
To verify correct Terminal color configuration, enter these commands in a Terminal window:wget http://www.vim.org/scripts/download_script.php?src_id=4568 -O colortest
perl colortest -w
There are some preference changes that are needed to allow certain tmux shortcut keys to be used on a Mac. In System Preferences, select Keyboard ... Keyboard Shortcuts ... Mission Control and uncheck "Move left a space" and "Move right a space". Those keyboard shortcuts are the tmux defaults for resizing a pane left or right by one cell. In iTerm2 preferences, select Profiles ... Keys and select "+Esc" for "Left option key" and "Right option key". This allows cmd option to be used as the meta key in tmux.
Earlier it was recommended to change the prefix key to C-a. If this is done, also consider changing the caps lock key to function as the control key. There are two reasons for this. The caps lock key is larger than the control key and it is next to the "A" key. To make this change, open System Preferences, select Keyboard ... Keyboard tab ... Modifier Keys, and select "^ Control" from the drop-down list next to "Caps Lock Key".
iTerm2 uses "Lion-style" fullscreen windows by default. This is an issue when multiple monitors are being used. Putting a terminal window in fullscreen mode does so using only one monitor and the other becomes unusable. To fix this, open iTerm2 preferences, select the General tab, and uncheck "Use Lion-style Fullscreen windows". Now to make an iTerm2 window fullscreen, press cmd-enter. Press it again to toggle out of fullscreen mode.
tmux does not integrate with the Mac system clipboard by default. This means cmd-c and cmd-v cannot be used to copy and paste text from and to tmux panes. However, there is a way to configure this functionality with other keys. Here are the configuration steps:
- Install the reattach-to-user-namespace command by running
brew install reattach-to-user-namespace - Add the following lines to
~/.tmux.conf:set-option -g default-command "reattach-to-user-namespace -l $SHELL"
bind C-c run "tmux show-buffer | reattach-to-user-namespace pbcopy"
bind C-v run "reattach-to-user-namespace pbpaste | tmux load-buffer - && tmux paste-buffer" - Start a new tmux session or reload the configuration of the current session
by entering command mode (prefix:) and enteringsource-file ~/.tmux.conf
To select text from a tmux pane, select it with the mouse (if mouse-mode option is set to on)
or enter copy mode (prefix [), move to start, press space bar, move to end, and press return.
To copy the selected text to the Mac system clipboard, press prefix C-c.
To paste text from the Mac system clipboard into a tmux pane, prefix C-v.
Copying and pasting text from and to Mac applications is done in the normal way.
Follow the same steps above to select and copy text from editors like Vim and emacs running in a tmux pane. To paste text into editors running in a tmux pane, cmd-v can be used. For Vim, enter insert mode before pasting.
Final Thoughts
tmux certainly has a learning curve. However, the effort pays off in increased productivity.
Several people provided feedback on this article. I especially thank Charles Sharp and Brian Hicks who provided the most extensive reviews.
Additional feedback on this article is welcome. Please email it to mark@ociweb.com.
References
- [1] tmux website
http://tmux.sourceforge.net/ - [2] tmux book
http://pragprog.com/book/bhtmux/tmux
