JVM to .NET Interop
by Charles Calkins, Principal Software Engineer
May 2014
Introduction
Writing mixed-language applications is common in today's software development, such as using JavaScript in a web browser and Java or Scala on the server side of a web application, or a script-based data analysis process invoking C or FORTRAN-based mathematics routines for increased performance. This article describes one form of multi-language development, where software written for Microsoft's .NET Framework invokes functions executing in a Java Virtual Machine.
A Real-World Need
Over the last year, the author has been writing a web application in Scala to complement a well-established desktop application that is written in C++ and C#. The web application presents graphs and reports in a manner similar to the desktop application, but provides delivery to Internet-based mobile devices. Both applications share the same underlying database, where some tables contain records of packed binary blobs. Code could be written for each application — once in C# for the desktop application, and again in Scala for the web one — to pack and unpack these blobs, but, to avoid code duplication, it was decided that a single library written in Scala should be invoked by C#.
Perhaps surprisingly, there are several ways this can be accomplished, as shown here:
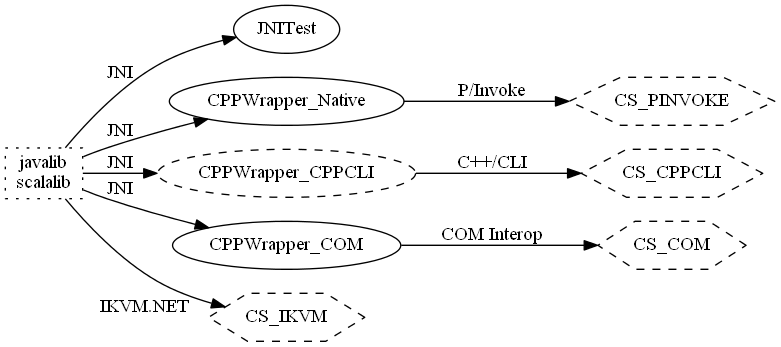
In this diagram, the relationships between the projects in this article are illustrated. The implementation language is identified by the shape: Java/Scala as a rectangle, C++ as an oval, and C# as a hexagon; and the runtime environment is shown by the border: the Java Virtual Machine as a dotted border, native code as a solid border, and the .NET Framework as a dashed border.
Starting on the left in the diagram, two ways to expose code on the JVM to the outside world are via the Java Native Interface (JNI), and by IKVM.NET:
-
JNI allows the JVM to call, and be called by, routines in languages such as C, C++, Objective-C, and even assembly. In this article, we will provide a C/C++ interface to the JVM that is used by
JNITestand the threeCPPWrapper_Xprojects. From C/C++, three methods are available to allow the code to be used from C#. The first, Microsoft's Platform Invocation Services (P/Invoke), defines signatures for C methods that can then be called in C#. The second, C++/CLI, provides extended C++ keywords for writing .NET classes in C++, allowing them to be used directly by other .NET languages without further manipulation. The third method encapsulates the JNI routines in a Component Object Model object. The object is used by C# via the COM Interop process. -
IKVM.NET translates Java bytecode to the Common Intermediate Language, generating a .NET assembly from a Java JAR file, allowing direct use by .NET applications.
This article will explore these methods in detail.
The Java and Scala to Invoke
For our examples, we will consider two classes: Custom and Adder. In Java, Custom is defined in the javalib package, consisting of a constructor which stores a value into a member variable, and a getter to retrieve it:
- // javalib\src\main\java\javalib\Custom.java
- package javalib;
-
- public class Custom {
- private final int i;
-
- public Custom(int i) {
- this.i = i;
- }
-
- public int get() {
- return i;
- }
- }
Class Adder has two methods. The first, add() adds an integer to the contents of a Custom object. The second, name(), is a static method that returns a string that gives the name of the Adder.
- // javalib\src\main\java\javalib\Adder.java
- package javalib;
-
- public class Adder {
- public int add(int a, Custom b) {
- return a + b.get();
- }
-
- public static String name() {
- return "javalib Adder";
- }
- }
In Scala, the code is functionally the same, but is much more compact, with the entire scalalib package defined in half the number of lines of javalib. The class Custom is declared in a single line, where val automatically generates a getter for i. Method add() is on class Adder, but name() is part of Adder's companion object.
- // scalalib\src\main\scala\scalalib\scalalib.scala
- package scalalib
-
- class Custom(val i: Int) {}
-
- class Adder {
- def add(a: Int, b: Custom) =
- a + b.i
- }
-
- object Adder {
- def name() =
- "scalalib Adder"
- }
The JAD Java Decompiler, applied to the CLASS files generated by the compilation of scalalib.scala show a representation of what Scala generates behind the scenes.
Class Custom is very similar to the class written by hand in Java, although the getter for i is named i(), rather than get().
- // Custom.jad
- package scalalib;
-
- public class Custom
- {
- public int i()
- {
- return i;
- }
-
- public Custom(int i)
- {
- this.i = i;
- super();
- }
-
- private final int i;
- }
Class Adder is emitted as two separate classes, one for the main class and one for the companion object. The class corresponding to the companion object, Adder$, implements name() and contains a static reference to itself named MODULE$.
- // Adder$.jad
- package scalalib;
-
- public final class Adder$
- {
- public String name()
- {
- return "scalalib Adder";
- }
-
- private Adder$()
- {
- }
-
- public static final Adder$ MODULE$ = this;
-
- static
- {
- new Adder$();
- }
- }
The second emitted class, Adder, implements add(), as well as name() as a static method, delegating to class Adder$ for its behavior.
- // Adder.jad
- package scalalib;
-
- public class Adder
- {
- public static String name()
- {
- return Adder$.MODULE$.name();
- }
-
- public int add(int a, Custom b)
- {
- return a + b.i();
- }
-
- public Adder()
- {
- }
- }
Part of the execution of buildikvm.bat invokes the sbt assembly command in both the javalib and scalalib directories. The Simple Build Tool is able to compile both Java and Scala code, and the sbt-assembly plugin for sbt packs all of the files in a project into a single JAR file, also making it a runnable JAR if applicable. Here, the result of sbt assembly creates javalib-assembly-1.0.jar and scalalib-assembly-1.0.jar, respectively.
Interop with Java Native Interface (JNI)
Our use of JNI consists of three phases. The first is the creation of a Java VM that includes the javalib and scalalib JAR files in its classpath. The second is obtaining references to the methods in the classes contained within. The previous section showed that, for Java, two classes need to be invoked through JNI — Custom and Adder. For Scala, there are three — Custom, Adder, and Adder$. The third phase invokes the methods to create a Custom object, and then add() it to an integer.
To reduce complexity, we shall create a wrapper class, Context, in C++, to contain all of the JNI references that must be maintained. From the JDK, we include jni.h, and link to jvm.lib, for JNI functionality. The first pointers we must store are to the JVM and to the JNI environment.
- // JNI\Context.h
- #include <jni.h>
-
- class Context {
- JavaVM *_jvm;
- JNIEnv *_env;
- ...
The function JNI_CreateJavaVM() creates a Java virtual machine. Although the API allows for multiple VMs to be created, implementations generally only allow for just one, and calling the function again returns an error. Arguments that must be supplied to JNI_CreateJavaVM() include the JNI version to use, as well as where the CLASS files are located that are to be used by the VM. Here, relative paths to the javalib and scalalib JARs are provided.
- // JNI\Context.cpp
- Context::Context() {
- ...
- JavaVMInitArgs vmArgs;
- JavaVMOption vmOptions;
- vmOptions.optionString =
- "-Djava.class.path="
- "..\\..\\javalib\\target\\scala-2.10\\javalib-assembly-1.0.jar;"
- "..\\..\\scalalib\\target\\scala-2.10\\scalalib-assembly-1.0.jar";
- vmArgs.version = JNI_VERSION_1_6;
- vmArgs.nOptions = 1;
- vmArgs.options = &vmOptions;
- vmArgs.ignoreUnrecognized = 0;
-
- int success = JNI_CreateJavaVM(&_jvm, (void**)&_env, &vmArgs);
- if (success < 0)
- return;
- ...
If the call to JNI_CreateJavaVM() is successful, then valid pointers to the JVM and the environment are returned. The pointer to the JVM is used to shut down the system, via a call to _jvm->DestroyJavaVM() in the destructor, while the pointer to the environment is used for interaction with the VM.
We next must obtain references to the methods that we wish to invoke. Executing javap -s on each CLASS file reveals the function signatures that we must use. For the Java class Adder, the output is:
- public class javalib.Adder {
- public javalib.Adder();
- Signature: ()V
-
- public int add(int, javalib.Custom);
- Signature: (ILjavalib/Custom;)I
-
- public static java.lang.String name();
- Signature: ()Ljava/lang/String;
- }
For each method, the signature shows the types of the parameters within parentheses, followed by the return type. For example, the signature (ILjavalib/Custom;)I of add() indicates that it takes two parameters: an integer (the I inside the opening parenthesis), and a reference to an instance of Custom (Ljavalib/Custom;), and it returns an integer (the I after the parenthesis).
Class Context stores references to the class and individual methods that are obtained.
- // JNI\Context.h
- ...
- jclass _clsJavaAdder;
- jmethodID _midJavaAdderConstructor;
- jmethodID _midJavaAdderAdd;
- jmethodID _midJavaAdderName;
- ...
The class reference is returned via a call to FindClass(). As shown in the signatures, the full path to the class must be provided, with slashes separating the components. Given the class reference, calls to GetMethodID() and GetStaticMethodID() obtain references to instance and static methods, respectively. The name of the method to locate is passed as an argument (with <init> used to reference the class's constructor), as well as its signature, which allows overloaded methods to be uniquely determined.
- // JNI\Context.cpp
- ...
- _clsJavaAdder = _env->FindClass("javalib/Adder");
- if (_clsJavaAdder != 0) {
- _midJavaAdderConstructor =
- _env->GetMethodID(_clsJavaAdder, "<init>", "()V");
- _midJavaAdderAdd =
- _env->GetMethodID(_clsJavaAdder, "add", "(ILjavalib/Custom;)I");
- _midJavaAdderName =
- _env->GetStaticMethodID(_clsJavaAdder, "name", "()Ljava/lang/String;");
- }
- ...
References to other methods are obtained similarly. As shown by the output of the JED disassembler above, the Scala method name() can be either obtained as a static method of Adder, or as an instance method of Adder$, as we do here:
- // JNI\Context.cpp
- ...
- _clsScalaAdderDollar = _env->FindClass("scalalib/Adder$");
- if (_clsScalaAdderDollar != 0) {
- _midScalaAdderDollarName =
- _env->GetMethodID(_clsScalaAdderDollar, "name", "()Ljava/lang/String;");
- }
Once all references to classes and methods are successfully obtained, we can create methods of Context which wrap the functionality needed to invoke them. For example, an object is created via a call to NewObject(), as shown here, to create an instance of Custom. The first parameter to NewObject() is a reference to the class to instantiate an instance of, the second a reference to the constructor to invoke, and lastly any constructor parameters, as needed. Here, the parameter is a Java int, with the JNI type of jint, corresponding to a C++ long. A pointer to the newly-created object is returned as a void * to the caller.
- // JNI\Context.cpp
- void *Context::JavaCreateCustom(long i) {
- if (_env && _clsJavaCustom && _midJavaCustomConstructor)
- return _env->NewObject(_clsJavaCustom, _midJavaCustomConstructor, (jint)i);
- return 0;
- }
The way in which a method is invoked depends upon its parameters and return type. As add() is an instance method that returns an int, CallIntMethod() is used. An invocation is encapsulated as:
- // JNI\Context.cpp
- long Context::JavaAdd(void *pObjAdder, long a, void *pObjCustom) {
- if (_env && pObjAdder && _midJavaAdderAdd && pObjCustom)
- return _env->CallIntMethod((jobject)pObjAdder, _midJavaAdderAdd, (jint)a, (jobject)pObjCustom);
- return 0;
- }
The add() method is not static, so requires both a reference to an instance of an object to call it on (here, pObjAdder), as well as a reference to the method itself. The parameters following are ones to pass to add() — an integer, and a reference to an instance of Custom.
The name() method is static, and returns a string object, so is invoked by a call to CallStaticObjectMethod(). A pointer to a character array is obtained from the string object through a call to GetStringUTFChars(). After the string is copied into the output buffer, the string is then freed via a call to ReleaseStringUTFChars().
- // JNI\Context.cpp
- void Context::JavaName(char *buf, int buflen) {
- if (_env && _clsJavaAdder && _midJavaAdderName) {
- jstring strName = (jstring)_env->CallStaticObjectMethod(_clsJavaAdder, _midJavaAdderName);
- const char *pName = _env->GetStringUTFChars(strName, 0);
- strncpy_s(buf, buflen, pName, _TRUNCATE);
- _env->ReleaseStringUTFChars(strName, pName);
- }
- }
Additional methods are written similarly to encapsulate the creation and invocation of the other classes and methods in javalib and scalalib.
The JNITest project is a C++ application which tests the JNI wrapper by instantiating a Context and calling its methods. For Java, it displays the object name, followed by creating an instance of Custom holding the value 3, and lastly add 9 to the value of the Custom object. It does the same for Scala, but using the values 4 and 7.
- // JNITest\JNITest.cpp
- int main(int argc, char* argv[])
- {
- char buf[30];
- Context C;
- C.JavaName(buf, sizeof(buf));
- std::cout << "Name: " << buf << std::endl;
- void *pJavaCustom = C.JavaCreateCustom(3);
- void *pJavaAdder = C.JavaCreateAdder();
- std::cout << C.JavaAdd(pJavaAdder, 9, pJavaCustom) << std::endl;
-
- C.ScalaName(buf, sizeof(buf));
- std::cout << "Name: " << buf << std::endl;
- void *pScalaCustom = C.ScalaCreateCustom(4);
- void *pScalaAdder = C.ScalaCreateAdder();
- std::cout << C.ScalaAdd(pScalaAdder, 7, pScalaCustom) << std::endl;
-
- return 0;
- }
The output of the test is:
Name: javalib Adder
12
Name: scalalib Adder
11
Platform Invocation Services (P/Invoke)
Platform Invocation Services, known as P/Invoke, is a method by which .NET Framework (Common Language Infrastructure) code can call native code, such as Windows API functions in operating system DLLs. The functions that are called are C-style, so we must convert Custom into a C-style API. While JNI functions could be used directly, this process provides greater encapsulation, as the JVM pointer, the environment and all of the class and method references would otherwise have to be marshalled separately.
We create the C-style wrapper of Context in the CPPWrapper_Native DLL project, which exports these functions for the caller to use.
Functions in a DLL can be exported in two ways: using a separate DEF file to list the functions to export, or to mark the functions where they are defined with __declspec(dllexport). We shall use the latter method.
The calling convention of each exported function must be specified, which determines such things as the order of arguments on the stack and name decoration conventions. P/Invoke, unless specified otherwise, uses the __stdcall calling convention, so each method is declared to use it.
As it is a C-style wrapper, the functions must have C, rather than C++ linkage, so are declared within an extern "C" block.
The rules above give annotated functions as follows. The first function is used to create a Context, and the remainder take a pointer to it as their first argument.
- // CPPWrapper_Native\CPPWrapper_Native.cpp
- extern "C" {
- __declspec(dllexport) void * __stdcall CreateContext() {
- return new Context();
- }
-
- __declspec(dllexport) void __stdcall JavaName(void *pContext, char *buf, int buflen) {
- static_cast<Context *>(pContext)->JavaName(buf, buflen);
- }
-
- __declspec(dllexport) void * __stdcall JavaCreateCustom(void *pContext, long i) {
- return static_cast<Context *>(pContext)->JavaCreateCustom(i);
- }
- ...
In the C# application which consumes this DLL (the CS_PINVOKE project), each function must be declared using the P/Invoke syntax. Each function is prefixed with a DllImport annotation, indicating where the native function can be found. Each function is declared extern, and uses types that are appropriate to the .NET Framework. The IntPtr type has the size of an integer on the platform, and is the equivalent of void *. The P/Invoke syntax does provide a few more complex types to aid in the interoperation, such as the .NET StringBuilder to be automatically populated by a character buffer that is copied into on the native side.
- // CS_PINVOKE\CS_PINVOKE.cs
- class CS_PINVOKE
- {
- [DllImport("CPPWrapper_Native.dll")]
- public static extern IntPtr CreateContext();
-
- [DllImport("CPPWrapper_Native.dll")]
- public static extern void JavaName(IntPtr context, StringBuilder buf, int buflen);
-
- [DllImport("CPPWrapper_Native.dll")]
- public static extern IntPtr JavaCreateCustom(IntPtr context, long i);
- ...
Once declared in this manner, they can be called as any other method in C#. The output of CS_PINVOKE.cs, as generated by the following, is the same as that of JNITest.
- // CS_PINVOKE\CS_PINVOKE.cs
- static void Main(string[] args)
- {
- IntPtr context = CreateContext();
- StringBuilder javaBuf = new StringBuilder(40);
- JavaName(context, javaBuf, javaBuf.Capacity);
- Console.WriteLine(javaBuf.ToString());
- IntPtr pJavaCustom = JavaCreateCustom(context, 3);
- IntPtr pJavaAdder = JavaCreateAdder(context);
- Console.WriteLine(JavaAdd(context, pJavaAdder, 9, pJavaCustom));
-
- StringBuilder scalaBuf = new StringBuilder(40);
- ScalaName(context, scalaBuf, scalaBuf.Capacity);
- Console.WriteLine(scalaBuf.ToString());
- IntPtr pScalaCustom = ScalaCreateCustom(context, 4);
- IntPtr pScalaAdder = ScalaCreateAdder(context);
- Console.WriteLine(ScalaAdd(context, pScalaAdder, 7, pScalaCustom));
- }
P/Invoke is especially useful when a native DLL is to be used by C#, but the DLL itself cannot be modified. The P/Invoke syntax allows the methods of the DLL to be used directly, provided the appropriate declarations are made. There is even a web site that contains declarations to allow the use of Windows system libraries.
C++/CLI
An implicit form of P/Invoke is provided by C++/CLI. C++/CLI provides additional C++ keywords to allow C++ classes to be created as .NET types, as well as the /clr compiler flag, which allows the application to use features in the Common Language Runtime. Depending upon the particular /clr option selected, the resulting file may contain native code, only Common Intermediate Language bytecode, or a mix of the two.
The CPPWrapper_CPPCLI project provides a C++/CLI wrapper for the Context class. We begin by using the System namespace, to include CLR types. The using namespace syntax is similar to using in C# or import in Java and Scala.
In the namespace CPPWrapper_DotNET, we create a class with the same name to wrap Context. The ref keyword indicates that this is a managed .NET class to be allocated on the garbage-collected heap, rather than a native C++ class to be allocated on the native heap.
An unmanaged pointer to an instance of Context is stored — a ref class cannot contain an unmanaged object directly, but can contain pointers to them. The constructor instantiates a Context on the native heap and sets the pointer, and the destructor frees it.
- // CPPWrapper_CPPCLI\CPPWrapper_CPPCLI.cpp
- #include "Context.h"
-
- using namespace System;
-
- namespace CPPWrapper_DotNET {
-
- public ref class CPPWrapper_DotNET {
- Context *_pContext;
- public:
-
- CPPWrapper_DotNET() {
- _pContext = new Context();
- }
-
- ~CPPWrapper_DotNET() {
- delete _pContext;
- }
- ...
The methods of the CPPWrapper_DotNET class wrap the calls to Context, as shown by this sample:
- // CPPWrapper_CPPCLI\CPPWrapper_CPPCLI.cpp
- String^ JavaName() {
- char buf[40];
- _pContext->JavaName(buf, sizeof(buf));
- return gcnew String(buf);
- }
-
- IntPtr JavaCreateCustom(long i) {
- return IntPtr(_pContext->JavaCreateCustom(i));
- }
- ...
- Int64 JavaAdd(IntPtr pJavaAdder, long a, IntPtr pJavaCustom) {
- return _pContext->JavaAdd(pJavaAdder.ToPointer(), a, pJavaCustom.ToPointer());
- }
- ...
In the JavaName() method, the unmanaged buffer set by Context::JavaName() is used to construct a managed .NET string. The gcnew keyword indicates that the object should be allocated on the garbage-collected heap, and the resulting object reference (signified by the caret) is returned by the method to its caller.
As in the P/Invoke case, a void * becomes an IntPtr. The constructor for IntPtr accepts a void *, and the ToPointer() method returns it.
The CS_CPPCLI project uses the wrapper defined above. As the class CPPWrapper_CPPCLI is already a managed class, it is used directly by C#, without the need for additional declarations. The entire program consists of:
- // CS_CPPCLI\CS_CPPCLI.cs
- using System;
-
- namespace CS_CPPCLI
- {
- class CS_CPPCLI
- {
- static void Main(string[] args)
- {
- CPPWrapper_DotNET.CPPWrapper_DotNET context = new CPPWrapper_DotNET.CPPWrapper_DotNET();
- Console.WriteLine(context.JavaName());
- IntPtr pJavaCustom = context.JavaCreateCustom(3);
- IntPtr pJavaAdder = context.JavaCreateAdder();
- Console.WriteLine(context.JavaAdd(pJavaAdder, 9, pJavaCustom));
- Console.WriteLine(context.ScalaName());
- IntPtr pScalaCustom = context.ScalaCreateCustom(4);
- IntPtr pScalaAdder = context.ScalaCreateAdder();
- Console.WriteLine(context.ScalaAdd(pScalaAdder, 7, pScalaCustom));
- }
- }
- }
Its output matches that of JNITest. C++/CLI is a very straightforward syntax, but does require code to be written in the .NET way – the use of ref class, compilation with the /clr flag, and such, which may not be appropriate for legacy projects. As long as a project can be compiled with the /clr flag, however, native classes and managed classes can coexist, so the addition of CLR types can be done incrementally. Adding /clr to a legacy C++ application is not necessarily an otherwise transparent change. For example, one executable that the author compiled in this manner would no longer run until string pooling was also enabled — by compiling with /clr, the structure of an internal string table changed such that there were more strings in the application than would fit in the table. Fortunately, once common strings were pooled together, the limit was no longer exceeded, and the application functioned normally.
Component Object Model (COM)
COM is an old Microsoft technology with roots in the early 1990s and Windows 3.1 days, although it is still used today in libraries such as DirectX. A COM server provides one or more COM objects for use. A server can be implemented as a DLL that is loaded into the same process that references the object (an in-process server), or implemented as a standalone executable (an out-of-process server). A COM object provides sets of functionality grouped into interfaces. One standard interface, IUnknown, must be implemented. The methods of IUnknown are AddRef() to increase the reference count of an interface, Release() to decrement the reference count, and QueryInterface() to obtain an interface pointer to a specifically requested interface. Objects and interfaces are identified by globally unique numeric identifiers. Additionally, objects also can be identified by a human-readable name.
For instance, if the Java and Scala example at the beginning of this article was implemented directly in COM, it would consist of two COM objects, each implementing IUnknown as well as an appropriate interface for the object's functionality, such as, perhaps, interface IAdd implementing the add() method. Rather than passing object references via void *, COM interface pointers would be used instead.
The methodology of requesting a pointer to an interface allows for decoupling clients and servers in that they can be upgraded independently. Consider a version 1 object implementing version 1 of an interface, and a version 1 client making use of that interface. Let the object be upgraded to version 2, with an additional version 2 interface. Provided that it still supports the version 1 interface, the client does not need to change — the client would still request the version 1 interface, which the object would still provide. If the client is upgraded to version 2, it can request the version 2 interface, and operate with enhanced behavior. If the client was upgraded, but not the object, then the client can operate with degraded functionality — the version 2 interface can be requested, and, when the client discovers that it is not available, can request the version 1 interface and still operate, but with degraded functionality.
Creating a COM server and COM object that is served by it is a cumbersome task if the code is written by hand. Fortunately, Visual Studio provides wizards for server and object creation.
For our wrapper, we create a single in-process COM server. Right-click on the name of the solution in the Solution Explorer, select Add->New Project... and choose the ATL Project. Name it CPPWrapper_COM and under Application Settings select the checkbox to Allow merging of proxy/stub code. Ensure that the DLL radio button is selected, and click Finish.
With the server created, a COM object can be added to it. Right-click on the CPPWrapper_COM project, and select Add->Class..., choose the ATL Simple Object, and click the Add button. Give it a Short name: of COMWrapper, and click Finish to accept all other settings.
Finally, switch from the Solution Explorer to the Class View, expand COMWrapper_COM, right-click on ICOMWrapper, and select Add->Add Method.... This can be done repeatedly to add each additional interface method. For example, give a Method name: of JavaName. Create one argument to it by providing a Parameter name: of pContext, a Parameter type: of LONGLONG, select the in checkbox, and press the Add button. Add a second argument named buf, with type BSTR *, and set it as an out parameter. For both methods, leave the return type as HRESULT. Click Finish to add the method to the interface.
As seen in the above process to add a method, COM has its own set of types. A BSTR, for instance, encodes a string as a 4-byte length, a sequence of Unicode characters, and two NULL characters as a terminator. Methods return an HRESULT value, which encodes the success or failure of the method, as well as a specific numeric error on failure. Parameters must be marked as to whether they only are passed into a function (in), are written to by the function (out), or both. The wizard writes object and method definitions to an Interface Definition (IDL) file, and how parameters are marked affects the marshalling and code generation performed when the IDL file is compiled into C++ code. The IDL and associated files can be modified by hand, but using the wizard reduces the chance of error.
Methods are implemented in COMWrapper.cpp, the skeleton of which is one of the many files that is generated by the Visual Studio wizard and IDL compilation process. The JavaName() method that was added above is implemented as:
- // COMWrapper_COM\COMWrapper.cpp
- STDMETHODIMP CCOMWrapper::JavaName(LONGLONG pContext, BSTR* buf)
- {
- char b[30];
- Context *pC = reinterpret_cast<Context *>(pContext);
- pC->JavaName(b, sizeof(b));
- *buf = ToBSTR(b);
- return S_OK;
- }
As COM does not have the equivalent of void *, we pass the pointer as a LONGLONG, a type large enough to store 64-bit pointers, and cast the value to be a pointer to a Context. The buffer returned by Context::JavaName() is not Unicode, so must be converted before it can be returned. The function returns S_OK, indicating that it worked successfully. A professional application should add proper error checking, however, such as returning one of the many predefined error codes, for instance using E_OUTOFMEMORY if memory could not be allocated for the string, or E_FAIL on an unspecified error.
To convert the string buffer to Unicode, we can make use of the Windows function MultiByteToWideChar(). Calling it once with a zero-length destination buffer indicates that it should return the number of bytes that would be needed by the converted string. The function is called again with a destination buffer allocated to the correct size.
- // COMWrapper_COM\COMWrapper.cpp
- BSTR ToBSTR(char *buf) {
- int n = MultiByteToWideChar(CP_ACP, MB_PRECOMPOSED, buf, -1, NULL, 0);
- wchar_t *wbuf = new wchar_t[n];
- MultiByteToWideChar(CP_ACP, MB_PRECOMPOSED, buf, -1, wbuf, n);
- BSTR bstr = SysAllocString((const OLECHAR*)wbuf);
- delete wbuf;
- return bstr;
- }
Compiling the COM server in Visual Studio registers it on the system, although registration can be performed by hand via the use of the regsvr32 command.
The project CS_COM uses the COMWrapper object. The COM Interop process converts failure HRESULT return values into exceptions automatically so return values do not need to be checked, but the syntax is a bit cumbersome with all values being returned via parameters. This code produces the same output as does JNITest:
- // CS_COM\CS_COM.cs
- using System;
-
- namespace CS_COM
- {
- class CS_COM
- {
- static void Main(string[] args)
- {
- // invoke the COM object
- CPPWrapper_COMLib.ICOMWrapper w = new CPPWrapper_COMLib.COMWrapper();
- long pContext;
- w.CreateContext(out pContext);
-
- string buf;
- w.JavaName(pContext, out buf);
- Console.WriteLine(buf);
-
- long pJavaCustom, pJavaAdder;
- w.JavaCreateCustom(pContext, 3, out pJavaCustom);
- w.JavaCreateAdder(pContext, out pJavaAdder);
-
- int result;
- w.JavaAdd(pContext, pJavaAdder, 9, pJavaCustom, out result);
- Console.WriteLine(result);
-
- w.ScalaName(pContext, out buf);
- Console.WriteLine(buf);
-
- long pScalaCustom, pScalaAdder;
- w.JavaCreateCustom(pContext, 4, out pScalaCustom);
- w.JavaCreateAdder(pContext, out pScalaAdder);
-
- w.JavaAdd(pContext, pScalaAdder, 7, pScalaCustom, out result);
- Console.WriteLine(result);
- }
- }
- }
IKVM
In contrast to the above methods, with IKVM (so named because I and K are on either side of J) there is no need for an intermediate library in C/C++. The ikvmc compiler will directly convert Java bytecode into .NET Common Intermediate Language bytecode.
The commands:
ikvmc -target:library javalib-assembly-1.0.jar
ikvmc -target:library scalalib-assembly-1.0.jar
create two assemblies, corresponding to each of the JAR files. These assemblies can then be referenced by a .NET application. The CS_IKVM project contains the following, which produces the same output as TestJNI.
- // CS_IKVM\CS_IKVM.cs
- using System;
-
- namespace CS_IKVM
- {
- class CS_IKVM
- {
- static void Main(string[] args)
- {
- Console.WriteLine(javalib.Adder.name());
- javalib.Custom javaCustom = new javalib.Custom(3);
- javalib.Adder javaAdder = new javalib.Adder();
- Console.WriteLine(javaAdder.add(9, javaCustom));
-
- Console.WriteLine(scalalib.Adder.name());
- scalalib.Custom scalaCustom = new scalalib.Custom(4);
- scalalib.Adder scalaAdder = new scalalib.Adder();
- Console.WriteLine(scalaAdder.add(7, scalaCustom));
- }
- }
- }
Using IKVM is definitely the simplest method to use Java or Scala code in C#. There is one caveat — symbols used in the CLASS files are translated directly, which can be a problem in the case of Scala. In particular, the dollar sign is not a valid C# identifier, so the Adder$ class cannot be directly referenced. This has a wider impact than it may first appear, as special types, such as the None value of an Option in Scala are implemented as objects, so have a trailing dollar sign as part of their internal type name. The issue can be mitigated, however, by writing a Scala function which returns the object, and on the C# side receiving it as a var, rather than as an explicitly typed variable.
Building the Examples
Tools and Process
Source code and binaries for the examples in this article are available here, and were developed under 64-bit Microsoft Windows 7 using Microsoft Visual Studio 2010, Simple Build Tool 0.13.1, IKVM.NET 7.2, and the the 64-bit Java 7 Development Kit. MPC 3.9.60 was used for project file management.
To run the samples on a 64-bit architecture, only installation of the JDK and setting appropriate paths is necessary, but to build the samples, install the JDK, sbt, IKVM and Visual Studio. Set the environment variables JAVA_HOME to the top-level Java directory, IKVM_ROOT to the top-level IKVM directory, and MPC_ROOT to the top-level MPC directory. Ensure that sbt's bin directory, %IKVM_ROOT%\bin, %JAVA_HOME%\bin and %JAVA_HOME%\jre\bin\server (or other location of jvm.dll) are in the system PATH. From a console prompt, execute the following command to generate project files for Visual Studio 2010:
%MPC_ROOT%\mwc.pl -type vc10 Interop.mwc
Also, execute this command to build the support libraries:
buildikvm.bat
Finally, build the Interop.sln solution in Visual Studio using the x64 build configuration. The output files will be in Output\Debug or Output\Release depending upon whether a debug or release build was performed. As relative paths are used, please run the examples from either directory for successful operation. Also, ensure that Visual Studio is run with administrative privilege, otherwise the COM server example, after it is built, will not be able to be registered automatically, and will have to be registered by hand.
The Makefile, Project, and Workspace Creator (MPC)
MPC is used for project file generation. Although it is particularly useful in a multi-platform, multi-tool environment where a single set of description files can be used to automatically generate Makefiles, Visual Studio solution files, Borland C++ Builder projects, etc., it is also handy for a single platform, single tool environment for improved project management. Base projects can be created to centralize settings, which are then inherited by project description files. This allows settings that apply to multiple projects to be set in only one place, as the same settings do not have to be applied by hand to each project individually, which reduces the chance of error.
The projects in this article inherit from one of two base projects, depending on whether they are in C++ or C#, and those base projects inherit from a base project that sets common paths. Base projects have an MPB file extension.
The base of all projects, Paths.mpb, sets the output, library and include directories for both the Debug and Release Windows builds. As these settings, in this case, are specific to a particular compiler feature, they are contained within a specific block. If this file were to be used on other architectures, options to the specific block could be supplied to restrict the definitions in various ways, such as to particular compiler verisons or platform types.
- // config\Paths.mpb
- project {
- specific {
- Release::lib_modifier =
- Debug::lib_modifier =
-
- Release::install = ../Output/Release
- Debug::install = ../Output/Debug
- Release::libout = ../Output/Release
- Debug::libout = ../Output/Debug
- Release::libpaths += ../Output/Release
- Debug::libpaths += ../Output/Debug
- Release::includes += ../Output/Release
- Debug::includes += ../Output/Debug
- }
- }
Projects compiled for C++ inherit from CPPBase.mpb, which itself inherits from Paths.mpb. This base project sets include paths and linker properties to allow applications to use the JDK. The environment variable JAVA_HOME is expanded to a full path via the call to expand, as Visual Studio prefers to use absolute, rather than relative paths.
- // config\CPPBase.mpb
- project : Paths {
- expand(JAVA_HOME) {
- $JAVA_HOME
- }
-
- includes += $(JAVA_HOME)\include
- includes += $(JAVA_HOME)\include\win32
-
- libpaths += $(JAVA_HOME)\lib
- libs += jvm
-
- includes += ../JNI
- }
The base project for C# projects is even smaller. Certain .NET assemblies are specified, as well as the architecture to use when generating code. The architecture is normally not needed, unless, as with this article, linking against a library with a particular architecture is being performed. As the C++ projects are compiled as 64-bit, compling C# code as 64-bit ensures that no incompatibilities (such as a BadFormatException) occur.
- // config\CSharpBase.mpb
- project : Paths {
- lit_libs += System System.Data System.Xml
-
- specific {
- PlatformTarget = x64
- }
-
- libpaths -= .
- }
By using base projects, MPC files that describe projects to build can be very short. For example, the MPC file that describes the CPPWrapper_Native project is as follows. The option managed = 0 ensures that native, rather than .NET, code is generated, while a nonzero value enables one of the/clr flag variants, depending on the value. The Source_Files section specifies the source files of the project, and if all source files were in the same directory as the MPC file, this section could even be eliminated.
- // CPPWrapper_Native\CPPWrapper_Native.mpc
- project : CPPBase {
- managed = 0
-
- Source_Files {
- *.cpp
- ../JNI/*.cpp
- }
- }
The MPC file which describes the CS_CPPCLI project is simpler still. By default, a library would be generated (if a main() function is not found), but setting the exename both confirms that the project that is generated is an executable, and what its name should be. The after clause creates a build dependency, ensuring that the current project is built after what is listed in the after clause.
- // CS_CPPCLI\CS_CPPCLI.mpc
- project : CSharpBase {
- exename = CS_CPPCLI
-
- after += CPPWrapper_CPPCLI
- }
MPC files can be as complex as needed, however. Due to the nature of COM server development, many options must be set, such as defined symbols via macros, COM server registration via RegisterOutput, specification of resource files, and the like. Additionally, files that are created by the IDL compilation process shouldn't be directly compiled into the project (they are automatically included by the COM framework itself) so are removed from consideration by prefixing their filename with a caret.
- // CPPWrapper_COM\CPPWrapper_COM.mpc
- project : CPPBase {
- managed = 0
-
- macros += _MERGE_PROXYSTUB
-
- specific {
- ModuleDefinitionFile = CPPWrapper_COM.def
- RegisterOutput = true
- useofatl = Dynamic
- unicode = 1
- }
-
- Resource_Files {
- *.rc
- *.rgs
- }
-
- Header_Files {
- *.h
- ../JNI/*.h
- ^CPPWrapper_COM.h
- ^CPPWrapper_COM_i.h
- }
-
- Source_Files {
- *.c
- *.cpp
- *.idl
- *.def
- ../JNI/*.cpp
- ^dlldata.c
- ^CPPWrapper_COM_p.c
- }
- }
To use the COM object that is created by the definition above, the unique ID of the COM object is specified in a comreferences entry, as is done in the CS_COM project.
- // CS_COM\CS_COM.mpc
- project : CSharpBase {
- exename = CS_COM
-
- after += CPPWrapper_COM
-
- specific {
- comreferences += CPPWrapper_COMLib:embed=true,guid=1E1DB34F-024E-4D3B-BE9F-F94B66BD8BBB,majorver=1,minorver=0,wrapper=tlbimp
- }
- }
Lastly, all of the MPC files are tied together into a workspace, so they can all be built together. Directories containing MPC files (or MPC files by name explicitly) are specified in a workspace (MWC) file. Running mwc.pl on a MWC file creates the workspace project files, and the cmdline option adjusts the command-line options for the run. Because projects are compiled as C++ by default, certain ones are identified as needing to be compiled as C# via the -language command-line option. The -include command-line option indicates the directory where base projects can be found.
- // Interop.mwc
- workspace {
- cmdline += -include config
-
- CPPWrapper_Native
- CPPWrapper_CPPCLI
- CPPWrapper_COM
- JNITest
-
- csharp {
- cmdline += -language csharp
- CS_CPPCLI
- CS_PINVOKE
- CS_COM
- CS_IKVM
- }
- }
Summary
This article has demonstrated four ways of using code on the JVM from C#, both simple and complex. Each is useful, depending on the application, although, if C/C++ is not needed, using IKVM is by far the easiest method. It has also been shown that MPC is useful for build management, allowing simple build descriptions when possible, but supporting complexity as needed.
References
- [1] Java Native Interface Specification
http://docs.oracle.com/javase/7/docs/technotes/guides/jni/spec/jniTOC.html - [2] Java Native Interface
http://en.wikipedia.org/wiki/Java_Native_Interface - [3] IKVM.NET Home Page
http://www.ikvm.net/ - [4] Platform Invocation Services
http://en.wikipedia.org/wiki/Platform_Invocation_Services - [5] C++/CLI
http://en.wikipedia.org/wiki/C%2B%2B/CLI - [6] COM Interop
http://en.wikipedia.org/wiki/COM_Interop - [7] Component Object Model
http://en.wikipedia.org/wiki/Component_object_model - [8] Common Intermediate Language
http://en.wikipedia.org/wiki/Common_Intermediate_Language - [9] sbt
http://www.scala-sbt.org/ - [10] MPC
https://objectcomputing.com/products/mpc - [11] JAD Java Decompiler Download Mirror
http://varaneckas.com/jad/ - [12] sbt-assembly
https://github.com/sbt/sbt-assembly - [13] Re: Multiple Calls to JNI_CreateJavaVM
https://community.oracle.com/message/6481723#6481723 - [14] What is PInvoke.net?
http://www.pinvoke.net/ - [15] /GF (Eliminate Duplicate Strings)
http://msdn.microsoft.com/en-us/library/s0s0asdt.aspx - [16] Re: IKVM Acronym
http://osdir.com/ml/java.ikvm.devel/2007-07/msg00013.html
Software Engineering Tech Trends (SETT) is a regular publication featuring emerging trends in software engineering.
