Large Image Display with Seadragon Ajax
By Charles Calkins, OCI Senior Software Engineer
October 2011
Introduction
As technology has progressed, the need to view large images and data sets has become commonplace. Consumer-grade cameras take single images that are ten megapixels or more, and can be stitched together to produce mosaics in the gigapixel range [1]. Mapping services from Google [2], Yahoo! [3], Microsoft [4], and others deliver worldwide street maps and aerial photos to viewers. Large data sets, such as from the USGS [5] and NASA [6], are tens of thousands of pixels across. Even museum works of art [7] and old manuscripts [8] can be studied in extreme detail on the web.
While the technology to create such data has progressed, the technology to view such data remotely on the Internet has not kept pace. Even the largest monitors are only approximately two thousand pixels across, and bandwidth limits and performance can reduce web-based image viewing even further.
As demonstrated by several of the sites above, a large image does not have to be viewed in its entirety — it can be divided into small tiles and only the tiles that currently fit within the web browser's view are transmitted to the client. Panning across and zooming into the image will cause additional tiles to be sent as needed, and tiles no longer visible to be discarded.
Applications such as Zoomify™ [9] and Flash Zoomer [10] allow for zooming and panning large images, but free versions are limited in functionality. In contrast, Microsoft has developed the Deep Zoom technology [11], consisting of a file format and associated viewers, which are available without cost. While the OpenZoom Description Format is another free alternative, it has been deprecated by its author [12] in favor of Deep Zoom.
A Deep Zoom format image can be viewed using the MultiScaleImage class [13] in Silverlight, as well as with Seadragon Ajax [14], which is written in pure JavaScript. As Seadragon Ajax will work in any modern browser, and does not require the Silverlight browser plugin, it is the viewer of choice used here.
This article will describe the Deep Zoom file format and a means to tile an image appropriately, as well as show examples of large images displayed with Seadragon Ajax. The code, available in the associated code archive, has been tested with Visual Studio 2010 on 64-bit Windows 7, as well as GCC 4.5.2 under 64-bit Ubuntu 11.04. MPC v3.9.27 was used for project generation.
Large Images on the Web
There are two important issues when writing software that reads and writes large images:
- Memory: As these images, by definition, are large, the entire image may not be able to be loaded into RAM. Loading only a small number of rows at one time may be feasible.
- Access: As images typically are compressed, random access to image rows is not guaranteed. Rows must be processed in sequential order.
These conditions lead us to the following class interfaces. Reading an image consists of opening it, closing it, and reading the next available row, starting from the first row of the image.
// ImageLib/ImageBase.h
class EXT_CLASS_IMAGELIB ImageReader : public ImageBase {
public:
    virtual void Open(const std::string &fileName) = 0;
    virtual void Close() = 0;
    virtual void ReadNextRow(ImageRow &row) = 0;
};
typedef std::shared_ptr<ImageReader> ImageReaderPtr;
Writing an image is similar. Creating an image needs additional parameters in addition to the filename, however — the size, number of channels and their depth must be provided, and will be described below. Images are also written one row at a time, starting from the first.
class EXT_CLASS_IMAGELIB ImageWriter : public ImageBase {
public:
    virtual void Open(const std::string &fileName,
        unsigned int width, unsigned int height,
        unsigned int channelCount, unsigned int channelDepth) = 0;
    virtual void Close() = 0;
    virtual void WriteRow(const ImageRow &row) = 0;
};
typedef std::shared_ptr<ImageWriter> ImageWriterPtr;
An ImageRow object represents the data for a single row of the image. EXT_CLASS_IMAGELIB is a macro which aids in the importing and exporting of code from the ImageLib DLL under Windows, and is empty under Linux.
The two most popular formats for web-based images are PNG [15] and JPEG [16]. They differ in several important respects:
- Compression: PNG provides for lossless compression — image data is packed without any loss of quality. JPEG has lossy compression, discarding image information in order to produce a smaller file size. Which format to use depends upon the characteristics of the image to display. JPEG can introduce compression artifacts in exchange for a small file size, and as JPEG is designed for photographic images, PNG can produce a better result for line drawings or other image types that have sharp transitions between colors. [17]
- Image Size: PNG images can be as large as 232 x 232, while JPEG images are limited to 216 x 216 (slightly less when using
libjpeg, as per theJPEG_MAX_DIMENSIONconstant). This is generally not a problem for standard images, but very large images cannot be created in JPEG format. - Transparency: PNG supports transparency (alpha channel), while JPEG does not. Transparency can be handy, for example, to indicate a "no data available" condition when converting data sets to a visual representation, or a "ray did not hit any objects in the scene" condition when raytracing, in addition to the more typical use of aiding in the blending of multiple images together.
- Bit depth: PNG allows 8 bits or 16 bits per channel, while JPEG supports 8 (though 12 for grayscale is possible, but not widely supported).
The generic interfaces above allow both PNG and JPEG image types to be supported. ThechannelCount in the ImageWriter constructor is either 3 (for RGB) or 4 (for RGB plus alpha), and the channelDepth is 8 or 16 bits per channel. The ImageBase base class of ImageReader andImageWriter allows these properties to be obtained from any image.
// ImageLib/ImageBase.h
class EXT_CLASS_IMAGELIB ImageBase {
protected:
    unsigned int _width;
    unsigned int _height;
    unsigned int _channelCount;
    unsigned int _channelDepth;
    FILE *_fp;
public:
    ImageBase(unsigned int width = 0, unsigned int height = 0,
        unsigned int channelCount = 4, unsigned int channelDepth = 16):
        _width(width), _height(height), _channelCount(channelCount),
        _channelDepth(channelDepth), _fp(0) {};
    ~ImageBase() { if (_fp) fclose(_fp); }
    unsigned int GetWidth() const { return _width; }
    unsigned int GetHeight() const { return _height; }
    unsigned int GetChannelCount() const { return _channelCount; }
    unsigned int GetChannelDepth() const { return _channelDepth; }
    ImageRow GetImageRow() const {
        return ImageRow(_width, _channelCount, _channelDepth); }
};
The management of the color channels and channel depth for a given image row is handled by the ImageRow class. The image data itself is maintained as an array of bytes in the _row member variable, and the other properties in additional member variables. Accessors are provided to retrieve them.
// ImageLib/ImageRow.h
class EXT_CLASS_IMAGELIB ImageRow {
    unsigned int _width;
    unsigned int _channelCount;  // 3 or 4
    unsigned int _channelDepth;  // 8 or 16
    std::vector<unsigned char> _row;

public:
    // create
    ImageRow(unsigned int width = 0, unsigned int channelCount = 4,
        unsigned int channelDepth = 16);

    // properties
    unsigned int GetWidth() const { return _width; }
    unsigned int GetChannelCount() const { return _channelCount; }
    unsigned int GetChannelDepth() const { return _channelDepth; }
    unsigned int GetPixelWidth() const {
        return GetChannelCount() * (GetChannelDepth()>>3); }

    // buffer
    unsigned char *Get() { return &_row[0]; }
    const unsigned char *Get() const { return &_row[0]; }
The main work of this class is performed by methods to get and set pixel values, and to convert between row formats. The GetPixel() and SetPixel() methods are overloaded to allow either 8 or 16 bits per channel.
    // read/write
    void Convert(ImageRow &row) const;
    void GetPixel(unsigned int x, unsigned char &r, unsigned char &g,
        unsigned char &b, unsigned char &a) const;
    void GetPixel(unsigned int x, unsigned short &r, unsigned short &g,
        unsigned short &b, unsigned short &a) const;
    void SetPixel(unsigned int x, unsigned char r, unsigned char g,
        unsigned char b, unsigned char a);
    void SetPixel(unsigned int x, unsigned short r, unsigned short g,
        unsigned short b, unsigned short a);
};
Either one or two bytes per color channel is stored in the _row array. That is, for a row with 8 bits per color channel, the number of bytes in the array equals the width of the row. For a row with 16 bits per color channel, the number of bytes in the array is twice the width of the row.
The GetPixel() and SetPixel() methods allow reading and writing of 8- or 16-bit channel values, to rows containing wither 8- or 16-bit data. If the formats are the same, a direct assignment is made. If the formats differ, the values are scaled appropriately.
Consider the case when a channel is being read with the 8-bit version of GetPixel(). If the row is storing 8-bit data, then the byte that is stored is returned for the channel. If the row is storing 16-bit data, then only the high-byte (data is stored in the _row array as big-endian) should be returned. Additonally, the row data may also contain an alpha channel — if it does, it should be returned, but if it does not, then "opaque" (a value of 2channel depth-1 = 255) should be returned instead.
// ImageLib/ImageRow.cpp
void ImageRow::GetPixel(unsigned int x, unsigned char &r,
    unsigned char &g, unsigned char &b,
    unsigned char &a) const {
    const unsigned char *p = &_row[x * GetPixelWidth()];
    a = 255;
    if (GetChannelDepth() == 8) {
        // copy the byte
        r = *p++;
        g = *p++;
        b = *p++;
        if (GetChannelCount() == 4) a = *p++;
    } else {
        // take the high byte only (big endian)
        r = *p++; p++;
        g = *p++; p++;
        b = *p++; p++;
        if (GetChannelCount() == 4) { a = *p++; p++; }
    }
}
If the 16-bit version of GetPixel() is used, the data returned is analogous, but opposite. If _row stores 8-bit data, the data is interpreted as the high-byte of a 16-bit value, with the low-byte set to 0. If _row stores 16-bit data, both bytes are returned. The default transparency value is still "opaque," but it is now the value 2channel depth-1 = 65535.
// ImageLib/ImageRow.cpp
void ImageRow::GetPixel(unsigned int x, unsigned short &r,
    unsigned short &g, unsigned short &b,
    unsigned short &a) const {
    const unsigned char *p = &_row[x * GetPixelWidth()];
    a = 65535;
    if (GetChannelDepth() == 8) {
        // copy the byte, multiply to scale
        r = *p++ << 8;
        g = *p++ << 8;
        b = *p++ << 8;
        if (GetChannelCount() == 4) a = *p++ << 8;
    } else {
        // copy the word (big endian)
        r = (*p++ << 8); r += *p++;  // doesn't work as one statement
        g = (*p++ << 8); g += *p++;
        b = (*p++ << 8); b += *p++;
        if (GetChannelCount() == 4) { a = (*p++ << 8); a += *p++; }
    }
}
The implementations of both SetPixel() methods are comparable, but store values instead of retrieve them, so are not shown here. Given these methods, converting from one row format type to another is as simple as reading from one ImageRow object and writing to another, letting GetPixel() and SetPixel() do the heavy lifting.
// ImageLib/ImageRow.cpp
void ImageRow::Convert(ImageRow &row) const {
    unsigned short r, g, b, a;
    unsigned int width =
        (GetWidth()<row.GetWidth())?GetWidth():row.GetWidth();
    for (unsigned int i=0; i<width; i++) {
        GetPixel(i, r,g,b,a);
        row.SetPixel(i, r,g,b,a);
    }
}
With the data representation complete, we can now implement the image formats themselves. We start with PNGWriter, a subclass of ImageWriter. We will use libpng for image manipulation, so we store png_structp and png_infop, two structures from libpng, in the class definition.
// ImageLib/PNGWriter.h
class EXT_CLASS_IMAGELIB PNGWriter : public ImageWriter {
    png_structp _png_ptr;
    png_infop _info_ptr;
public:
    PNGWriter() : _png_ptr(0), _info_ptr(0) {}
    ~PNGWriter() { Close(); }
    void Open(const std::string &fileName, unsigned int width,
        unsigned int height, unsigned int channelCount = 4,
        unsigned int channelDepth = 16);
    void Close();
    void WriteRow(const ImageRow &row);
};
Opening a file for writing implies creating that file, after confirming that the desired image parameters are compatible with PNG files.
// ImageLib/PNGWriter.cpp
void png_cexcept_error(png_structp png_ptr, png_const_charp msg);

void PNGWriter::Open(const std::string &fileName,
    unsigned int width, unsigned int height,
    unsigned int channelCount, unsigned int channelDepth) {
    _width = width;
    _height = height;
    _channelCount = channelCount;
    if ((_channelCount != 3) && (_channelCount != 4))
        throw ImageException(
            "Only RGB and RGBA color channels are supported for PNG");
    _channelDepth = channelDepth;
    if ((_channelDepth != 8) && (_channelDepth != 16))
        throw ImageException(
            "Only 8 and 16 bits per channel are supported for PNG");

    if (!(_fp=fopen(fileName.c_str(), "wb")))
        throw ImageException(std::string("Could not open ") +
            fileName + std::string(" for writing"));
Using libpng is straightforward — the _png_ptr and _info_ptr structures are created, image parameters set via a call to png_set_IHDR(), and the structures written to the PNG file in preparation for row image data to follow.
    _png_ptr = png_create_write_struct(PNG_LIBPNG_VER_STRING, NULL,
        (png_error_ptr)png_cexcept_error, NULL);
    if (!_png_ptr)
        throw ImageException("png_create_write_struct failed");

    _info_ptr = png_create_info_struct(_png_ptr);
    if (!_info_ptr)
        throw ImageException("png_create_info_struct failed");

    png_init_io(_png_ptr, _fp);

    // 8 or 16
    // PNG_COLOR_TYPE_RGB or PNG_COLOR_TYPE_RGBA or PNG_COLOR_TYPE_GRAY
    png_set_IHDR(_png_ptr, _info_ptr, width, height, _channelDepth,
        (_channelCount==3)?PNG_COLOR_TYPE_RGB:PNG_COLOR_TYPE_RGBA,
        PNG_INTERLACE_NONE, PNG_COMPRESSION_TYPE_BASE,
        PNG_FILTER_TYPE_BASE);

    png_write_info(_png_ptr, _info_ptr);
}
The _row array in the ImageRow is already in the form needed by png_write_row() to write image data to the PNG file, so the ImageRow buffer can be referenced directly.
// ImageLib/PNGWriter.cpp
void PNGWriter::WriteRow(const ImageRow &row) {
    png_write_row(_png_ptr, const_cast<unsigned char *>(row.Get()));
}
Finally, closing an image consists of freeing the libpng structures and closing the open file handle.
// ImageLib/PNGWriter.cpp
void PNGWriter::Close() {
    if (_png_ptr) {
        if (_info_ptr) {
            png_write_end(_png_ptr, _info_ptr);
            png_destroy_write_struct(&_png_ptr, &_info_ptr);
        }
        else
            png_destroy_write_struct(&_png_ptr, (png_infopp)NULL);
    }

    if (_fp)
        fclose(_fp);

    _png_ptr = 0;
    _info_ptr = 0;
    _fp = 0;
}
With PNGWriter complete, we implement PNGReader. It implements the interface defined byImageReader, and also stores png_structp and png_infop.
// ImageLib/PNGReader.h
class EXT_CLASS_IMAGELIB PNGReader : public ImageReader {
    png_structp _png_ptr;
    png_infop _info_ptr;
public:
    PNGReader() : _png_ptr(0), _info_ptr(0) {}
    ~PNGReader()  { Close(); }
    void Open(const std::string &fileName);
    void Close();
    void ReadNextRow(ImageRow &row);
};
The Open() method opens the file, and tests it to see if it is really a PNG file, throwing an exception if it is not.
// ImageLib/PNGReader.cpp
void PNGReader::Open(const std::string &fileName) {
    Close();

    _fp = fopen(fileName.c_str(), "rb");
    if (!_fp)
        throw ImageException(std::string("Could not open ") +
            fileName + std::string(" for reading"));

    char header[8];
    if (fread(header, 1, 8, _fp) != 8)
        throw ImageException(fileName +
            std::string(" is not recognized as a PNG file"));
    if (png_sig_cmp((png_bytep)header, 0, 8))
        throw ImageException(fileName +
            std::string(" is not recognized as a PNG file"));
Image parameters, such as height, width, bit depth and channel count, are then read from the file. The PNG file format can represent other image types (such as single-channel grayscale), so checks are made to ensure the image being opened is RGB or RGBA, and 8- or 16-bits per channel. Exceptions are thrown if any conditions are violated.
    _png_ptr = png_create_read_struct(PNG_LIBPNG_VER_STRING, NULL,
        (png_error_ptr)png_cexcept_error, NULL);

    if (!_png_ptr)
        throw ImageException("png_create_read_struct failed");

    _info_ptr = png_create_info_struct(_png_ptr);
    if (!_info_ptr)
        throw ImageException("png_create_info_struct failed");

    png_init_io(_png_ptr, _fp);
    png_set_sig_bytes(_png_ptr, 8);
    png_read_info(_png_ptr, _info_ptr);
    _width = png_get_image_width(_png_ptr, _info_ptr);
    _height = png_get_image_height(_png_ptr, _info_ptr);

    png_byte bitDepth = png_get_bit_depth(_png_ptr, _info_ptr);
    if ((bitDepth!=8) && (bitDepth!=16))
        throw ImageException("Only 8 and 16 bit images are supported");
    _channelDepth = bitDepth;

    // might also be PNG_COLOR_TYPE_GRAY
    png_byte colorType = png_get_color_type(_png_ptr, _info_ptr);
    if ((colorType!=PNG_COLOR_TYPE_RGB) &&
        (colorType!=PNG_COLOR_TYPE_RGBA))
        throw ImageException(
            "Only RGB and RGBA color channel images are supported");
    _channelCount = (colorType == PNG_COLOR_TYPE_RGB)?3:4;

    png_read_update_info(_png_ptr, _info_ptr);
}
Once the file is open, reading a row of the image is straightforward. If the buffer supplied does not have the same characteristics as does the image, it is reallocated to be compatible. The image data is read with a call to png_read_row().
// ImageLib/PNGReader.cpp
void PNGReader::ReadNextRow(ImageRow &row) {
    if ((row.GetWidth() != _width) ||
        (row.GetChannelCount() != _channelCount) ||
        (row.GetChannelDepth() != _channelDepth))
        row = GetImageRow();
    png_read_row(_png_ptr, row.Get(), NULL);
}
Closing the file consists of freeing the PNG read structure, and closing the file handle.
// ImageLib/PNGReader.cpp
void PNGReader::Close() {
    if (_png_ptr)
        png_destroy_read_struct(&_png_ptr, (png_infopp)NULL,
            (png_infopp)NULL);

    if (_fp)
        fclose(_fp);

    _png_ptr = 0;
    _info_ptr = 0;
    _fp = 0;
}
This concludes the implementation of PNGReader. JPEGWriter and JPEGReader, available in the code archive, follow the same structure so are not shown here, but use libjpeg for JPEG file manipulation.
For convenience when manipulating images, we use a factory for creating instances of image objects. An ImageBuilder returns an ImageReader, ImageWriter or appropriate file extension, depending upon the concrete ImageBuilder instance, plus provides a static factory method to return an appopriate ImageBuilder instance depending upon the filename of an image in question. ImageBuilder is an abstract base class, as follows:
// ImageLib/ImageBuilder.h
class EXT_CLASS_IMAGELIB ImageBuilder {
public:
    virtual ImageReaderPtr GetReader() const = 0;
    virtual ImageWriterPtr GetWriter() const = 0;
    static ImageBuilderPtr GetImageBuilder(const std::string &fileName);
    virtual std::string GetExtension() const = 0;
};
Subclasses for PNG and JPEG images simply construct the appropriate readers and writers.
// ImageLib/ImageBuilder.h
class EXT_CLASS_IMAGELIB PNGBuilder : public ImageBuilder {
public:
    ImageReaderPtr GetReader() const {
        return ImageReaderPtr(new PNGReader()); }
    ImageWriterPtr GetWriter() const {
        return ImageWriterPtr(new PNGWriter()); }
    std::string GetExtension() const { return ".png"; }
};

class EXT_CLASS_IMAGELIB JPEGBuilder : public ImageBuilder {
public:
    ImageReaderPtr GetReader() const {
        return ImageReaderPtr(new JPEGReader()); }
    ImageWriterPtr GetWriter() const {
        return ImageWriterPtr(new JPEGWriter()); }
    std::string GetExtension() const { return ".jpg"; }
};
The factory creates an appropriate builder based on the file extension of the supplied file name.
// ImageLib/ImageBuilder.cpp
ImageBuilderPtr ImageBuilder::GetImageBuilder(
    const std::string &fileName) {
    int i = fileName.find_last_of('.');
    if (i == std::string::npos)
        throw ImageException("File extension not found");
    std::string ext = fileName.substr(i);
    std::transform(ext.begin(), ext.end(), ext.begin(), ::toupper);
    if ((ext == ".JPG") || (ext == ".JPEG"))
        return ImageBuilderPtr(new JPEGBuilder());
    if (ext == ".PNG")
        return ImageBuilderPtr(new PNGBuilder());
    throw ImageException("Unknown file extension");
}
Now that we have the means to read and write large images, we can use these classes to develop Deep Zoom format tiles.
Deep Zoom Tiling
An example of tiling a 10000x10000 image, with 256x256 pixel tiles, is shown below:
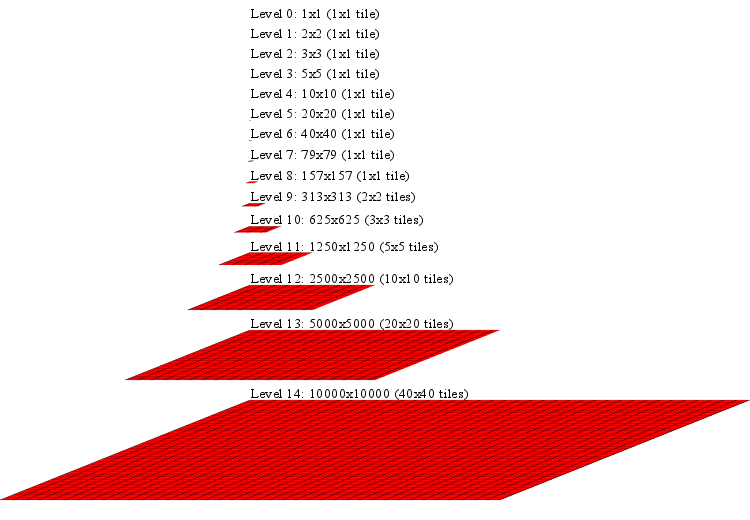
As can be seen, an image is represented as a series of levels, where each level is half the width and height of the level above it, from the full size of the image, down to 1x1 pixel. Given the width and height of an image, the maximum level number is represented by ⌈log2(max(width,height))⌉, which, for a 10000x10000 image, is 14, yielding 15 levels of detail.
Each level is subdivided into tiles of small dimension, for fast retrieval from the web server. In addition to the base tile size, a small overlap can also be added, to ensure that no rendering issues appear when the tiles are scaled in the browser. As is seen in the diagram, levels 0 through 8 consist of a single tile, as the image size at that level is less than 256x256. Level 9 consists of one 256x256 tile, and three smaller tiles, to cover the 313x313 area. At level 14, 1600 tiles are needed to represent the image at its full size.
Tiles are arranged, by level, into numbered subdirectories of a <basename>_files directory. An additional XML file, <basename>.dzi, is created, giving parameters of the tiling, such as the image size and file type.
Producing a tile set thus consists of three operations: resizing an image to half its width and height, cropping a small area of an image and saving it as a tile, and creating appropriate files in a directory hierarchy. These operations are applied repeatedly, for all levels of detail. We first examine the method to resize the image.
We call the resize operation Half(), and pass it the names of two files — the name of the original image to reduce, and the name of the reduced image to create. We also pass a function to allow progress to be displayed to the user.
// ImageLib/Half.cpp
void EXT_CLASS_IMAGELIB Half(const std::string &srcFileName,
    const std::string &destFileName, ProgressFn progress) {
Based on the file names, we can create image readers and writers that are appropriate for the image types.
    ImageReaderPtr reader =
        ImageBuilder::GetImageBuilder(srcFileName)->GetReader();
    ImageWriterPtr writer =
        ImageBuilder::GetImageBuilder(destFileName)->GetWriter();
Next, we open for reading the image to reduce and use its properties to determine the size of the reduced image to create. If the original image's width or height is odd, then that dimension of the reduced image size is rounded up.
    unsigned int halfSrcWidth = reader->GetWidth()/2;
    unsigned int halfSrcHeight = reader->GetHeight()/2;
    unsigned int destWidthExtra = reader->GetWidth()%2;
    unsigned int destHeightExtra = reader->GetHeight()%2;

    // round up if odd
    unsigned int destWidth = halfSrcWidth + destWidthExtra;
    unsigned int destHeight = halfSrcHeight + destHeightExtra;
We open, for writing, the reduced image at the appropriate size, with the same channel count and depth as the original image. Because JPEG files are limited in size to approximately 64Kx64K pixels, care must be taken to ensure that the destination image size remains smaller than that to avoid error, as invoking Half() on a PNG image, and saving the result as a JPEG image, is possible.
   writer->Open(destFileName, destWidth, destHeight,
        reader->GetChannelCount(), reader->GetChannelDepth());
As per the rules of large images described above, we must operate upon individual rows at a time, in sequential order. The Half() algorithm reduces the image to half of its size by discarding every other row and column. Here, two rows are read from the source file — the first is processed by a call to the Half() helper function, and the second is discarded.
   for (unsigned int y=0; y<halfSrcHeight; y++) {
        // show progress
        if ((y%1000 == 0) && progress) {
            std::stringstream s;
            s << "    Row " << y << " of " << destHeight;
            progress(s.str());
        }

        // row to keep
        reader->ReadNextRow(srcRow);
        Half(writer, srcRow, destRow, halfSrcWidth, destWidthExtra);

        // row to discard
        reader->ReadNextRow(srcRow);
    }

    // odd number of rows, so copy one more
    if (destHeightExtra>0)
        Half(writer, srcRow, destRow, halfSrcWidth, destWidthExtra);

    if (progress) {
        std::stringstream s;
        s << "    Done " << destHeight;
        progress(s.str());
    }
}
The reduction of a single row is performed by discarding every other pixel. When an ImageRow for the reduced image is created, it is written to the output file.
void Half(ImageWriterPtr writer, ImageRow &srcRow, ImageRow &destRow,
    unsigned int halfSrcWidth, unsigned int destWidthExtra) {
    unsigned short r,g,b,a;
    for (unsigned int x=0; x<halfSrcWidth; x++) {
        srcRow.GetPixel(x*2, r,g,b,a);  // drop every other pixel
        destRow.SetPixel(x, r,g,b,a);
    }
    if (destWidthExtra>0) {
        // odd number of destination pixels in the row, so copy one more
        srcRow.GetPixel(halfSrcWidth, r,g,b,a);
        destRow.SetPixel(halfSrcWidth, r,g,b,a);
    }
    writer->WriteRow(destRow);
}
With the resize algorithm complete, we can examine the cropping algorithm.
To improve the speed of repeated cropping of a large image, the pattern of cropping can be taken into account. Consider the first tile of a large image. The tile begins at 0,0 and ranges to, say, 256,256. The next tile, given a 1 pixel overlap, ranges from 256,0 to 513,256. The same rows, 0 through 256, are used by both tiles, as well as any additional tiles in the same tile row. Reading rows sequentially from a file means that file will need to be read from the beginning for each subsequent tile. Keeping rows 0 through 256 in memory while the tile row is being created, however, allows these rows to be read only once, providing a significant speedup due to the reduced I/O. While this does consume system memory, the amount of memory needed is still significantly less than would be needed for an entire image, so a huge image can still be processed. For this, we create an image row cache with class RowCache.
We wish to retrieve rows from the row cache by row number, and wish to specify an upper limit to the cache size so the amount of memory used is bounded. We will use two structures for the cache itself. The _rowCache map stores the row data, mapping row indices to ImageRow objects. The _mru list maintains a most-recently-used list of row indices. If a row is requested that is not currently in the cache, and the cache has reached its maximum size, the _mru list is consulted to determine the least-recently-used row to discard. As a RowCache is similar to an ImageReader object, accessors are provided to retrieve the cached image characteristics.
// ImageLib/RowCache.h
class EXT_CLASS_IMAGELIB RowCache {
protected:
    ImageReaderPtr _reader;
    std::string _fileName;
    unsigned int _maxCacheSize;
    std::map<unsigned int, ImageRow> _rowCache;
    std::list<unsigned int> _mru;
    unsigned int _lastRowRead;

public:
    RowCache(const std::string &fileName, unsigned int maxCacheSize);
    ImageRow GetRow(unsigned int row);
    unsigned int GetWidth() { return _reader->GetWidth(); }
    unsigned int GetHeight() { return _reader->GetHeight(); }
    unsigned int GetChannelCount() const {
        return _reader->GetChannelCount(); }
    unsigned int GetChannelDepth() const {
        return _reader->GetChannelDepth(); }
    std::string GetFilename() { return _fileName; }
};
The RowCache constructor initializes member variables with constructor parameters and opens the file for reading.
// ImageLib/RowCache.cpp
RowCache::RowCache(const std::string &fileName,
    unsigned int maxCacheSize) :
    _fileName(fileName), _maxCacheSize(maxCacheSize),
    _lastRowRead(-1) {
    _reader = ImageBuilder::GetImageBuilder(fileName)->GetReader();
    _reader->Open(fileName);
}
The behavior of the cache is implemented in GetRow(). First, the cache is consulted to see if it already contains the requested row. If the row is already in the cache, it is returned.
ImageRow RowCache::GetRow(unsigned int row) {
    std::map<unsigned int, ImageRow>::iterator rowIter =
        _rowCache.find(row);
    if (rowIter != _rowCache.end()) {
        // make the requested row the most recently used row
        // (move it to the head of the _mru)
        _mru.erase(std::remove(_mru.begin(),_mru.end(),row),_mru.end());
        _mru.push_front(row);

        return rowIter->second;
    }
If the row is not in the cache, the size of the cache is examined. If it is already at its maximum size, the least-recently-used row is discarded.
    // first, check to see if there is room in the cache for the new
    // row - if not, purge the oldest row (the one at the back)
    if (_mru.size() >=  _maxCacheSize) {
        unsigned int rowToPurge = _mru.back();
        _mru.pop_back();
        _rowCache.erase(rowToPurge);
    }
As there is now room in the cache for an additional row, the requested row is read from the file. As the image file must be read sequentially, if the requested row is earlier than the current row index of the file, the file reading is restarted. The rows are then read (and discarded) until the desired one is obtained.
    // read the row from the file
    // if the row needed is past where the file has already been read,
    // then restart the read from the beginning
    if ((_lastRowRead >= row) && (_lastRowRead != -1)) {
        _reader =
            ImageBuilder::GetImageBuilder(_fileName)->GetReader();
        _reader->Open(_fileName);
        _lastRowRead = -1;
    }

    // read and discard rows up to the desired row
    ImageRow rowPtr = _reader->GetImageRow();
    while ((_lastRowRead == -1) || (_lastRowRead < row)) {
        _reader->ReadNextRow(rowPtr);
        _lastRowRead++;
    }
If the row is already in the mru_ list, it is moved to the head of the list, as it is now the most-recently-used row.
    _mru.erase(std::remove(_mru.begin(), _mru.end(), row), _mru.end());
    _mru.push_front(row);
The row is then cached in the map, and returned to the caller.
    _rowCache[row] = rowPtr;

    return rowPtr;
}
With RowCache complete, the crop operation is straightforward. The RowCache is passed as an argument, as well as the dimensions of the crop and the name of the file in which to store the cropped image.
// ImageLib/Crop.cpp
void Crop(RowCache &cache, unsigned int x, unsigned int y,
    unsigned int width, unsigned int height,
    const std::string &fileName) {
If the region to crop is larger than the size of the image being cropped, the entire image is file copied to the destination. The FileManagement class provides OS-specific filesystem operations, and is available in the associated code archive.
    if ((width>=cache.GetWidth()) && (height>=cache.GetHeight())) {
        FileManagement::Copy(cache.GetFilename(), fileName);
        return;
    }
If the region to crop is smaller than the original image size, then, row by row, appropriate pixels are copied from the source to destination images. Care must be taken to ensure that the crop region does not exceed the original image dimensions, so the width and height of the crop region are adjusted if necessary.
    ImageWriterPtr writer =
        ImageBuilder::GetImageBuilder(fileName)->GetWriter();
    writer->Open(fileName, width, height,
        cache.GetChannelCount(), cache.GetChannelDepth());

    if (x+width>=cache.GetWidth())
        width=cache.GetWidth()-x;
    if (y+height>=cache.GetHeight())
        height=cache.GetHeight()-y;

    ImageRow destRow = writer->GetImageRow();
    for (unsigned int row = y; row<y+height; row++) {
        ImageRow srcRow = cache.GetRow(row);

        unsigned short r,g,b,a;
        for (unsigned int i=0; i<width; i++) {
            srcRow.GetPixel(i+x, r,g,b,a);
            destRow.SetPixel(i, r,g,b,a);
        }

        writer->WriteRow(destRow);
    }
}
With resizing and cropping complete, the tiling itself can be performed. We start with a helper function to read the width and height of the image to tile, plus determine the number of levels of detail needed.
// ImageLib/Tile.cpp
void GetTileParams(const std::string &fileName, unsigned int &width,
    unsigned int &height, unsigned int &maximumLevel) {
    ImageReaderPtr reader =
        ImageBuilder::GetImageBuilder(fileName)->GetReader();
    reader->Open(fileName);
    width = reader->GetWidth();
    height = reader->GetHeight();
    reader->Close();

    maximumLevel = (unsigned int)ceil(log(
        (double)std::max(width, height))/log(2.0));
}
Starting with the largest image, additional image files are created which are named based on the level of detail. The largest image can just be copied and renamed, but each successive image isHalf() of the previous one.
void BuildLevels(const std::string &fileName,
    unsigned int maximumLevel, ProgressFn progress) {
    if (progress)
        progress("Build levels...");

    // the deepest image level is the same as the main image
    // so just copy the existing one
    if (progress)
        progress("  " + maximumLevel);
    FileManagement::Copy(fileName, GetLevelFilename(fileName,
        maximumLevel));

    // iterate over the remaining levels
    for (unsigned int levelR = 0; levelR <=maximumLevel-1; levelR++) {
        unsigned int level = maximumLevel-1-levelR;
        if (progress)
            progress("  " + level);
        try {
            // reduce the previous level by half
            Half(GetLevelFilename(fileName, level+1),
                GetLevelFilename(fileName, level), progress);
        } catch (std::exception &e) {
            throw ImageException(std::string("Level: ") + level +
                ": " + e.what());
        }
    }
}
The image filenames are just the base name of the file (the name without the .jpg or .png extension), an underscore, the level of detail, and the image file type extension.
std::string GetLevelFilename(const std::string &fileName,
    unsigned int level) {
    std::stringstream s;
    s << FileManagement::GetBasename(fileName) << "_" << level <<
        ImageBuilder::GetImageBuilder(fileName)->GetExtension();
    return s.str();
}
Each image, at each level of detail, is now tiled, with the tiles saved in the appropriate place in the directory hierarchy. The BuildTiles() function takes tile parameters as arguments, and creates the <basename>_files directory.
void BuildTiles(const std::string &fileName, const std::string &tileExt,
    unsigned int maximumLevel, unsigned int width, unsigned int height,
    unsigned int tileSize, unsigned int overlap, ProgressFn progress) {
    if (progress)
        progress("Build tiles...");

    std::string mainDir =
        FileManagement::GetBasename(fileName) + "_files";
    FileManagement::CreateDir(mainDir);
Next, at each level of detail, a directory is created under the <basename>_files directory to store the tiles for that level.
   for (unsigned int level = 0; level <= maximumLevel; level++) {
        std::string levelDir = mainDir +
            FileManagement::PathSep() + level;
        FileManagement::CreateDir(levelDir);
Next, a RowCache is created for the image being tiled.
        // don't cache more rows than needed for a single tile row
        // (tile height plus overlap)
        RowCache rowCache(GetLevelFilename(fileName, level),
            tileSize+2*overlap);
Next, the number of tiles is calculated based on the size of the image to tile, the size of each tile, and the tile overlap.
        double scale = 1.0 / (1 << (maximumLevel - level));
        unsigned int levelWidth = (unsigned int)(ceil(width*scale));
        unsigned int levelHeight = (unsigned int)(ceil(height*scale));

        // get the number of tiles needed to cover the level dimensions
        unsigned int numTileColumns =
            (unsigned int)(ceil(levelWidth / (double)tileSize));
        unsigned int numTileRows =
            (unsigned int)(ceil(levelHeight / (double)tileSize));
Lastly, for each tile, the starting position and dimensions are determined, the tile cropped, and saved in a file name indicative of its column and row.
      for (unsigned int row = 0; row < numTileRows; row++)
            for (unsigned int column = 0; column < numTileColumns;
                column++) {

                // tile starting pixel
                unsigned int tileX = (column == 0) ? 0 :
                    (tileSize * column - overlap);
                unsigned int tileY = (row == 0) ? 0 :
                    (tileSize * row - overlap);

                // tile dimensions
                unsigned int tileWidth = tileSize +
                    ((column == 0) ? 1 : 2) * overlap;
                unsigned int tileHeight = tileSize +
                    ((row == 0) ? 1 : 2) * overlap;

                // ensure the tile doesn't go past the edge of the level
                tileWidth = std::min(tileWidth, levelWidth - tileX);
                tileHeight = std::min(tileHeight, levelHeight - tileY);

                if (progress)
                    progress(std::string("  ") + level + ": " +
                        column + "," + row);

                // crop the tile from the level image and save it
                std::string tilePath = levelDir +
                    FileManagement::PathSep() + column + "_" + row +
                    ((tileExt.size()==0)?
                    ImageBuilder::GetImageBuilder(
                        fileName)->GetExtension() : tileExt);
                Crop(rowCache, tileX,tileY, tileWidth,tileHeight,
                    tilePath);
            }
    }
}
With the tiles created, the DZI file can be built. The DZI file stores the tile size, overlap, file type, and image dimensions.
void BuildDZI(const std::string &fileName, const std::string &tileExt,
    unsigned int width, unsigned int height, unsigned int tileSize,
    unsigned int overlap) {
    std::stringstream dzi;
    dzi << "\n" <<
        "<Image TileSize=\"" << tileSize << "\" Overlap=\"" <<
        overlap << "\" Format=\"" + ((tileExt.size()==0)?
        ImageBuilder::GetImageBuilder(fileName)->GetExtension() :
        tileExt).substr(1) // drop the leading .
        + "\"\n" <<
        "       xmlns=\"http://schemas.microsoft.com/deepzoom/2008\">\n" <<
        "       <Size Width=\"" << width << "\" Height=\"" <<
        height << "\" ></Size>\n" << "</Image>\n";

    std::ofstream dziFile((FileManagement::GetBasename(fileName) +
        ".dzi").c_str());
    dziFile << dzi.str();
    dziFile.close();
}
The completed tiling algorithm performs the above steps.
void Tile(const std::string &fileName, const std::string &tileExt,
    unsigned int tileSize, unsigned int overlap, ProgressFn progress) {
    unsigned int width, height, maximumLevel;
    GetTileParams(fileName, width, height, maximumLevel);
    BuildLevels(fileName, maximumLevel, progress);
    BuildTiles(fileName, tileExt, maximumLevel, width, height, tileSize,
        overlap, progress);
    BuildDZI(fileName, tileExt, width, height, tileSize, overlap);
}
In the example of the 10000x10000 pixel image above, after tiling to JPEG files of size 256x256, the resulting directory structure would look similar to:
    myImage.dzi
    myImage_files/
      0/
        0_0.jpg
      1/
        0_0.jpg
      ...
      8/
        0_0.jpg
      9/
        0_0.jpg, 0_1.jpg, 1_0.jpg, 1_1.jpg
      ...
      14/
        0_0.jpg ... 39_39.jpg
Finally, we create a command-line application, Zoom, to tile an image. Command-line parameters specify the image to tile, the tile size, overlap, and tile image file format. If not specified, the tile size is 256x256, the overlap is 1, and the tile image format matches the format of the original image.
// Zoom/main.cpp
void Progress(const std::string &msg) {
    std::cout << msg << std::endl;
}

int main(int argc, char *argv[]) {
    try {
        CommandLine cl(argc, argv);
        if (cl.Length() == 0) {
            // tile size, overlap, type
            std::cout <<
                "Usage: zoom -i image.png  [-s 256 ] [ -o 1 ] [-t type]"
                << std::endl;
            return 1;
        }

        std::string fileName;
        if (!cl.GetOpt("-i", fileName)) {
            std::cout << "An image name must be specified" << std::endl;
            return 1;
        }

        int tileSize=256, overlap=1;
        cl.GetOpt("-s", tileSize);
        cl.GetOpt("-o", overlap);
        std::string ext;
        if (cl.GetOpt("-t", ext)) {
            if (ext[0]!='.')
                ext = "." + ext;
        }

        Tile(fileName, ext, tileSize, overlap, Progress);
    } catch (std::exception &e) {
        std::cout << "Error: " << e.what() << std::endl;
    }
    return 0;
}
We are now ready to display the tiled image on a web page.
Displaying an Image With Seadragon Ajax
Once a DZI file has been built, Seadragon Ajax is added to a web page to view it. The Seadragon Ajax distribution consists of JavaScript files, and an img directory containing images for navigation buttons. The file seadragon-min.js contains the entire application, and is preferred for production use. The file seadragon-dev.js and the associated src subdirectory also are available with functionality identical to that of seadragon-min.js, but formatted in a manner that aids debugging. Here, we will only use seadragon-min.js.
In the same directory as the web page that is to contain the Deep Zoom image, the img subdirectory is copied, as well as seadragon-min.js. A CSS style section is added to the web page that will contain the Deep Zoom image, giving the properties of the <div> in which the Deep Zoom image will reside. For instance, for a <div> with the ID of container, the following can be used:
  #container {
        width: 500px;
        height: 400px;
        background-color: black;
        border: 1px solid black;
        color: white;   /* text color for messages */
    }
In the <body> of the page, the <div> is created, and the Seadragon Ajax viewer instantiated with the name of the DZI file. The Deep Zoom image is now visible on the page.
    <div id="container"></div>
    <script src="seadragon-min.js"></script>
    <script>
        var viewer = new Seadragon.Viewer("container");
        viewer.openDzi("myImage.dzi");
    </script>
Now that Deep Zoom images can be created, the following sections show various examples.
Example 1 - USGS Data
The United States Geographical Survey (USGS) provides geographic data in a variety of formats. Data from the National Elevation Dataset (NED) is distributed through the Seamless Data Warehouse [18]. This example uses the n20w156 data set, from the 1/3rd arc-second NED data (NED 1/3). This data set covers the island of Hawaii and shows the Mauna Kea and Mauna Loa volcanoes. The data is stored as a 10812x10812 array of 4-byte floating point numbers (the GRIDFLOAT format) in the 445 MB file floatn20w156_13.flt. To parse this data, we create a helper class, FileReader, with a ReadRow() method to read a single data row. The data is stored as big-endian, so must be reversed on a little-endian architecture.
// gridfloat/main.cpp
class FileReader {
    const unsigned int _rowWidth;
    std::vector<unsigned char> _rawRow;  // to save memory allocations

    bool _isBigEndianArchitecture;
    std::ifstream _in;
public:
    FileReader(const std::string &fileName) : _rowWidth(10812),
        _in(fileName.c_str(), std::ios::in|std::ios::binary) {
        _rawRow.resize(4*_rowWidth);
        _isBigEndianArchitecture = IsBigEndianArchitecture();
    }

    bool ReadRow(std::vector<float> &row) {
        if (!_in.is_open() || !_in.good())
            return false;
        row.resize(_rowWidth);

        _in.read((char *)&_rawRow[0], 4*_rowWidth);
        for (unsigned int x=0; x<_rowWidth; x++) {
            unsigned char *ptr = (unsigned char *)&row[x];
            for (unsigned int i=0; i<4; i++)
                *ptr++ = _rawRow[x*4+(_isBigEndianArchitecture?i:3-i)];
        }
        return true;
    }
};
Stack Overflow [19] provides a trick to tell whether an application is running on a big-endian or little-endian architecture.
   bool IsBigEndianArchitecture() {
        union {
    #ifdef WIN32
            __int32 i;
    #else
            uint32_t i;
    #endif
            char c[4];
        } bint = {0x01020304};

        return bint.c[0] == 1;
    }
The main() method of our converter collects the name of the data file to read and the image file to write from the command line, and obtains an ImageWriter for the writing of the output image.
int main(int argc, char *argv[]) {
    try {
        CommandLine cl(argc, argv);
        if (cl.Length() == 0) {
            std::cout << "Usage: gridfloat -d data.flt -i out.img"
                << std::endl;
            return 1;
        }

        std::string dataFileName;
        if (!cl.GetOpt("-d", dataFileName)) {
            std::cout << "A data file name must be specified"
                << std::endl;
            return 1;
        }

        std::string imageFileName;
        if (!cl.GetOpt("-i", imageFileName)) {
            std::cout << "An image file name must be specified"
                << std::endl;
            return 1;
        }

        ImageWriterPtr writer =
            ImageBuilder::GetImageBuilder(imageFileName)->GetWriter();
With the ImageWriter created, we open the output image for writing. Due to the lighting calculation that we will use, the output image is one row and column smaller than the input image. From this ImageWriter, we obtain an image row buffer to write into.
        // data is 8 bits/channel RGB
        writer->Open(imageFileName, 10811,10811, 3,8);
        ImageRow row = writer->GetImageRow();
As the data file is parsed, we maintain the last two rows read in the rowA and rowB vectors, because two rows are needed to determine surface properties.
        unsigned int rowsWritten = 0;
        FileReader dataFile(dataFileName);
        std::unique_ptr<std::vector<float>> rowA(new std::vector<float>);
        std::unique_ptr<std::vector<float>> rowB(new std::vector<float>);
        if (!dataFile.ReadRow(*rowA)) {
            std::cout << "Cannot read row" << std::endl;
            return 1;
        }

        // 1 since already read a row
        for (unsigned int y=1; y<10812; y++) {
            if (rowsWritten%1000 == 0)
                std::cout << rowsWritten << std::endl;

            if (!dataFile.ReadRow(*rowB)) {
                std::cout << "Cannot read row" << std::endl;
                return 1;
            }
For each row, we iterate over each element. A value of -9999 indicates that no data is available for that point, so we color it black.
         for (unsigned int x=1; x<10812; x++) {
                if ((*rowA)[x] == -9999)  // no data
                    row.SetPixel(x-1, (unsigned char)0,0,0,255);
                else {
As the data set represents elevation, it is natural to show it as if it was lit by an imaginary sun. The lighting of point (x,y,z) depends upon its orientation to the light source, so we obtain a surface normal for the point. We create two vectors, one from the point (x,y,z) to the point (x-1,y,z), and another from the point (x,y,z) to the point (x,y-1,z). The cross-product of these two vectors creates a third vector perpendicular to both, which represents the orientation of the surface at that point. This is why the output image is one row and column smaller than the source data — one row and one column is lost by this calculation.
                    // compute cross product
                    float v1x = -1, v1y=0, v1z = (*rowB)[x-1]-(*rowB)[x];
                    float v2x = 0, v2y=-1, v2z=(*rowA)[x]-(*rowB)[x];
                    float vnx = /*v1y*v2z-v1z*v2y;*/ v1z;
                    float vny = /*v1z*v2x-v1x*v2z;*/ v2z;
                    float vnz = /*v1x*v2y-v1y*v2x;*/ 1;

                    // normalize
                    float mag = sqrt(vnx*vnx+vny*vny+vnz*vnz);
                    vnx/=mag; vny/=mag; vnz/=mag;
The intensity of light at a point is relative to the angle between the surface normal at that point and the light source. The dot product between the two provides a calculation of this intensity, as it is the cosine of the angle between the two vectors. If the surface normal points directly at the light source, the vectors are coincident (the angle between them is 0), and the cosine is 1, giving the brightest illumination. If the surface normal is at exactly 90 degrees from the direction to the light source, the surface is not illuminated as the cosine of 90 degrees is 0. It is possible for the surface normal to face away from the light source, which leads to a negative dot product. In this case, the surface cannot be directly illuminated by the light source, so the intensity value is clamped to 0. The resulting intensity is scaled between 0 and 255, and assigned to all three color channels as a grayscale color value for the point under consideration.
                    // do lighting calc against vn l dot n
                    float lx=-1000.0f, ly=-1000.0f, lz=2000.0f;
                    mag = sqrt(lx*lx+ly*ly+lz*lz);
                    lx/=mag; ly/=mag; lz/=mag;

                    float dot = std::max(lx*vnx+ly*vny+lz*vnz, 0.0f);
                    unsigned char c = (unsigned char)(255*dot);
                    row.SetPixel(x-1, c,c,c,255);
                }
            }
The row is then written to the output file, the current row is swapped to become the previous row, and the loop continues until all rows are processed.
           if (rowsWritten < writer->GetHeight()) {
                writer->WriteRow(row);
                rowsWritten++;
            }
            rowA.swap(rowB);  // shift down
        }

        std::cout << "Rows written: " << rowsWritten << std::endl;
    } catch (std::exception &e) {
        std::cout << "Error: " << e.what() << std::endl;
    }

    return 0;
}
The resulting zoomable image can be seen below.
Example 2 - Climate Data
NASA's Blue Marble Next Generation [20] images show how Earth changes through the seasons. Each .bin file of data provides 3 one-byte color channels, at a resolution of 86400x43200. These do not need further processing, and can be written to an image directly, as shown here:
    // data is 8 bits/channel RGB
    writer->Open(imageFileName, 86400,43200, 3,8);
    ImageRow row = writer->GetImageRow();

    unsigned int rowsWritten = 0;
    std::ifstream in(dataFileName.c_str(),
        std::ios::in|std::ios::binary);
    if (in.is_open()) {
        while (in.good()) {
            if (rowsWritten%1000 == 0)
                std::cout << rowsWritten << std::endl;

            in.read((char *)row.Get(), 3*writer->GetWidth());

            if (rowsWritten < writer->GetHeight()) {
                writer->WriteRow(row);
                rowsWritten++;
            }
        }
    }
The result of tiling the image produced by parsing world.200405.3x86400x43200.bin, a 10.4 GB file representing the Earth in May, 2004, is below. Even as an image, the disk space required is still large — if the tiles are generated as PNG images, the total space needed is nearly 2 GB, while, as JPEG, the total size is still about 500 MB at a quality of 90%.
Example 3 - Computer Art
In the July, 2011 SETT [21], I described a basic 3D renderer, and although sufficient for the example, lacked generality. This example extends the renderer with more capabilities, to make it more similar to the subblue renderer that inspired it [22]. In particular, camera position and orientation, lighting, and other parameters are now adjustable via a Params structure. The structure is defined in C++ as:
// OCL_Mand/OCL_Mand.cpp
#pragma pack(push, 1)
typedef struct {
    // rendering parameters
    float _cameraPosition[3];  float _pad1;
    float _cameraOrientation[3]; float _pad2;
    float _objectOrientation[3]; float _pad3;
    int _antialiasing;
    int _width;  // overall image dimensions
    int _height;
    float _cameraZoom;
    ...
    float _sampleStep;
    float _sampleContribution;
} Params;
#pragma pack(pop)
and in OpenCL as:
// OCL_Mand/Mandelbox.cl
typedef struct __attribute__((packed)) Params {
    // rendering parameters
    float3 _cameraPosition;
    float3 _cameraOrientation;
    float3 _objectOrientation;
    int _antialiasing;
    int _width;  // overall image dimensions
    int _height;
    float _cameraZoom;
    ...
    float _sampleStep;
    float _sampleContribution;
} Params;
In order to ensure alignment of bytes, both structures have their alignment set to byte packing. Also, a float3 in OpenCL is actually the size of four floats — an extra padding float is added to the C++ structure to compensate.
In the C++ application, the fields of a variable params, of type Params, are set. An OpenCL buffer is created, and the contents of params are copied into it by use of the CL_MEM_COPY_HOST_PTR option.
// OCL_Mand/OCL_Mand.cpp
    Params params;
    Set(params._cameraPosition, 0.0f, -6.0f, 0.0f);
    Set(params._cameraOrientation, 0.0f, 0.0f, -90.0f);
    ...
    cl::Buffer initParamsBuffer = cl::Buffer(context,
        CL_MEM_READ_WRITE | CL_MEM_COPY_HOST_PTR, sizeof(Params), ¶ms);
Several fields in the Params structure, such as view and object rotation matrices, are calculated based on various earlier fields. They are included in the structure as they are used several places in the renderer, and this allows only a pointer to the Params buffer to need be passed to each renderer function, rather than requiring many individual parameters.
These fields are initialized by an OpenCL kernel function named Initialize(), by passing the Params OpenCL buffer as a parameter.
    cl::Kernel initKernel = cl::Kernel(program, "Initialize");
    ...
    initKernel.setArg(0, initParamsBuffer);
    queue.enqueueNDRangeKernel(initKernel, cl::NDRange(),
        cl::NDRange(1), cl::NDRange());
In order to support large images, the renderer was also modified to render a single line at a time, rather than the entire image. The Mandelbox() rendering function is now called with the Params structure, a buffer for the image row, and the image row index to calculate, as arguments.
    cl::Kernel renderKernel = cl::Kernel(program, "Mandelbox");
    ...
    int imageBufferSize = 4*width;  // RGBA
    cl::Buffer imageBuffer = cl::Buffer(context, CL_MEM_WRITE_ONLY,
        imageBufferSize);  // 1 byte each, RGBA

    renderKernel.setArg(0, initParamsBuffer);
    renderKernel.setArg(1, imageBuffer);
    for (unsigned int currentRow = 0; currentRow < height;
        currentRow++) {
        if (currentRow%100 == 0)
            std::cout << currentRow << std::endl;

        renderKernel.setArg(2, currentRow);
        queue.enqueueNDRangeKernel(renderKernel, cl::NDRange(),
            cl::NDRange(width), cl::NDRange());
        queue.finish();
When a row is complete, the buffer is copied from OpenCL, parsed, and written to the output file.
        unsigned char *imagePtr =
            (unsigned char *)queue.enqueueMapBuffer(imageBuffer,
                CL_TRUE, CL_MAP_READ, 0, imageBufferSize);
        for (unsigned int x=0; x<width; x++)
            row.SetPixel(x, *(imagePtr+4*x), *(imagePtr+4*x+1),
                *(imagePtr+4*x+2), *(imagePtr+4*x+3));
        writer.WriteRow(row);
    }
Rendering row by row allows very large images to be generated — a row can be tens of thousands of pixels in width and the image height as large as desired by repeatedly invoking the row renderer. In contrast, on my Pavilion laptop, an OpenCL 2D image buffer is limited to 8192x8192. The result of rendering a large image of the Mandelbox, with fog, is as follows:
Bonus Section
In addition to creating one large image, a sequence of smaller images can be created, with parameters such as rotation or scale factor varying based on the frame number. If a sequence of these images are saved with consecutive filenames, such as imgNNNN.png, where NNNN is the frame number, an application such as FFmpeg [23] (builds for Windows available at [24]), can be used to combine the frames into an animation. For instance, under Windows with FFmpeg build SVN-r23418, this script
set FFMPEG_DATADIR=C:\bin\ffmpeg\presets
C:\bin\ffmpeg\bin\ffmpeg -r 24 -i img%%04d.png -f flv -s 1280x720 -qscale 1 -g 40 myfile.flv
will combine such files into a high definition FLV-format file suitable for upload to YouTube, as shown below.
References
- [1] Gigapixel image
http://en.wikipedia.org/wiki/Gigapixel_image - [2] Google Maps
http://maps.google.com/ - [3] Yahoo! Local Maps
http://maps.yahoo.com/ - [4] bing Maps
http://www.bing.com/maps/ - [5] USGS Seamless Data Warehouse
http://seamless.usgs.gov/ - [6] Visible Earth
http://visibleearth.nasa.gov/ - [7] Art Project
http://www.googleartproject.com/ - [8] The Julliard Manuscript Collection
http://www.juilliardmanuscriptcollection.org/ - [9] Zoomify
http://www.zoomify.com/ - [10] Flash Zoomer
http://www.yofla.com/flash/flash-zoomer/index.php - [11] Deep Zoom
http://msdn.microsoft.com/en-us/library/cc645050%28v=vs.95%29.aspx - [12] OpenZoom Description Format
http://www.gasi.ch/blog/openzoom-description-format/ - [13] MultiScaleImage Class
http://msdn.microsoft.com/en-us/library/system.windows.controls.multiscaleimage%28v=VS.95%29.aspx - [14] Seadragon Ajax
http://gallery.expression.microsoft.com/SeadragonAjax - [15] Portable Network Graphics
http://www.libpng.org/pub/png/ - [16] The JPEG committee home page
http://www.jpeg.org/ - [17] Web Style Guide 3rd edition, Graphic File Formats
http://webstyleguide.com/wsg3/11-graphics/5-web-graphics-formats.html - [18] Seamless Data Warehouse
http://seamless.usgs.gov/ - [19] http://stackoverflow.com/questions/1001307/detecting-endianness-programmatically-in-a-c-program
http://stackoverflow.com/questions/1001307/detecting-endianness-programmatically-in-a-c-program - [20] BMNG Raw Data
http://visibleearth.nasa.gov/view_rec.php?id=7862/ - [21] GPU Computing with OpenCL
http://sett.ociweb.com/sett/settJul2011.html - [22] 3D Mandelbulb Ray Tracer
http://www.subblue.com/projects/mandelbulb - [23] FFmpeg
http://www.ffmpeg.org/ - [24] Zeranoe FFmpeg builds (for Windows)
http://ffmpeg.zeranoe.com/builds/
